Adding a SATA drive to a laptop allows you to increase your storage capacity and potentially improve performance. The process involves obtaining the necessary hardware, accessing the laptop’s internals, connecting the new drive, and configuring it in your operating system. With some technical know-how, you can upgrade your laptop’s storage capabilities on your own.
Quick Answers
Here are some quick answers to common questions about adding SATA to a laptop:
- A SATA drive requires a SATA port on the laptop’s motherboard to connect to.
- Laptops often have empty SATA ports inside that are not being used.
- 2.5 inch SATA drives are commonly used for laptop upgrades as they fit the internal space.
- A hard drive caddy may be needed to install the new SATA drive in place of the CD/DVD drive.
- The BIOS will need to be set to boot from the new SATA drive if installing an OS.
- Migration software can transfer your data and OS to a new SATA SSD.
Prerequisites
Before getting started, make sure you have the following:
- A new 2.5 inch SATA drive, either a hard drive or solid state drive (SSD).
- A Phillips head screwdriver.
- An external enclosure or docking station for the new drive (recommended).
It’s also a good idea to back up your important data beforehand in case anything goes wrong during the process.
Step 1 – Open the Laptop Case
The first step is to open up your laptop’s case to access the internal components:
- Disconnect all peripherals, remove any removable batteries, and power off the laptop.
- Carefully flip the laptop over to access the bottom panel.
- Look for screw covers. Slide or peel these back to reveal the screws underneath.
- Use the Phillips screwdriver to remove all screws from the bottom panel.
- Pry up around the edges of the bottom panel to detach it and access the internal components.
Be gentle when opening the case to avoid damaging any tabs or clips. Refer to a disassembly guide for your specific laptop model if needed.
Step 2 – Locate the SATA Port
Once inside, you need to locate an available SATA port to plug your new drive into. There may be open SATA ports right on the motherboard, or you may need to remove the existing hard drive to access the SATA connection.
Look for these types of SATA ports inside your laptop:
- 2.5 inch drive bay – Room for adding a 2.5 inch SATA drive.
- M.2 slot – An M.2 connector for a SATA M.2 SSD drive.
- Optical drive bay – Can replace the CD/DVD drive with a SATA hard drive caddy.
If you don’t see any open SATA ports, you will need to remove your current hard drive to utilize its SATA connection instead.
Step 3 – Install the New Drive
Once you’ve located a SATA port, it’s time to install the new drive. The method will vary slightly depending on the type of drive and connection:
2.5 inch SATA Drive
- Slide the drive into the empty 2.5 inch drive bay and secure it with screws.
- Connect the SATA data cable and SATA power cable to the back of the drive.
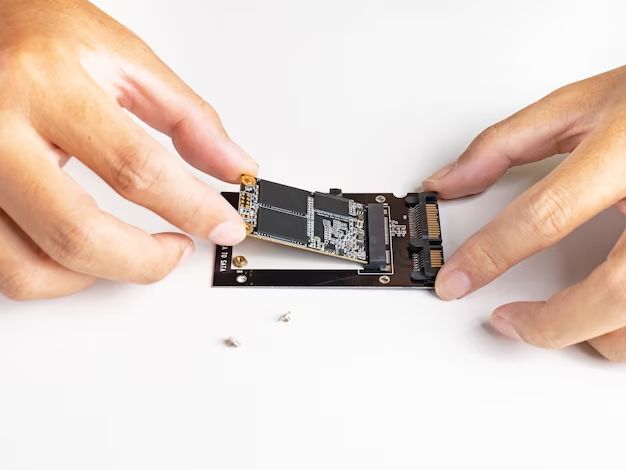
M.2 SATA SSD
- Locate the M.2 slot and remove any existing screw or standoff.
- Slide the M.2 drive into the slot at about a 30 degree angle.
- Secure the drive with the screw or standoff.
Optical Drive Bay Caddy
- Remove the CD/DVD drive from the optical drive bay.
- Slide the hard drive into the caddy and connect the SATA and power cables.
- Slide the caddy with drive back into the optical drive bay.
Take care when handling and connecting the new drive. Double check that all cables are properly attached.
Step 4 – Replace Cover and Boot Up
Once the new drive is installed, you can finish up:
- Carefully replace the bottom cover and re-insert all screws.
- Reconnect any removable batteries and peripherals.
- Power the laptop back on. Enter your system BIOS on boot.
- Within the BIOS, find the boot options and select the new SATA drive as the first boot device.
- Save changes and exit the BIOS. The system should boot from the new drive.
If you installed a blank drive, you will need to install your preferred operating system on it before you can use the new storage space.
Installing Your Operating System
If your new SATA drive is blank, you will need to install an operating system on it. Here are some options:
Fresh OS Install
- Boot from a Windows, Linux, or other OS installation disc or USB drive.
- Follow the on-screen prompts to install the OS directly onto your new SATA drive.
- Install any required drivers after the OS installation completes.
Clone Existing OS Drive
- Use disk cloning software or OS tools to copy your existing system drive to the new drive.
- Swap the old drive for the new cloned drive and boot up.
Migration Software
- Use data migration software to transfer your OS, applications, and data files to the new drive.
- The migration process occurs while booted into the OS on your old drive.
- Swap the old drive for the new drive after migration completes.
Performing a clean OS installation gives you a fresh start while cloning preserves your existing setup. Migration software offers convenience when moving to a new drive.
Initializing the New Drive
If you added a secondary SATA drive for extra storage space, you will need to initialize and format it before you can utilize the capacity. This process will prepare the drive for data storage.
- Boot into your main OS drive first after install.
- Open Disk Management (Windows) or GParted (Linux).
- Locate the new disk and initialize it as GPT or MBR.
- Create a new partition filling all available space.
- Format the partition with a file system (NTFS, exFAT, ext4, etc).
- Assign a drive letter or mount point so your OS can access it.
- The new storage space is now ready to use.
Adding a secondary SATA drive is an easy way to expand your laptop’s storage for more room for files, photos, videos, games, and other data.
Performance and Upgrade Considerations
Upgrading to a solid state drive (SSD) via SATA can provide big performance improvements over a traditional hard disk drive (HDD). However, there are some considerations:
SSD vs HDD Performance
| Attribute | SSD | HDD |
| Sequential Read Speed | Up to 550 MB/s | Up to 200 MB/s |
| Sequential Write Speed | Up to 520 MB/s | Up to 150 MB/s |
| Random Read Speed | Up to 100,000 IOPS | Up to 1200 IOPS |
| Random Write Speed | Up to 80,000 IOPS | Up to 300 IOPS |
As you can see, SSDs provide much faster read/write speeds and random access performance compared to HDDs. This results in faster boot times, quicker application/file access, and a more responsive system overall.
M.2 vs 2.5 inch SATA SSD
For the best performance, consider upgrading to an M.2 SATA SSD over a 2.5 inch SATA SSD. M.2 offers:
- Faster interface (up to 6Gb/s for SATA M.2 vs 3Gb/s for 2.5 inch SATA).
- Lower latency.
- Lower power consumption.
However, maximum speeds will still be limited by the SATA interface itself. For the fastest SSD speeds, you would need an M.2 PCIe NVMe drive and compatible laptop.
Conclusion
Adding a SATA drive can boost the storage capabilities and performance of your laptop. With some DIY effort, you can install either a 2.5 inch or M.2 SATA SSD or hard drive via the internal drive bays or optical bay caddy. Just be sure to purchase a compatible drive, properly connect it, initialize it in your OS, and set it up as your boot drive or extra storage space. Follow the steps covered here, take the necessary precautions, and you can successfully add SATA to your laptop.