What is the F12 Boot Menu?
The F12 boot menu allows you to select a boot device at startup (1). It provides options for booting from a hard drive, USB drive, CD/DVD, or network.
When you start up your computer, it normally boots from the primary hard drive by default. However, the F12 boot menu gives you a temporary one-time boot menu to pick another startup device (2).
Pressing F12 during the initial boot process will bring up the boot device selection menu. From there, you can choose to boot from removable media like a USB flash drive or optical disc. The F12 boot menu allows you to bypass the default hard drive boot order.
This is useful for running diagnostics from a CD/DVD, booting from an OS installation disc, selecting a temporary boot device, and troubleshooting boot issues. The boot menu gives you more control over the startup process.
Sources:
(1) https://www.easeus.com/knowledge-center/acer-boot-menu.html
(2) https://community.acer.com/en/kb/articles/563-why-cant-i-get-the-f12-boot-menu-to-work-on-my-notebook-or-netbook
Why Enable the F12 Boot Menu?
The F12 boot menu provides important benefits that make it worth enabling on your computer:
First, it allows you to boot from external media like a USB drive or CD/DVD. This is useful if you need to troubleshoot your computer, reinstall the operating system, or run rescue utilities.
For example, you could boot from a Windows installation disc to refresh your PC or boot from a Linux live USB to recover files from a failing hard drive. Without F12, you’d be limited to booting from the internal hard drive.
Second, the F12 menu gives you more control over the boot process. Normally, the computer boots from the primary hard drive automatically. With the boot menu, you can choose to boot from a different drive or device for special situations.
This level of control can be helpful for troubleshooting boot issues or testing different operating systems.
Overall, enabling the F12 boot menu expands your options for booting and troubleshooting. It’s a useful feature for both novice and advanced computer users.
Enabling F12 Boot Menu in BIOS
To enable the F12 boot menu in the BIOS setup on a Windows PC:
1. Restart your computer and press the key to enter the BIOS, which is often Delete, F2, F8, F10 or F12 depending on your manufacturer. Refer to your device manual if unsure.
2. Once in the BIOS, navigate to the “Boot” tab or menu.
3. Look for options related to “Boot Device Priority” or “Boot Order.” This specifies the order in which bootable devices are detected on startup.
4. Move your desired boot device like a USB drive or CD/DVD drive to the top of this list. This will make that device the default first boot option.
5. Save changes and exit BIOS.
Now when you restart the computer, you can tap F12 on the manufacturer splash screen to access the boot menu and select your prioritized boot device. The BIOS will check that device first to detect an operating system to load (Microsoft Answers).
Enabling F12 Boot Menu in UEFI
The Unified Extensible Firmware Interface (UEFI) is the modern replacement for the legacy BIOS firmware. To enable the F12 boot menu in UEFI:
1. Access the UEFI settings menu. This is typically done by pressing the F2, Delete, or F10 key during the boot process. The exact key will vary by computer manufacturer and model.
2. Navigate to the Boot options tab or menu.
3. Look for an option to “Enable Boot Menu” or “Enable F12 Boot Menu” and enable it. The exact setting may be named differently on some systems.
4. Save changes and exit the UEFI menu.
Once enabled in the UEFI settings, pressing F12 during boot should bring up the boot menu allowing you to select a boot device. If F12 still does not work, ensure Fast Boot is disabled in the UEFI as this can sometimes override boot key presses.
For more details, refer to your computer or motherboard manual for the exact steps to access UEFI and the boot options on your specific system.
Using F12 Boot Menu
The F12 boot menu allows you to select a boot device to start your computer from on a one-time basis. Here are the steps to use the F12 boot menu:
- Restart your computer and tap the F12 key continuously when you see the initial boot screen. This will bring up the one-time boot menu.
- Use the arrow keys to highlight the device you want to boot from. Common options are the hard drive, USB drive, CD/DVD drive, or network boot.
- Press Enter to boot from the selected device just for that one time.
You can also edit the one-time boot order in the F12 menu before selecting a device. This allows you to prioritize certain devices for the current boot.
For example, on a Dell computer you can use the arrow and +/- keys to move devices up or down in the boot order. Just remember this temporarily overrides the permanent boot order set in the BIOS.[1]
Booting from USB Drive
One of the most common uses of the F12 boot menu is to boot from a USB drive to install an operating system. Here are the steps to boot from a USB drive using the F12 menu:
First, you will need to download the ISO image for the operating system you want to install. Many Linux distributions and Windows installation media can be downloaded for free online. For example, you can get installation images for Ubuntu, Windows 10/11, etc. After downloading the ISO, you will need to create a bootable USB drive.
There are several free tools available to create a bootable USB from an ISO image, like Rufus on Windows or Startup Disk Creator on Linux. Use one of these tools to copy the ISO to a USB flash drive, which creates a bootable installation drive. Make sure to back up any important data on the USB drive, as it will be formatted in the process 1.
With the bootable USB created, restart your computer and tap the F12 key to bring up the boot menu. Use the arrow keys to select the USB drive and press Enter to boot from it. This will load the installer for the operating system ISO you copied over.
From there, follow the on-screen instructions to install the OS. This usually involves selecting your language, accepting licensing terms, choosing an installation type, and configuring partitions to format your hard drive. Once the OS is installed, you can remove the USB drive and boot into your newly installed system.
Booting from CD/DVD
One of the main uses of the F12 boot menu is to boot from optical media like CDs or DVDs. This allows you to boot into operating system installation media or bootable utilities from a disc.
To boot from a CD or DVD using the F12 boot menu:
- Burn the ISO image file of your desired operating system or bootable utility onto a CD or DVD. Use DVD burning software like ImgBurn to burn the ISO file properly onto a blank disc.
- Insert the burned disc into your CD/DVD drive and restart your computer.
- When the manufacturer logo appears, press F12 repeatedly to access the boot menu.
- Select the CD/DVD drive option from the boot menu using the arrow keys and Enter.
This will boot your computer from the CD/DVD disc instead of the hard drive. You can use this method to boot into Windows or Linux installation media to install or repair your operating system. Or boot into a utility disc for maintenance tasks like disk partitioning, data recovery, password resetting, etc.
Just remember to burn the disc properly from an ISO file, and make sure your BIOS/UEFI firmware is configured to allow booting from the optical drive. Then using the F12 key you can easily select the CD/DVD drive to boot from any bootable disc.
Network Booting
Network booting allows you to boot a computer directly from a network interface instead of a local drive. This requires a PXE (Preboot Execution Environment) server on the network that hosts the boot image. The client computer must have network boot options enabled in the BIOS.
To boot from the network using the F12 boot menu:
- Press F12 when the computer starts to access the boot menu.
- Select the “Network” or “LAN” boot option.
- The client will connect to the PXE server and download the boot image across the network.
Network booting is commonly used for operating system deployment, cloning machines, and diskless workstations. It allows managing and loading OS images centrally on a PXE server instead of locally on each device.
To enable network booting, the BIOS/UEFI firmware must have “Network Boot” or “PXE” options enabled. The network interface card must also have PXE boot support.
For more details on configuring PXE and network boot, refer to the in-depth guides from Oracle and Prajwal Desai.
Troubleshooting F12 Boot Menu
If you are having issues accessing the F12 boot menu, there are a few troubleshooting steps you can try:
First, check that USB or CD/DVD is set as the first boot device in your BIOS boot order. To do this, enter the BIOS setup (usually by pressing F2, Delete, or a function key on bootup), go to the boot tab, and make sure USB or CD/DVD is prioritized over hard drives in the boot order list. Setting removable media as the first boot option ensures the F12 key will bring up the boot menu as expected (1).
If the boot order is already correct, try pressing the F12 key at different times during the boot process. There is often a short window where the F12 key press is detected, so try tapping it continuously as soon as you power on the computer. If that doesn’t work, listen for any bootup sound or watch for a splash screen, then start tapping F12. Getting the timing right may be key to bringing up the menu (2).
Finally, make sure the computer is booting in the same mode (UEFI vs. legacy BIOS) as the boot media you want to select. If there is a mismatch, the F12 menu may not respond as expected. You may need to switch boot modes in the BIOS or remake your USB/CD boot media to get everything working properly (3).
With some trial and error, most issues with accessing the F12 boot menu can be resolved by following these troubleshooting tips.
Alternative Boot Methods
While the F12 key is common for accessing the boot menu, some systems may use a different function key like F10 or F8 instead. Consult your computer or motherboard manual to determine the proper boot menu key.
Rather than using the boot menu, you can also change the boot order directly in the BIOS/UEFI settings. This will permanently change which device boots first. Access the BIOS on startup (typically by pressing F2, Delete, or a manufacturer-specific key) and find the “Boot Order” section to rearrange devices. This avoids having to press F12 and select a boot device each time.
(Source)
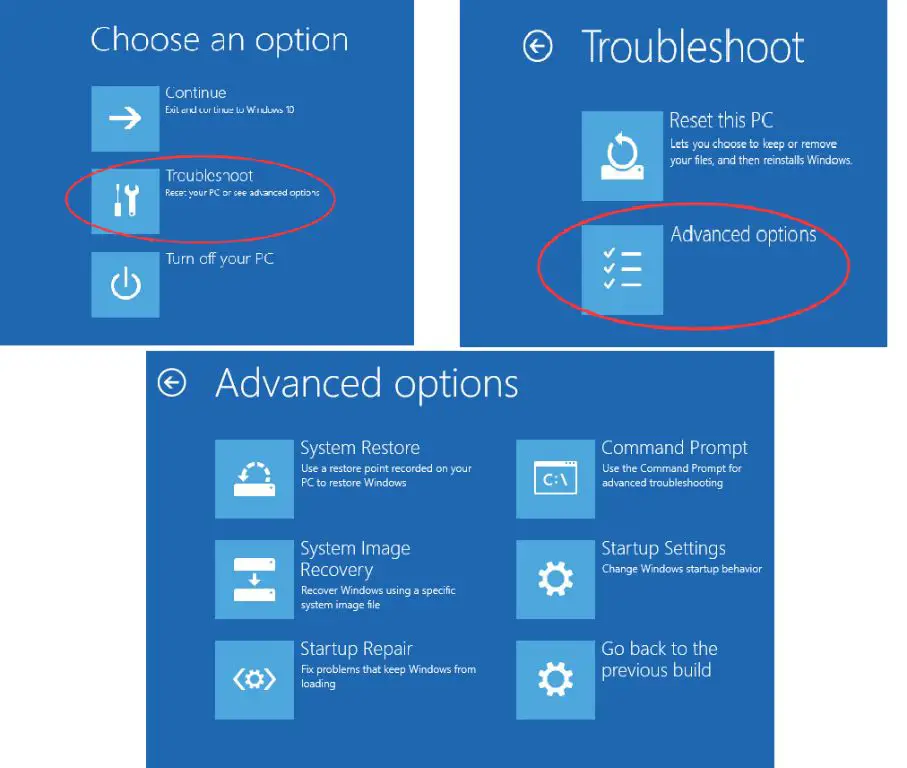
Finally, some operating systems like Windows 10 have their own boot manager that can select the boot drive without entering the BIOS. For example, you can access the Windows boot options menu by holding Shift and clicking Restart. This menu allows choosing between multiple operating systems or bootable devices from within Windows, without changing firmware settings.
(Source)