Finding your AutoRecovery files on a Mac is an important step in recovering lost work or documents after a crash. AutoRecovery is an automatic backup feature built into many Mac applications that saves versions of your open files at set intervals. When you know where to look, retrieving these AutoRecovery files can save you from having to redo lost work.
What is AutoRecovery on Mac?
AutoRecovery is a native feature in macOS and many Mac applications that automatically saves versions of open documents while you work. It functions as a temporary backup system, storing file snapshots in case of a crash, freeze, or force quit that causes data loss.
Some common Mac apps that utilize AutoRecovery include:
- Microsoft Word
- Microsoft Excel
- Apple Pages
- Apple Numbers
- Adobe Photoshop
- Adobe Illustrator
AutoRecovery is enabled by default in these programs. It quietly runs in the background, copying your open files at set time intervals. The interval timing varies between apps, but is usually every 5-10 minutes.
Where are AutoRecovery files stored on Mac?
When enabled, AutoRecovery files are stored in specific folders on your Mac hard drive or SSD. Their file location depends on which app created them.
Microsoft Office AutoRecovery files
For Microsoft 365/Office for Mac apps like Word, Excel, and PowerPoint, AutoRecover files are stored here by default:
~/Library/Containers/com.microsoft.Word/Data/Library/Preferences/AutoRecovery
~/Library/Containers/com.microsoft.Excel/Data/Library/Preferences/AutoRecovery
~/Library/Containers/com.microsoft.Powerpoint/Data/Library/Preferences/AutoRecovery
Apple iWork AutoRecovery files
For Apple’s iWork apps like Pages, Numbers, and Keynote, AutoRecovery files are stored here:
~/Library/Containers/com.apple.iWork.Pages/Data/Library/Preferences/AutoRecovery
~/Library/Containers/com.apple.iWork.Numbers/Data/Library/Preferences/AutoRecovery
~/Library/Containers/com.apple.iWork.Keynote/Data/Library/Preferences/AutoRecovery
Adobe CC AutoRecovery files
For Adobe Creative Cloud apps like Photoshop, Illustrator, and InDesign, AutoRecover files are stored here:
~/Library/Preferences/Adobe/Adobe Photoshop 2020/AutoRecover
~/Library/Preferences/Adobe/Adobe Illustrator 2020/AutoRecover
~/Library/Preferences/Adobe/Adobe InDesign 2020/AutoRecover
How to find and restore AutoRecovery files on Mac
If you experience a crash, freeze, or force quit in an app, you may be able to recover your lost work using AutoRecovery files. Here are the steps to find and restore them on Mac:
- Reopen the application – The app should prompt you with recovery options for any found AutoRecovery files from your last session.
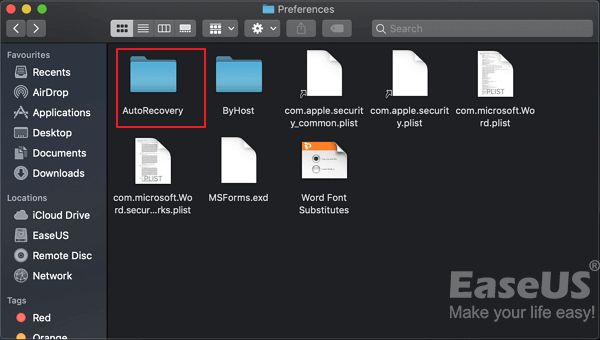
- Check AutoRecovery folder in Finder – If no prompt appears, go directly to the AutoRecovery folder for that app in Finder. The paths are listed above.
- Identify latest AutoRecovery file – The AutoRecovery file will be named e.g. “Word AutoRecovery File 1.asd” with a time stamp. Locate the newest file.
- Open the AutoRecovery file – Double-click the latest AutoRecovery file to open the restored document.
- Save As a new file – Once open, immediately Save As a new file in case the AutoRecovery version contains corrupt data.
Following these steps should allow you to successfully recover your most recently saved work using the AutoRecovery files. Keep in mind they may not contain 100% of the content before the crash, depending on when it last saved a version.
How to customize AutoRecovery settings
You can customize AutoRecovery in any compatible Mac app to save backups more or less frequently:
Microsoft Office
- Open Word, Excel, PowerPoint or other Office app
- Go to Preferences > Save (or Application Name > Preferences > Save)
- Adjust the “Save AutoRecover info every” setting
- Choose interval time between 1 and 120 minutes
Apple iWork
- Open Pages, Numbers, Keynote or other iWork app
- Go to Preferences > General (or Application Name > Preferences > General)
- Adjust the “Save AutoRecovery” setting
- Choose interval time between 5 and 120 minutes
Adobe CC
- Open Photoshop, Illustrator, InDesign or other Adobe app
- Go to Preferences > File Handling (or Application Name > Preferences > File Handling)
- Adjust the “Save Auto Recovery info every” setting
- Choose interval time between 5 and 120 minutes
Saving AutoRecovery files more frequently provides more regular backups, but takes up more drive space. Finding the right balance for your usage is recommended.
How to disable AutoRecovery
If you wish to disable AutoRecovery entirely in an app, follow these steps:
Microsoft Office
- Go to Preferences > Save (or Application Name > Preferences > Save)
- Uncheck the “Save AutoRecover info every” box
Apple iWork
- Go to Preferences > General (or Application Name > Preferences > General)
- Uncheck the “Save AutoRecovery” box
Adobe CC
- Go to Preferences > File Handling (or Application Name > Preferences > File Handling)
- Set the “Save Auto Recovery info every” setting to “Never”
This will completely disable AutoRecovery backups in that app.
Other AutoRecovery tips
Here are some other useful tips for using AutoRecovery effectively:
- Manually save your document regularly in addition to AutoRecovery for maximum backup.
- Make sure you have enough hard drive space for storing AutoRecovery versions.
- Disable AutoRecovery in apps you use for temporary/disposable work.
- Test that AutoRecovery is working properly by force quitting an app and verifying file recovery.
- If AutoRecovery files become excessive, delete old ones manually in Finder.
Conclusion
AutoRecovery can save you from catastrophe when an app or system crash leads to data loss. By knowing where AutoRecovery files are kept, how to access them, and customizing the settings, you can maximize the usefulness of this Mac backup feature. Be sure to save your work regularly in addition to relying on AutoRecovery for the best protection.