What is an unallocated USB drive?
An unallocated USB drive is a USB flash drive or external hard drive that is not properly formatted and partitioned, so it does not show up as a normal, usable drive when plugged into a computer. When you plug in an unallocated drive, you may get a message saying the drive needs to be formatted before it can be used. Or the drive may not show up at all in File Explorer or Disk Management. This typically happens if the drive was never partitioned and formatted correctly, if the partition table or file system became corrupted somehow, or if the partitions were deleted accidentally.
What causes a USB drive to become unallocated?
There are several potential causes for a USB drive ending up in an unallocated state:
– The drive was never properly formatted and partitioned in the first place. Some very cheap USB sticks may not come pre-formatted out of the box.
– The partition table or file system got corrupted. This can happen from improper ejection, virus infection, physical damage, power failure during a write operation, etc.
– The partitions were accidentally deleted. For example, in Disk Management on Windows, it’s possible to delete the partitions on a drive inadvertently.
– A partition recovery or formatting utility corrupted the partition table or boot sector.
– There was a manufacturing defect that prevented proper formatting.
So in summary, the most common causes are the drive was never formatted originally, file system corruption, accidentally deleting the partitions, or errors during repartitioning/reformatting.
How can I check if a USB drive is unallocated?
Here are the steps to check if a USB drive is unallocated:
1. Connect the USB drive to your computer.
2. Open File Explorer on Windows or Finder on Mac. Check if the drive shows up here. If it does not appear, it may be unallocated.
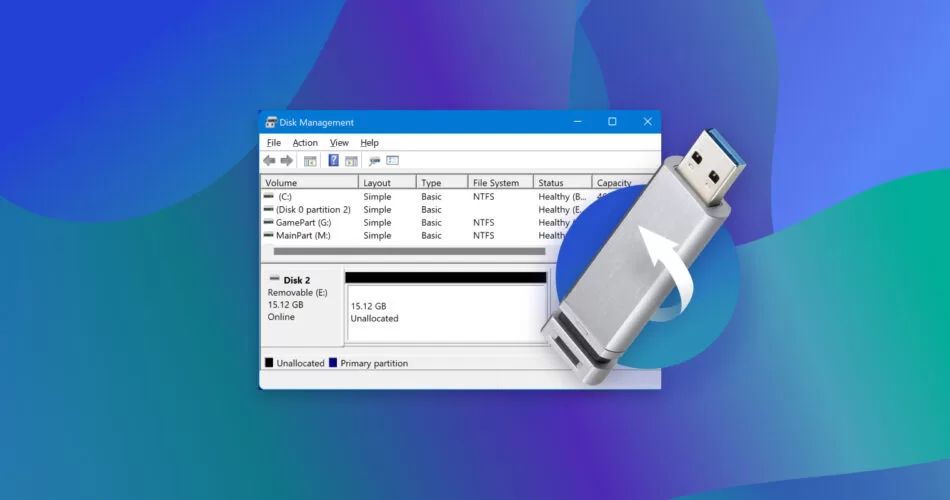
3. Open Disk Management on Windows (press Windows+R and type “diskmgmt.msc”) or Disk Utility on Mac. Look for the USB drive here.
4. If the drive shows up but does not have any partitions, file system or drive letter assigned, it is unallocated space. The disk may say “Unallocated” or “Not Initialized”.
5. You can also use third party partitioning tools like MiniTool Partition Wizard, EaseUS Partition Master, GParted etc. An unallocated drive will show up as a disk with empty space and no partitions defined.
If using any of these methods, the USB drive shows up as unallocated space or not initialized, that confirms it is an unallocated drive that needs to be partitioned and formatted.
How to fix an unallocated USB drive in Windows?
Here are the steps to fix and recover an unallocated USB drive in Windows:
1. Connect the unallocated USB drive to your computer.
2. Open Disk Management (press Windows key + R, type “diskmgmt.msc” and hit Enter).
3. Right-click on the unallocated space on your USB drive and select “New Simple Volume”.
4. In the New Simple Volume Wizard that opens up, click Next.
5. Specify the size of the new partition (by default, it selects the full capacity). Click Next.
6. Assign a drive letter to the USB drive. Click Next.
7. Select “Format this volume with the following settings” and choose NTFS as the file system.
8. Check “Perform a quick format” and click Next.
9. Click Finish to complete the formatting process.
The USB drive should now show up in File Explorer with the new drive letter. You can use the drive normally again.
If you get any errors while trying to create a new partition, you may need to initialize the disk first. Right-click the unallocated space, choose Initialize Disk, select the partition table type (GPT or MBR), and click OK. Then try creating the new partition again.
This will fix most cases of an unallocated drive in Windows. However, if the drive has physical damage or file system corruption, you may need to reformat it completely. Read the section below for how to do low-level formatting.
Additional Solutions in Windows
– If the above steps don’t work, try using diskpart commands in the Windows Command Prompt to clean and create a new partition instead.
– You can also use third party partitioning tools like MiniTool Partition Wizard, EaseUS Partition Master, AOMEI Partition Assistant etc.
– If the drive has bad sectors, you may need to perform a full format instead of a quick format. This will map out the bad sectors.
– As a last resort, perform a low-level format to completely erase and reformat the drive from scratch. This will wipe all data.
How to fix an unallocated USB drive on Mac?
Here is the process to fix an unallocated USB drive on Mac:
1. Connect the unallocated USB drive to your Mac.
2. Open Disk Utility (press Command + Spacebar and search for it).
3. Select the unallocated USB drive in the sidebar. Click the Erase tab.
4. Specify a name, format (Mac OS Extended is recommended) and scheme (GUID or MBR).
5. Click Erase to reformat the drive.
6. Once complete, you can close Disk Utility. The USB drive should now show up on your desktop or in Finder, ready to use.
If you run into any errors while erasing, try these steps:
– Initialize the disk first by selecting the drive and clicking Initialize. Then Erase.
– Try reformatting with a different file system like MS-DOS (FAT) instead.
– Perform a secure erase to completely reset the drive. This will wipe all data.
– Physically connect the drive to a different USB port/cable on your Mac.
– Use a third party app like Drive Genius or TechTool Pro to repair and reformat the drive.
Reformatting the drive using Disk Utility will resolve most unallocated drive issues on Mac. If that fails, you likely have a damaged drive that needs professional data recovery.
How to low level format an unallocated USB drive?
If your unallocated USB drive has file system errors or bad sectors that prevent formatting, you may need to do a low-level format:
On Windows:
1. Use a tool like HDD Low Level Format Tool. Connect the unallocated USB drive.
2. Select the correct USB drive and change other settings if needed.
3. Click Start to begin the low-level format. This will completely erase the drive.
4. Once completed, you can partition and reformat the drive normally in Disk Management.
On Mac:
1. Connect the USB drive and open Disk Utility.
2. Select the drive and click Erase. Choose a name and MS-DOS format.
3. Select Security Options and move the slider to the Most Secure setting.
4. Click Erase to wipe the drive. This performs a secure erase similar to low-level formatting.
5. Once done, reformat the drive as Mac OS Extended (HFS+) to use on Mac.
Low-level formatting rewrites the entire drive surface to remove bad sectors. It will erase all data so make sure you have backups. But it provides the most thorough solution for stubborn unallocated drive issues.
Can I recover data from an unallocated USB drive?
If your unallocated USB drive contains important files and data you need to recover, follow these steps before formatting:
– First, avoid writing anything new to the drive. Even opening Disk Management on Windows can overwrite data.
– Install data recovery software like Recuva, TestDisk, PhotoRec, or EaseUS Data Recovery Wizard.
– Connect the unallocated drive to your computer. Select the drive in the recovery app.
– Scan the drive for recoverable files. This may take some time.
– Browse the found files and select those you want to recover. Save them to another drive.
– After recovering your files, you can proceed with fixing the drive’s formatting.
The less you interact with the drive, the better chance you have of recovering data intact. But do not format the drive before attempting data recovery, or the files will be lost forever.
Tips to prevent USB drives from becoming unallocated
Here are some tips to avoid your USB drives ending up in an unallocated state:
– Always eject the drive safely before unplugging it. Never just pull out the USB stick.
– Create the habit of safely removing the hardware before unplugging external hard drives.
– Avoid using USB drives on public computers. They could be infected with malware.
– Don’t remove the drive during a file transfer or write operation. Wait for it to finish.
– Handle the drive carefully and avoid physical damage. Do not bend or drop drives.
– Regularly scan drives with antivirus software and Disk Cleanup to fix errors early.
– Consider using newer USB drives with protective casing and rugged design.
– Keep backups of your USB drive files on another device or cloud storage.
– When partitioning/formatting, use the “Optimize for performance” allocation unit size.
Following these best practices will help minimize corruption and maximize the lifespan of your USB flash drives and external drives.
Conclusion
In summary, an unallocated USB drive is a drive that has not been properly partitioned and formatted, causing it to appear blank and unusable. This can happen if the drive was never setup correctly to begin with, if the partition table or file system got corrupted, or partitions were accidentally deleted.
To fix an unallocated drive in Windows, use Disk Management to create a new partition and quick format it. On Mac, use Disk Utility to erase and reformat the drive. For drives with hardware issues, try low-level formatting to completely reset them. And if you need to recover data first, avoid interacting with the drive and use data recovery software.
Following some basic precautions when using USB drives can help prevent the drive from becoming unallocated in the first place. But if it does happen, the solutions outlined above should get your USB drive working again so you can continue storing data on it.