Having an external hard drive fail to initialize can be incredibly frustrating. This issue usually arises when your computer is unable to recognize the external hard drive and mount it correctly. There are several potential causes for this problem, but thankfully, there are also a few possible solutions you can try to get your external hard drive working again.
What Causes This Error?
There are a few common culprits that can lead to the external hard drive not initializing error:
- Corrupted system files or bad sectors on the external hard drive
- Outdated or corrupt drivers on your computer
- Damaged USB port
- Faulty or inadequate power supply to the hard drive
- External hard drive is set to an unsupported file system
- The external hard drive has not been formatted properly
Errors during the initialization process when you connect the external hard drive to your computer can prevent the operating system from recognizing the device and mounting it correctly. This leads to the external hard drive not showing up in your list of drives and devices.
How to Fix an External Hard Drive Not Initialized
If your external hard drive is not initializing, there are a number of troubleshooting steps you can take to try and resolve the issue:
1. Check External Hard Drive Connections
The first thing to check is whether the external hard drive is properly plugged into your computer. Unplug the cable connections and plug them back in securely. Try connecting the external hard drive to another USB port on your computer if possible. The drive should make an audible connection sound when connected. This confirms the USB cable and ports are working.
2. Update or Reinstall Drivers
Outdated, corrupt, or missing drivers can sometimes cause external hard drives not to initialize properly. Update the drivers related to your external hard drive, which include:
- USB drivers
- Hard drive chipset drivers
- Motherboard drivers
You can manually download updated drivers from the device manufacturer website and install them. Or use a driver update utility to identify outdated drivers and update all of them automatically.
If updating does not work, uninstall the related drivers and reboot your computer to force a fresh driver reinstall.
3. Change Drive Letter and Paths
If your external hard drive shows up in Disk Management but not Windows Explorer, the drive may not have an assigned drive letter. Follow these steps:
- Press Windows + R to open the Run dialog box.
- Type diskmgmt.msc and click OK to open Disk Management.
- Right-click on the external drive and choose Change Drive Letter and Paths.
- Click Add and assign a new unused drive letter.
- Click OK to save the changes.
This will assign a drive letter to your external hard drive so that it shows up in Windows Explorer.
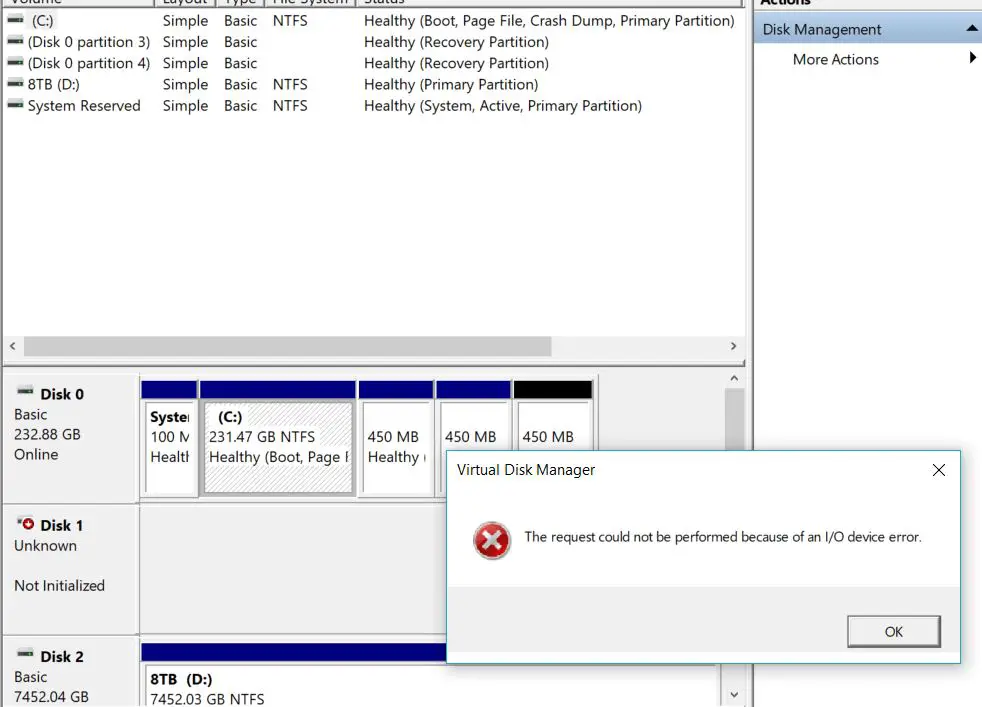
4. Initialize the Hard Drive
If your external hard drive shows up as unknown or not initialized in Disk Management, you may need to initialize it. This will reformat and erase all data on the drive.
- Press Windows + R to open the Run dialog box.
- Type diskmgmt.msc and click OK to open Disk Management.
- Right-click on the unknown disk and choose Initialize Disk.
- Select a partition style – MBR or GPT – and click OK.
- Right-click the disk partition and choose New Simple Volume.
- Follow the on-screen prompts to initialize the volume with a drive letter.
The external hard drive should now show up with unused space in Windows Explorer.
5. Check for Bad Sectors
Corrupted sectors on your external hard drive can prevent initialization. To scan for bad sectors:
- Open Command Prompt as admin.
- Type chkdsk F: /f /r /x (replace F with your external drive letter).
- Type Y to confirm and press Enter.
Chkdsk will scan your external hard drive and repair any bad sectors. You can also use third-party tools like HDD Regenerator to scan for and repair bad sectors.
6. Format External Hard Drive
If all else fails, reformatting your external hard drive will erase all data but can resolve initialization issues. Here’s how to reformat your drive:
- Press Windows + R to open the Run dialog box.
- Type diskmgmt.msc and click OK to open Disk Management.
- Right-click the external drive partition and choose Format.
- Select a file system – exFAT or NTFS – and click OK.
This will completely reformat your external hard drive and should allow it to initialize properly when connected to your computer.
External Hard Drive Not Initialized – Data Recovery
If your external hard drive contains important data, reformatting or initializing will erase everything. In that case, data recovery software is your best chance of getting the files back.
Data recovery apps work by scanning the external hard drive sectors and rebuilding corrupted or erased files. We recommend:
| Data Recovery Software | Key Features |
|---|---|
| Stellar Data Recovery | Recovers lost partitions, supports Windows and Mac, repairs corrupt drives |
| EaseUS Data Recovery Wizard | Full hard drive recovery tools, simple interface, filters for quick file finding |
| Disk Drill | Scans and restores data from internal and external drives, filters for quick recovery |
Using data recovery software gives you the best chance of getting your files back intact before attempting drive initialization.
How to Avoid This Issue in the Future
While external hard drive errors can happen randomly, there are steps you can take to avoid this issue in the future:
- Always eject the external drive safely before unplugging it
- Use a reliable surge protector to prevent power fluctuations
- Keep your computer and drive updated with the latest software/firmware
- Don’t forcefully unplug the drive while it’s accessing data
- Store drives properly and avoid damage, drops, bumps, etc
Following best practices for using and handling external drives can prevent most connection issues. But hard drive failures can still occur out of nowhere.
Getting Professional Data Recovery Help
For extreme external hard drive problems, your best solution is to take it to a professional data recovery lab. They have specialized tools and clean room facilities to repair drives and recover data in complex situations.
If DIY solutions don’t work and your data is valuable, professional data recovery is worth the cost for secure file recovery. Search online for ‘data recovery lab near me’ to find a reputable service.
Conclusion
Not being able to initialize an external hard drive properly can happen due to connection issues, hardware damage, or drive errors. Thankfully, there are many troubleshooting steps you can take to resolve the problem:
- Check drive connections and change USB ports/cables
- Update motherboard, USB, and hard drive drivers
- Assign a drive letter in Disk Management
- Initialize the external drive in Disk Management
- Scan for and repair bad sectors
- Reformat the external hard drive
Following this step-by-step troubleshooting guide should help you get your external hard drive recognized again. But if the drive contains important data, use recovery software to extract the files first before attempting to initialize it. With the right tools and techniques, you can recover from external hard drive errors and get your data back.