What is VirtualBox?
VirtualBox is a virtualization software program that allows you to run other operating systems on your computer without rebooting. It is developed by Oracle and allows users to set up and run virtual machines (VMs) on a host computer. Some key features of VirtualBox include:
- Allows you to install and run a different operating system like Linux or Windows on your Mac or PC.
- Enables running multiple VMs simultaneously.
- Supports a wide range of guest operating systems including Windows, Linux, Solaris, OS/2 and more.
- Free to download and use, even in commercial settings.
- Open source with an active community supporting its development.
In summary, VirtualBox provides a way to virtualize and sandbox different computing environments on a single physical machine. This allows testing software, running legacy systems, accessing different OS features and more without dedicating separate hardware or dual booting.
Why Would You Want to Boot from a CD in VirtualBox?
There are several reasons you may want to boot a virtual machine from a CD or DVD ISO image in VirtualBox:
To install a new operating system on the virtual machine. Booting from the OS installation disc is necessary to start the installation process when setting up a new VM. For example, you would boot from a Windows, Linux, or Mac OS X installer disc image.
To run recovery tools or troubleshoot issues. Booting from recovery CDs or diagnostic discs can help fix problems, reset passwords, or repair damaged systems within the VM. Many OS discs have built-in recovery modes.
To access software tools and bootable utilities. There are various CD images that provide useful tools that run independently of any installed OS, such as partitioning tools, antivirus scanners, backup software, etc. Booting from these allows you to use the tools on the virtual machine.
For testing and compatibility purposes. Booting different OS installation discs in a VM lets you test compatibility and try out operating systems without altering the host computer. This is useful for app testing, web development, and technical evaluations.
Overall, the ability to boot VMs from CD/DVD gives you greater flexibility, control, and options to efficiently create, manage, and troubleshoot virtual machines in VirtualBox.
Enabling CD/DVD Booting in VirtualBox
In order to boot a VM from a CD/DVD image in VirtualBox, you first need to enable booting from CD/DVD in the VM settings. This is disabled by default when you create a new VM.
To enable it, with the VM powered off, go to the Settings dialog for the VM. Under the System section, go to the Motherboard tab. Here you will find the checkbox labeled “Enable Boot from CD/DVD”. Check this box to allow the VM to boot from the virtual CD/DVD drive.
You may also want to move the CD/DVD drive to be the first boot device in the boot order. This can be configured under the Boot Order section on the same page. Move the CD/DVD drive to be at the top of the list.
With boot from CD/DVD enabled and the drive set as the first boot device, you can now insert a CD/DVD image and boot the VM from it when powered on. This allows you to boot from ISO disk images or physical CD/DVD drives attached to the host system.[1]
Inserting a Virtual CD/DVD
To boot a VM from a CD or DVD image file in VirtualBox, you first need to add the ISO file to the virtual machine’s storage. Here are the steps:
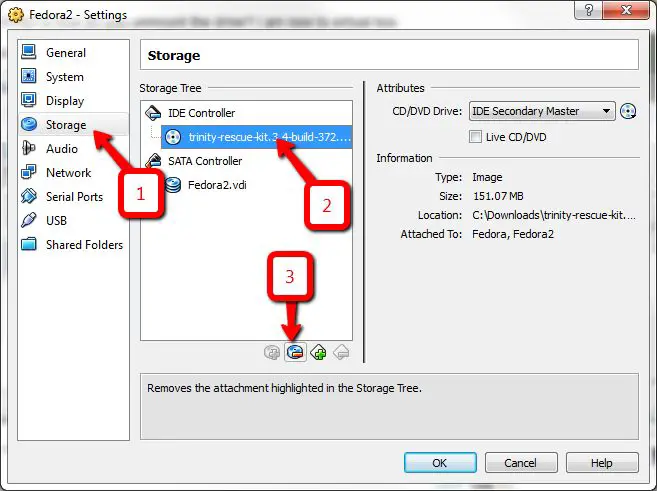
- With the VM shut down, go to the Storage settings for that VM.
- Click the “Add Optical Drive” icon, select “Choose Disk”, and navigate to the ISO file you want to use.
- Select the ISO file and click Open to add it.
- The ISO file will now show up under Optical Drives in Storage.
This mounts the ISO image virtually, allowing you to boot the VM from it as if it were a real disc inserted in a physical drive. Make sure the ISO is added before booting up the VM.
See this video for a visual demonstration: How to Install OS from ISO Image in VirtualBox
Booting the VM from the Virtual CD/DVD
Once you have enabled CD/DVD booting in the VM settings and inserted a virtual CD/DVD into the virtual drive, you can boot the VM from the CD/DVD. When starting the virtual machine, press a key (usually ESC, F2, F10, or F12 depending on the system) during the initial boot screen to bring up the boot menu. Then select the CD/DVD drive from the boot menu to boot from the media in the drive.
For example, in VirtualBox when starting a VM, press F12 during boot to access the boot menu. Then select the CD/DVD drive to boot the VM from the inserted disc. This will load the operating system or other media from the virtual CD/DVD instead of the default hard drive boot.
If the VM still does not boot from the CD/DVD, make sure the disc image or ISO is valid and properly loaded into the virtual drive. You may need to reinsert the virtual disc or set the drive to bootable under VM settings. Troubleshooting boot issues may also require checking the VM’s firmware mode and boot order configuration.
Troubleshooting CD Booting Issues
There are a few common problems that can prevent a CD or DVD from booting properly in VirtualBox:
Improper ISO mounting – Make sure that the ISO file has been mounted properly as a virtual CD/DVD drive in the VM’s settings. If it is not mounted correctly, the VM will not detect the virtual disc.
Disabled boot priority – Double check that CD/DVD drive is set as the first boot device in the VM’s system BIOS. If the hard drive or another device is set to boot first, it will not boot from the CD/DVD drive.
Insufficient RAM allocated – Booting from optical media requires a certain amount of RAM. Make sure the VM is allocated at least 512 MB of RAM, ideally 1 GB or more.
Corrupted ISO file – Verify the ISO was not corrupted when downloading by comparing its checksum/hash value. Test booting the ISO on another VM or physical machine if possible.
IDE vs SATA controller – For older operating systems, check that the VM optical drive is configured to use an IDE controller rather than SATA.
Other hardware conflicts – Try removing other unnecessary virtual hardware like network adapters to see if they are interfering with the boot process.
Damaged virtual optical drive – As a last resort, delete and re-add the virtual CD/DVD drive in the VM configuration.
For additional troubleshooting tips, refer to this VirtualBox community thread.
Using Physical vs. Virtual CD/DVD Drives
When setting up CD/DVD drives in VirtualBox, you have the option to use either a physical drive or a virtual drive connected to an ISO image file. There are pros and cons to each approach.
Using a physical CD/DVD drive allows you to directly access real media in your virtual machine. This can be useful for testing or installing legacy software and operating systems. However, accessing the physical drive requires configuring VirtualBox to have direct passthrough access, which can introduce security risks and compatibility issues. The virtual machine may not release the drive properly when shut down.
Using a virtual drive provides more control and security. You can connect an ISO image file directly without allowing full access to the physical hardware. The virtual drive behaves like an actual disk drive from within the VM. This approach also lets you swap out ISO images easily without interrupting the VM. However, you will need access to ISO images rather than physical media.
In most cases today, using a virtual drive with ISO images is recommended for security and convenience. However, physical drive access may be necessary in some specialized use cases like testing boot processes. Overall, VirtualBox provides flexibility to use both options.
Booting Legacy BIOS vs UEFI Systems
VirtualBox supports booting guest operating systems using either the legacy BIOS or UEFI (Unified Extensible Firmware Interface) firmware. Legacy BIOS has been around for decades and uses the Master Boot Record (MBR) partitioning scheme. UEFI is newer, designed as a replacement for BIOS, and utilizes the GUID Partition Table (GPT) scheme. There are some key differences between the two when it comes to booting in VirtualBox:
Legacy BIOS requires different settings than UEFI/EFI. For BIOS, you would enable “Boot Hard Disk” or specify the bootable virtual disk. For UEFI, you need to add an EFI bootloader like bootx64.efi. VirtualBox has an option to choose the firmware type when creating the VM. The guest OS must also be installed in the appropriate mode (MBR for BIOS, GPT for UEFI). See this VirtualBox forum post for more details on UEFI booting.
So in summary, whether you boot BIOS or UEFI depends on how the virtual machine and OS are configured. Check your VM settings and OS installer to ensure they match. If you want to switch modes after installing the OS, you may need to reconfigure partitions and bootloaders. Consult the VirtualBox user manual for full instructions on legacy vs UEFI booting.
Alternative Boot Methods
In addition to booting from a virtual CD/DVD drive, there are other ways to boot a VM in VirtualBox:
Network booting: You can configure VirtualBox to boot a VM over the network using PXE. This allows booting from a boot image stored on a server rather than locally on the VM. To enable, go to the VM Settings > Network > Advanced and select “Cable Connected” for the network adapter. You will also need to configure DHCP and TFTP servers to host the network boot files. See https://www.virtualbox.org/manual/ch03.html#network_pxe for more details.
USB booting: You can connect a physical USB device to the VM and boot from it. Go to Settings > USB and select the device. On VM startup, press F12 to bring up the boot menu and select the USB device. This allows booting from OS installation media like a USB stick. See https://www.virtualbox.org/manual/ch03.html#usb-support for details.
Boot manager: Pressing F12 on VM startup opens the “Boot Manager” menu where you can select alternate boot options like USB devices, DVD drives, or network PXE boot. This menu allows selecting a one-time boot device.
Custom EFI path: When booting UEFI VMs, you can specify a custom EFI executable path in Settings > System > Motherboard to directly boot an alternate EFI file.
When to Use Other Virtualization Software
While VirtualBox is a popular free virtualization tool, there are some cases where you may want to consider using alternatives.
VMware’s paid products like VMware Workstation and VMware Fusion offer better performance and more advanced features compared to VirtualBox. VMware tools also have tighter integration with Windows and macOS for a more seamless experience. However, they come at a cost. See (https://www.parallels.com/tips/virtualbox/alternative/) for more details on VMware alternatives.
Microsoft Hyper-V is worth considering if you are solely using Windows and want deeper integration with Windows itself. As it comes built into Windows, it can be more convenient than installing third-party software. Performance is also very good. However, it lacks cross-platform support compared to solutions like VirtualBox. See (https://alternativeto.net/software/virtualbox/) for more VirtualBox alternatives.
QEMU is an open source emulator that can provide better performance and flexibility compared to VirtualBox in some cases. It has useful features for developers and advanced users. The learning curve is steeper though. See (https://www.g2.com/products/virtualbox/competitors/alternatives) for QEMU and other high-performing alternatives.
In summary, while VirtualBox excels at cross-platform virtualization for home and small business use, there are cases where alternatives like VMware, Hyper-V or QEMU may be preferable depending on your specific needs and budget.