What Does Initializing a Hard Drive Mean?
Initializing a hard drive prepares it for use by erasing existing data and partition information. It sets up the drive’s file system without actually formatting it. Initializing is not the same as formatting a drive.
Formatting completely erases all data and partitions on the drive and installs a new file system. Initializing simply makes the drive ready for formatting by clearing existing partitions and data.
Reasons you may need to initialize a hard drive include:
- Preparing a new drive for use
- Wiping a used drive before reformatting it
- Resolving partition issues or errors
- Changing the partition style, e.g. from MBR to GPT
So in summary, initializing sets up the blank slate needed to then fully format and use a drive.
When to Initialize a Hard Drive
There are a few common scenarios when you may need to initialize a hard drive:
Getting a new hard drive – When you install a brand new internal or external hard drive, Windows will not recognize it until it has been initialized. Initializing assigns a file system to the drive and prepares it for first use.
Hard drive not detected/not showing up – If your hard drive is connected but not appearing in File Explorer or Disk Management, initializing it can often make it detectable to the operating system. The drive may just need to be assigned a drive letter.
Hard drive has corrupted data – Initializing can fix drive errors caused by corrupted partitions or other logical damage to the file system. It will erase all data on the drive and recreate the partitioning from scratch. So only use this option if data recovery is not required.
According to Microsoft, initializing a disk “removes all partitions and data on the disk to prepare it for use.”[1] So in most cases, you would only initialize a brand new drive or one whose data you are fine with losing.
[1] https://learn.microsoft.com/en-us/windows-server/storage/disk-management/initialize-new-disks
How to Initialize a Hard Drive in Windows
There are two main ways to initialize a hard drive in Windows – using Disk Management and using the Diskpart command line tool.
Using Disk Management
Disk Management is a built-in graphical tool in Windows that allows you to manage disks and volumes. Here are the steps to initialize a disk using Disk Management:
- Open Disk Management (right-click the Start button and select “Disk Management”).
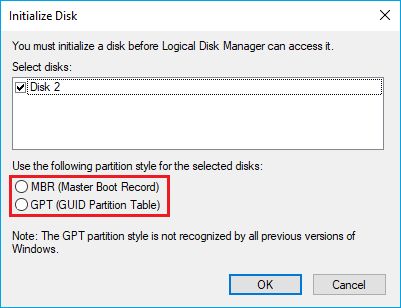
- Right-click the disk you want to initialize and select “Initialize Disk”.
- Select the disk partition style – MBR or GPT.
- Click “OK” to confirm.
The disk will now be initialized and you can create new partitions on it or format it.
Using Diskpart Command Line
Diskpart is a command line tool for managing disks and volumes. To initialize a disk using Diskpart:
- Open an elevated Command Prompt window.
- Type
diskpartand press Enter. - Type
list diskto view available disks. - Select the disk you want to initialize by typing
select disk X(where X is the disk number). - Type
cleanto erase and initialize the disk.
Now the disk is initialized and ready for partitioning and formatting. Refer to Microsoft’s documentation for more details on using Diskpart.
How to Initialize a Hard Drive on Mac
There are two main ways to initialize a hard drive on Mac – using Disk Utility, and using the command line.
Using Disk Utility
Disk Utility is an application included with macOS that allows you to manage internal and external disks. To initialize a drive with Disk Utility:
- Open Disk Utility (located in Applications > Utilities)
- Select the drive you want to initialize in the left sidebar
- Click the “Erase” tab
- Give the drive a name and select “Mac OS Extended (Journaled)” as the format
- Click “Erase” to initialize the drive
This will quickly reformat the drive and initialize it for use with macOS. Note that this will erase all existing data on the drive.
Using the Command Line
You can also initialize a drive from the command line using the diskutil command. To do this:
- Open the Terminal app
- Enter
diskutil listand identify the disk identifier for the drive you want to initialize (e.g. disk2) - Enter
diskutil eraseDisk JHFS+ "Drive Name" disk2replacing “Drive Name” with the name you want to give the disk, and disk2 with the disk identifier - Enter your admin password when prompted
This will initialize the drive, giving it the specified name and formatting it as Mac OS Extended (Journaled). As with Disk Utility, this will erase any existing data.
The command line option gives you more control and allows you to initialize drives not recognized by Disk Utility. However, the Disk Utility method is simpler for most users.
Initializing an External Hard Drive
The process for initializing an external hard drive is largely the same as initializing an internal drive. However, there are a couple additional things to keep in mind when initializing an external drive:
On Windows, you may need to use Computer Management instead of Disk Management to initialize an external drive. External drives will show up in Disk Management, but the initialize option may be greyed out. Opening Computer Management provides more options for initializing the disk.
When connected to a Windows PC, most external hard drives will show up as an unallocated drive and prompt you to initialize it before use. However, some external drives come pre-formatted and ready for use out of the box.
If your external hard drive already has data on it, initializing will erase all of the existing data. So only initialize an external drive if it is brand new or you are okay with wiping it.
Some users have reported external hard drives showing up as uninitialized even if they have worked before. In these cases, try a different USB port and cable before initializing.
Like with internal drives, you’ll need to choose between MBR and GPT when initializing an external drive. Choose based on whether you’ll be booting an OS from the drive or need partitions larger than 2TB.[1]
Risks and Dangers of Initializing a Hard Drive
The biggest risk of initializing a hard drive is that it will erase all data on the drive. When you initialize a drive, it resets the drive by erasing the partition table and file system of the drive. Any files and folders that were on the drive will no longer be accessible after initialization (1). Therefore, initializing a drive should only be done if you do not need any of the data on the drive anymore.
There is also a risk of data corruption if the initialization process gets interrupted. Initializing a drive involves writing a new partition table and creating a new file system. If this gets interrupted, such as if the computer loses power or resets during initialization, it could corrupt the partition table or file system of the drive. This could make it very difficult to access the data on the drive afterward (2). Therefore, it is important not to interrupt the initialization process once it begins.
In summary, the two main risks are complete data loss if the existing data is not backed up, and potential data corruption if the process is unexpectedly interrupted. Users should be extremely cautious when initializing a drive that contains important files.
(1) https://answers.microsoft.com/en-us/windows/forum/all/what-does-initialization-do-to-a-hard-disk/4c01e30c-37fb-4884-b124-ac2d59078008
(2) https://4ddig.tenorshare.com/hard-drive/does-initializing-a-disk-erase-data.html
Initializing a Hard Drive vs Formatting
Initializing a hard drive is different from formatting it. Initialization sets up the partitioning and file system on the drive, while formatting erases all data on the drive.[1]
When you initialize a new hard drive, you are setting up the drive’s partition table and defining the partition scheme to be used. This includes setting up either a Master Boot Record (MBR) or GUID Partition Table (GPT) partition style, which determines how the partitions and data will be organized and accessed on the drive.[2]
On the other hand, formatting a drive erases all the existing data and replaces the file system with a new one, such as NTFS or exFAT. The previous contents of the drive are removed permanently.
So in summary:
- Initializing sets up the hard drive’s partitions and defines the partition style, without erasing data.
- Formatting erases all data and writes a new file system onto the drive partitions.
Initializing is required on new drives to prepare them for use, while formatting erases existing data. Both processes are necessary before a drive can be used to store files and data.
[1] https://learn.microsoft.com/en-us/windows-server/storage/disk-management/initialize-new-disks
[2] https://www.startech.com/en-us/faq/hard-drives-general-initialize-partition-format
Initializing a Solid State Drive (SSD)
Initializing a solid state drive (SSD) follows the same process as initializing a traditional hard disk drive (HDD). The steps to initialize an SSD are identical in both Windows and Mac operating systems.
The main benefit of initializing an SSD is that it enables the TRIM command, which helps maintain the drive’s performance over time. TRIM clears out blocks of data that are no longer in use, allowing the SSD controller to write data more efficiently.
To initialize an SSD in Windows:
- Open Disk Management (right click on Start menu and select “Disk Management”)
- Right click on the disk and select “Initialize Disk”
- Select the partition style – MBR or GPT
- Click “OK” to confirm
On Mac:
- Open Disk Utility
- Select the SSD on the left sidebar
- Click the “Erase” tab
- Name the drive and select a format (APFS recommended)
- Click “Erase” to initialize
Initializing ensures the SSD is empty and ready to be partitioned or formatted before use. It also activates garbage collection routines like TRIM to maintain optimal performance. The process is quick and easy on both Windows and Mac.
Verifying Initialization and Checking for Errors
After initializing a hard drive, it’s important to verify that the process completed successfully. Here are two ways to check that initialization worked and scan for any errors:
Opening Disk Management to Verify
The easiest way to confirm initialization is to open up Disk Management in Windows (source). In the lower panel, the disk should now show the full capacity and a status of “Online.” This means Windows recognizes the full drive and it is ready for use.
Using CheckDisk to Scan for Errors
For a more thorough verification, run the CheckDisk utility (source). This will scan the drive sectors and check for bad sectors or file system errors. To run CheckDisk:
1. Open File Explorer, right-click on the drive, and choose “Properties.”
2. Go to the Tools tab and click “Check.”
3. Check “Scan drive” and choose whether to fix any errors automatically.
4. Click “Start” and let the scan run. This may take some time for large drives.
If any errors are found, consider re-initializing the drive or formatting it before further use. Overall, CheckDisk helps validate initialization completed correctly.
FAQs about Initializing Hard Drives
Initializing a hard drive is a common task when setting up new drives, but it can also lead to confusion and misconceptions. Here are some frequently asked questions to help clarify when and why initialization is necessary.
Is initializing a hard drive the same as formatting it?
No, initializing and formatting a drive are two different processes. Initialization sets up the basic structure on a drive, while formatting erases all data and fully prepares the drive for use. Initialization alone does not delete data on the drive [1].
When is it absolutely necessary to initialize a new drive?
Initializing is required for brand new internal and external hard drives that are being used for the first time. It defines fundamental information like the partition table and file system. Without initialization, the OS would not be able to access or store data on the drive [2].
Is initialization required for used or repurposed drives?
Usually not. Drives that have already been initialized and formatted do not need to be initialized again if they are disconnected and reconnected or repurposed for a new system or use. However, initialization may be required if there is an issue detecting the existing partitions [3].
Can I initialize a drive without losing data on it?
Yes, data will remain intact after initializing as long as you do not also format the drive. However, you should always backup important data prior as a precaution.
Overall, initializing should only be done on new blank drives or when troubleshooting drive issues. It is not necessary when repurposing used drives that already have recognizable partitions and file systems.
[1] https://4ddig.tenorshare.com/hard-drive/does-initializing-a-disk-erase-data.html
[2] https://learn.microsoft.com/en-us/windows-server/storage/disk-management/initialize-new-disks
[3] https://www.startech.com/en-us/faq/initialize-hard-drives