What does it mean when a disk is not initialized?
Disk initialization is the process of preparing a new disk for use by partitioning and formatting it. All new disks must be initialized before they can store data. An uninitialized disk is one that has not gone through this process and is not yet prepared for normal operation.
Disks need to be initialized because operating systems use initialization to define the physical storage structure on the drive. This includes creating partitions to separate and allocate space, writing a file system format like NTFS or HFS+ to organize files and folders logically, and recording other metadata needed to manage data storage and retrieval. Without initialization, the OS cannot write or read data on the disk.
Common causes of uninitialized disks include:
- Brand new internal or external hard drives that have not been partitioned and formatted yet.
- Hard drives that have become corrupted, damaged, or unallocated so the OS no longer recognizes their structure.
- Drives that are not detected properly due to connectivity issues or driver problems.
- Securely wiped disks that have had their partitioning and formatting erased.
In summary, an uninitialized disk lacks the basic structure and organization required for data storage and operations. The disk must be initialized before it can be used normally.
Symptoms of an uninitialized disk
When a disk is not properly initialized, you will notice some common symptoms that indicate there is a problem. Some key symptoms of an uninitialized disk include:
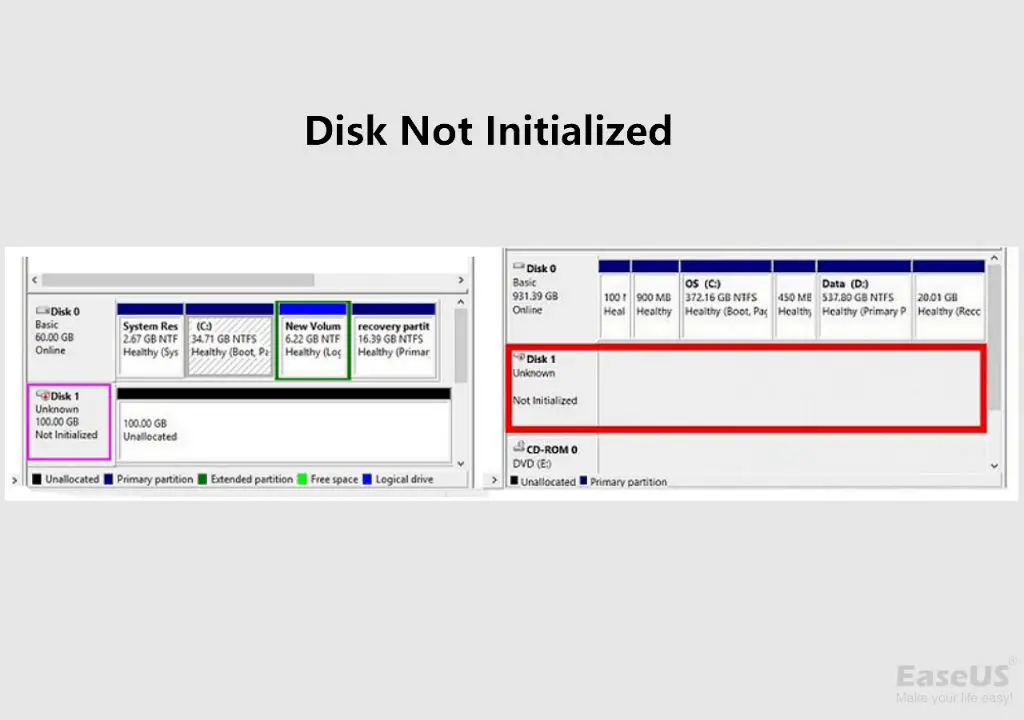
The disk shows up as “unknown” in Disk Management. Disk Management is the Windows built-in tool for managing disks. When a disk is uninitialized, Disk Management will be unable to identify the type of disk or properly display information about it.
The disk has no drive letter assigned to it. Normally, Windows automatically assigns drive letters (C:, D:, etc.) to connected disks. But an uninitialized disk will show up without a drive letter, making it inaccessible through Windows Explorer.
You are unable to access or format the disk. When attempting to open or interact with an uninitialized disk through File Explorer, you may get error messages about the disk needing to be formatted. But the formatting process will fail with an “incorrect function” error.
Overall, the main symptom is that Windows is unable to recognize the disk properly and treats it as an unknown or unallocated space. Trouble accessing the disk or errors about formatting are key signs a disk is not initialized. For more details, see this guide on troubleshooting uninitialized disks.
Before recovering an uninitialized disk
Before attempting to recover data from or initialize an uninitialized disk, it’s important to rule out any hardware issues that could be causing the problem. Some troubleshooting steps to take include:
https://www.stellardatarecovery.co.uk/hard-drive-uninitialized.htm
First, try reconnecting the SATA and power cables connected to the uninitialized disk. Cables can become loose over time, resulting in connectivity issues. Unplug the cables completely, inspect them for damage, blow out any dust, then firmly reconnect them.
Next, update the motherboard disk controller drivers. Outdated disk controller drivers can sometimes cause disks to not initialize properly. Find and install the latest driver for the motherboard or disk controller from the manufacturer’s website. A driver update may allow the disk to be detected and initialized.
https://www.easeus.com/resource/disk-unknown-not-initialized.html
Finally, consider running hardware diagnostics on both the disk drive and motherboard to rule out hardware defects. Hard drive manufacturers like Seagate and Western Digital provide free diagnostics software to test drive health. A faulty disk controller or damaged motherboard could also be preventing disk initialization.
If the uninitialized disk still does not show up after hardware troubleshooting, then software data recovery methods may be needed to recover data before attempting initialization.
Using Disk Management
Disk Management is a built-in Windows utility that can be used to initialize disks. Here are the steps to initialize a disk using Disk Management:
1. Open Disk Management by pressing Windows Key + R and entering “diskmgmt.msc”.
2. Right-click on the disk you want to initialize and select “Initialize Disk”.
3. Select either MBR (Master Boot Record) or GPT (GUID Partition Table) partitioning. MBR is compatible with older operating systems while GPT supports larger disk sizes. GPT is recommended for drives larger than 2TB or for UEFI/GPT boot mode. [1]
4. The disk will now have a partition and a drive letter assigned. You can right-click and change the drive letter if needed.
Allocating a drive letter allows Windows and applications to access the disk. By default, the next available letter will be assigned sequentially after existing drive letters.
Overall, Disk Management provides a straightforward way to initialize disks and prepare them for use in Windows.
Using DiskPart
DiskPart is a command-line disk partitioning tool included in Windows that can be used to initialize an uninitialized disk. To use DiskPart to initialize a disk:
1. Open the DiskPart command line interface by typing ‘diskpart’ in the Windows search bar or Run menu and pressing Enter.
2. Type ‘list disk’ to display all disks connected to your computer. Identify the disk number of the uninitialized disk.
3. Type ‘select disk X’ where X is the disk number to select the uninitialized disk.
4. Type ‘clean’ to delete all existing partitions and format the disk.
5. Type ‘create partition primary’ to create a new primary partition on the disk.
This will initialize the disk by writing a new empty partition table to the disk. You can then format the disk and assign a drive letter to start using it. Refer to this guide for the full DiskPart commands to initialize a disk.
Using third-party tools
There are several reliable third-party tools that can help initialize an uninitialized disk, such as:
EaseUS Partition Master
EaseUS Partition Master is a popular third-party partition management software that allows initializing disks. As per EaseUS, EaseUS Partition Master Free provides an option to initialize a disk and set it to MBR or GPT partition style. The steps involve selecting the unallocated space, right-clicking, choosing ‘Initialize Disk’ and then selecting MBR or GPT partition style.
AOMEI Partition Assistant
AOMEI Partition Assistant Professional is another excellent third-party partitioning tool for initializing disks as explained in this DiskPart guide. The key steps are choosing the unallocated space, right-clicking, clicking ‘Initialize’ and then confirming initialization as MBR or GPT.
MiniTool Partition Wizard
As outlined on MiniTool, the MiniTool Partition Wizard also allows initializing disks. The main steps include selecting the disk, choosing ‘Initialize Disk’ option, picking MBR or GPT partition style and then executing the operation.
Recovering data from the uninitialized disk
If the disk contains important files you need to recover, data recovery software should be your first step in trying to get them back. Programs like Disk Drill, EaseUS Data Recovery Wizard, Recuva, and Photorec can scan uninitialized disks and recover deleted files. Follow the steps for your chosen software to select the uninitialized disk, scan it, and restore files to another drive.
Data recovery software looks for file signatures still present on the disk. This allows it to reconstruct files even if the disk is not initialized. However, the longer you use the disk and write new data, the more likely old file data will get overwritten.
If DIY software does not find your files, you may need to send the disk to a data recovery specialist. They have access to advanced techniques like imaging the drive sectors and working in a dust-free clean room. While expensive, specialists can sometimes recover data in situations where consumer software fails. They may be your last resort for irreplaceable files.
Avoiding uninitialized disks
There are a few steps you can take to prevent external hard drives from becoming uninitialized:
Safely eject external drives: Always use the “Safely Remove Hardware” option when disconnecting an external hard drive. This ensures any cached writes are flushed before disconnecting. Improperly ejecting a drive increases the chances of corruption and initialization issues.[1]
Check Disk Management regularly: Open Disk Management periodically to check on your drives. Look for any warning signs like missing drive letters or prompts to initialize. Take corrective action immediately if you spot any problems.[2]
Following these basic precautions will minimize the chances of a drive becoming uninitialized. However, you should still periodically back up your data as a safeguard against potential drive failure.
[1] https://www.stellardatarecovery.co.uk/hard-drive-uninitialized.htm
[2] https://www.easeus.com/storage-media-recovery/external-hard-drive-not-initialized.html
When to seek professional help
Here are some situations when it may be best to seek professional hard drive recovery services:
DIY methods unsuccessful – If you have exhausted all the DIY options mentioned in this guide and still have not been able to recover your data, then it may be time to enlist the help of data recovery professionals. They have specialized tools, equipment, and skills for recovering data even from severely damaged drives.
Critical or irreplaceable data – If the data you lost is business critical, sentimentally priceless, or completely irreplaceable, then utilizing professional services is highly recommended. The risks are too high and stakes too important to not take advantage of expert help in these cases. Paying for guaranteed, highly successful services can be well worth it when it comes to your most valuable data.
Key Takeaways
Here are some of the main things to keep in mind when recovering an uninitialized disk:
- Use Windows Disk Management or DiskPart utilities first to try and initialize the disk.
- Third-party tools like EaseUS Data Recovery Wizard can help recover data from uninitialized disks.
- Back up your data regularly to avoid potential data loss from disk issues.
- Initializing a disk erases all data, so recover data first before initializing if needed.
- If DIY recovery methods don’t work, seek help from a professional recovery service.
- Understand the causes of uninitialized disks to help avoid the issue in the future.
Recovering an uninitialized disk starts with trying to initialize it and using data recovery software. Backups help avoid data loss. Seek professional help if you exhaust DIY methods. Avoiding disk errors like corruption helps reduce the chances of dealing with an uninitialized disk.