Removing a hard drive from a desktop computer is a straightforward process that can be done in just a few minutes with the right tools. While the exact steps may vary slightly depending on your computer model, the general process will be very similar across all desktop PCs. In this comprehensive guide, we’ll walk through the complete process of removing both 3.5″ and 2.5″ hard drives from a desktop computer.
When would you need to remove a hard drive from a desktop computer?
There are a few common reasons why you may need to remove the hard drive from a desktop PC:
- Upgrading to a larger or faster hard drive for more storage capacity or better performance
- Replacing a failed or dying hard drive
- Removing sensitive data before disposing of an old computer
- Troubleshooting hardware issues that may be caused by a faulty hard drive
- Transferring the hard drive to a new computer
Removing and replacing hard drives is one of the most common upgrades for desktop PCs. With just a few tools and following some simple steps, it’s a task any computer user can handle themselves.
What you’ll need
Here’s a list of the basic tools and supplies you’ll need to remove a hard drive from a desktop computer:
- Philips head screwdriver
- Anti-static wrist strap (recommended)
- Clean, well-lit workspace
- Replacement hard drive (if applicable)
Additionally, it can be helpful to have a container or anti-static bag on hand to store the hard drive in once removed from the computer.
Preparing to remove the hard drive
Before you get started removing the hard drive, there are a few steps you should take to prepare:
- Back up any important data on the hard drive if possible.
- Disconnect all peripherals such as USB devices, printers, and scanners.
- Power down the computer and unplug the power cord.
- Discharge any static electricity by touching a metal surface or wearing an anti-static wrist strap.
- Clear a spacious, clean workspace to disassemble the desktop tower.
These preparatory steps should be followed anytime you open up a desktop computer to help avoid data loss or electrical damage.
Removing the side panel
The first step is to remove the side panel from the desktop tower to access the internal components:
- Set the tower upright and locate the panel securing screws, usually on the back of the tower. The screws may require a philips head screwdriver to loosen.
- With the screws removed slide the panel back and maneuver it off the tower. Some panels lift straight off while others swing open like a door.
- Set the side panel aside in a safe place so you can easily reattach it later.
Locating the hard drive
Once inside the tower, you need to locate the hard drive. In most desktop PCs, the hard drive is housed in a drive cage or mounted in a drive bay.
3.5″ hard drives are the larger, mechanical drives that are usually installed vertically in a drive cage or drive bay. They connect via wide ribbon cables and require power from the PSU.
2.5″ hard drives are smaller, solid state drives that may be mounted in a dedicated 2.5″ drive bay or adapter. They use a narrow SATA cable for data and get power from the motherboard.
Look for SATA cables running from the drive to the motherboard as a way to identify both types. Use your computer’s manual or online resources if you need help locating the exact hard drive model.
Disconnecting cables
Once you’ve located the hard drive, the next step is to disconnect the data and power cables:
- Start by disconnecting either end of the SATA data cable from the hard drive and motherboard.
- For 3.5″ drives, also disconnect the power cable coming from the PSU.
- Unclip any adhesive or wire ties bundling the cables for easier accessibility.
Try not to pull the cables too tightly to avoid damaging the connectors. Also, take note of where the cables were connected for reassembly later.
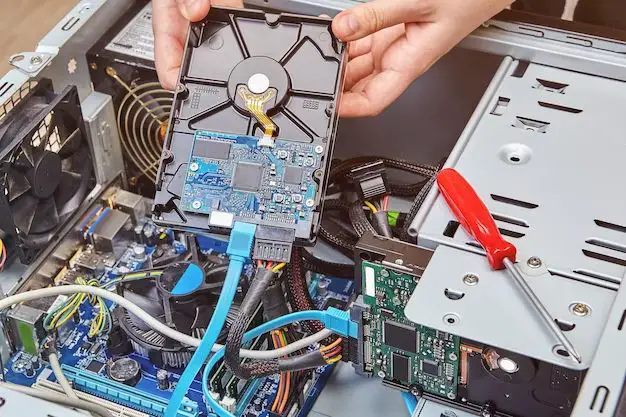
Removing the drive from the bay
With the cables detached, you can now remove the physical hard drive from the drive bay or cage:
- Look for small screws on each side or bracket of the drive bay that hold the drive in place.
- Carefully remove the screws and set them aside so they don’t get lost.
- Slide the drive forward to remove it from the bay.
- For vertically mounted 3.5″ drives, lift the drive up and out of the cage.
Hold the drive gently without touching the circuit board on the underside. Some drive cages feature quick release levers to easily eject the drive from the bay.
Installing a new hard drive
If you’re replacing the drive with a new hard drive, this is when you’ll install it into the now vacant bay:
- Line up the mounting holes on the bottom of the new drive.
- Slide or lower it into place until flush with the back of the bay.
- Replace any bay screws to secure the drive.
- Reconnect the SATA and power cables to the same ports.
Take care not to twist or crimp any cables. Refer to your motherboard manual if you’re unsure of the SATA port numbers. The drive should now be fully installed and ready for use once the computer is reassembled.
Reassembling the computer
With the hard drive removed or replaced, you’re now ready to reassemble the desktop computer:
- Carefully align the side panel back onto the tower frame.
- Replace all the perimeter screws to secure the panel back in place.
- Reconnect any peripherals like printers and USB devices.
- Attach the power cord and switch computer back on.
Be sure not to pinch any cables while replacing the side panel. For optimal airflow and cooling, check that cables are neatly organized and fans remain unobstructed.
Checking drive functionality
Once powered back on, you should immediately check that the computer recognizes the new hard drive if one was installed. Here are some things to verify:
- Listen for drive power up sounds at startup.
- Check for the drive in BIOS settings and disk management.
- Look under My Computer for the new drive letter.
- Run diagnostics like CHKDSK to scan for errors.
If the BIOS doesn’t detect a new drive, recheck the cable connections. You may need to initialize and format a brand new drive before it becomes accessible.
What to do with the old hard drive
Once removed from the desktop computer, the original hard drive can be:
- Reinstalled into another desktop computer or external enclosure for data access.
- Securely wiped of all data for safe disposal or donation.
- Kept as a backup or secondary data drive if still functional.
- Recycled responsibly if no longer working.
Always run a full format or wiping utility like DBAN if the drive contains sensitive information before repurposing or properly destroying the drive.
Troubleshooting common issues
While not overly complex, some common challenges can come up when removing a desktop hard drive:
Can’t locate the drive
If you’re unable to find the hard drive inside the tower, refer to the computer or motherboard manual for the specific drive bay location in that model. Look for SATA cables to trace back to the drive.
Cables are too short
SATA cables can sometimes be too short to allow fully removing the hard drive from the bay. Disconnect both ends of the cable for more slack or replace with a longer SATA cable if needed.
Stripped or stuck screws
Overly tightened or stripped screws holding the drive bay in place can be bypassed by carefully prying the drive free. Be cautious not to crack the bay housing and replace any defective screws.
Drive won’t power on
If the newly installed hard drive isn’t powering on, it likely indicates a loose data or power cable connection. Double check the SATA and power cable fittings are snug and connected to the correct ports.
Computer won’t boot
A blank screen on startup typically means the computer is not detecting the hard drive correctly. Try resetting the cables, booting into BIOS, or adding a different drive to narrow down the issue.
Conclusion
While removing a hard drive from a desktop computer sounds intimidating, it can actually be accomplished in just a few straightforward steps. The key things to remember are:
- Prepare by backing up data, powering down, and discharging static.
- Locate the hard drive model and disconnect all cables.
- Remove any small screws securing the drive in the bay.
- Lift or slide the drive free from the desktop tower.
- Optionally install a replacement drive and reconnect cables.
- Verify drive detection before reassembling the computer.
Exercising care and patience, and following proper ESD grounding procedures are critical to avoid damaging components. But with minimal tools and know-how, you can successfully remove and replace desktop hard drives.