Removing and replacing the hard drive in your PS4 is a great way to upgrade your console’s storage capacity. The process involves opening up your PS4, disconnecting the existing hard drive, and installing a new hard drive. With a few basic tools and some patience, it’s a straightforward process that most PS4 owners can tackle themselves. In this guide, we’ll walk you through the steps for safely removing the hard drive from your PS4.
Why Would You Want to Remove the PS4 Hard Drive?
There are a few key reasons you may want to remove and replace the PS4 hard drive:
- Upgrade to a larger capacity hard drive – The base PS4 comes with a 500GB hard drive, but games and their updates take up a lot of space. Upgrading to a 1TB or 2TB hard drive gives you a lot more breathing room.
- Replace a failed or damaged drive – If your existing PS4 hard drive stops working or becomes corrupted, replacing it with a new drive will get your console working again.
- Perform a clean system install – Wiping your PS4 hard drive and doing a fresh system install can clear out bugs, improve system performance, and remove unwanted data.
So if you need more space, are having hard drive issues, or just want to start fresh, removing and replacing the PS4 hard drive is a worthwhile endeavor.
What You’ll Need
Before getting started, make sure you have the following tools and parts on hand:
- Phillips head screwdriver
- Replacement 2.5″ SATA hard drive (compatible options listed below)
- External hard drive enclosure (optional, for reusing old hard drive)
- USB thumb drive
For the new hard drive, you’ll want a 2.5″ form factor SATA HDD or SSD with a capacity between 250GB to 8TB. Some popular models include:
- Samsung 870 EVO SSD (up to 4TB)
- WD Blue Mobile Hard Drive (up to 2TB)
- Seagate FireCuda SSHD (up to 2TB)
- HGST Travelstar 7K1000 (up to 1TB)
Any 2.5″ drive between 9.5mm and 15mm thickness will fit in the PS4 hard drive bay. Just make sure you get a drive with enough capacity for your needs.
Backing Up Your Data
Before cracking open your PS4, it’s highly recommended you back up your game data, saved games, settings, screenshots and video clips. This will allow you to restore everything to your new hard drive once it’s installed.
There are two ways to back up PS4 data:
PS Plus Cloud Storage
If you subscribe to PlayStation Plus, you can sync your PS4 game saves and settings to the cloud. Insert the USB thumb drive into your PS4 and go to Settings > Application Saved Data Management > Saved Data in System Storage > Upload to Online Storage. This will copy your key data to the cloud.
External Hard Drive
You can also back up data to an external USB hard drive. Just connect the drive to your PS4, go to Settings > System > Back Up and Restore, and select Back Up PS4. This will copy all data from the system storage to your external drive.
After backing up your data using one of those methods, you’re ready to safely remove the PS4 internal hard drive without worrying about data loss.
Powering Down
Start by powering your PS4 all the way down – don’t just put it into Rest Mode. Hold the power button down until you hear two beeps. The system will fully shut down.
Once powered off, unplug the PS4 power cable from the back and disconnect any other cables or peripherals. Now it’s safe to open up the console.
Removing the PS4 Hard Drive Cover
The PS4 slim and PS4 Pro have slightly different case designs. Here are the steps for both models:
PS4 Slim
1. Place your PS4 Slim upside down and look for the hard drive cover. It’s the small plastic piece with a PlayStation symbol on the left side of the console bottom.
2. There is a blue pull tab sticking out from the cover. Slide the blue tab to the left to release the hard drive cover latch.
3. Lift off the hard drive cover. There is a screw still holding it in place, so don’t yank it.
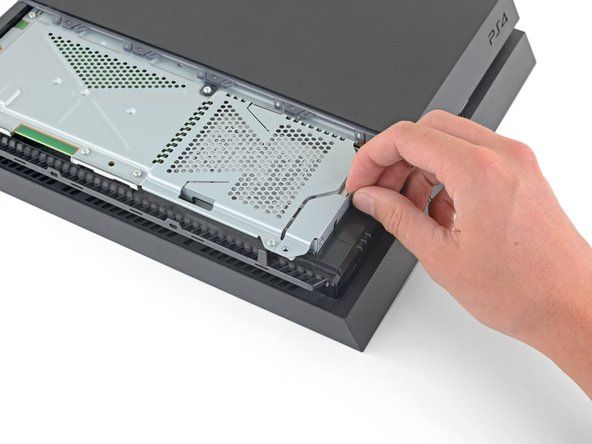
PS4 Pro
1. Place your PS4 Pro upside down and locate the hard drive bay cover. It’s the shiny plastic piece in the lower left of the console bottom.
2. Pull up gently on the cover. There are two plastic clamps securing it, one on the left and one on the right.
3. After unclipping both sides, you can fully remove the hard drive cover.
With the covers off both models, you now have access to the internal hard drive.
Removing the Hard Drive Mounting Bracket
The hard drive is secured in a metal mounting bracket with four screws – two per side. Use your Phillips head screwdriver to unscrew all four screws. Be sure not to lose these tiny screws!
Once all four screws are out, you can slide the hard drive and bracket out together. The SATA and power cables will still be attached to the back of the hard drive.
Disconnecting the Hard Drive Cables
With the hard drive partially out, you’ll need to disconnect the two cables attached to the rear:
1. Grab the small black SATA data cable and gently pull it straight out. Don’t yank it!
2. For the wider power cable, press down on the plastic release tab with your finger. This will loosen the cable so you can pull it out.
3. With both cables detached, you can fully remove the hard drive and bracket.
Installing the New Hard Drive
Now it’s time to reverse the process and install your shiny new hard drive:
1. Place the new hard drive into the mounting bracket. The label on the drive should face up and the SATA ports should align with the open edge.
2. Slide the hard drive into the PS4 hard drive bay and secure the bracket using the four Phillips screws you removed earlier.
3. Reconnect the SATA cable to the hard drive port on the left side. Push the cable in gently until it clicks.
4. Reconnect the wider power cable on the right. Make sure the plastic release tab clicks back into place.
5. Double check that both cables are securely attached. Don’t bend or pinch the cables.
6. Replace the hard drive bay cover on the underside. Snap it back into place.
The physical hard drive replacement is complete! Now you just need to reinstall the system software.
Reinstalling the PS4 System Software
To finalize the hard drive swap, you’ll need to format the new drive and install a fresh copy of the PS4 system software:
1. Download the latest PS4 reinstallation file from Sony’s website to your computer.
2. Copy the file over to a USB thumb drive. The file must be in a folder called PS4 > Update on the root of the drive.
3. Insert the USB drive into your PS4 and power it on.
4. The PS4 will boot into Safe Mode and recognize the system update file.
5. Follow the on-screen prompts to initialize the new hard drive and install the software.
6. Once complete, you’ll be able to log into your PSN account and re-download games and apps.
Restoring Your Backed Up Data
If you backed up your PS4 data earlier, you can now restore it:
For PS Plus cloud saves – log into your PSN account and sync the latest cloud data. It will download onto your new hard drive.
For an external hard drive backup – connect the drive to your PS4 and go to Settings > System > Back Up and Restore. Select Restore PS4 and it will copy all data back to the new system storage.
That’s it! With your files and settings restored, it will be like nothing ever changed. Enjoy your PS4’s new and improved storage capacity.
Conclusion
Removing and replacing the PS4 hard drive is a straightforward DIY job if you follow the steps carefully. Just make sure to back up important data in advance, assemble the necessary tools, and take your time disconnecting the cables. With a little patience, you’ll have your PS4 back up and running with a brand new hard drive. The end result is well worth the effort – a storage boost for all your gaming needs.