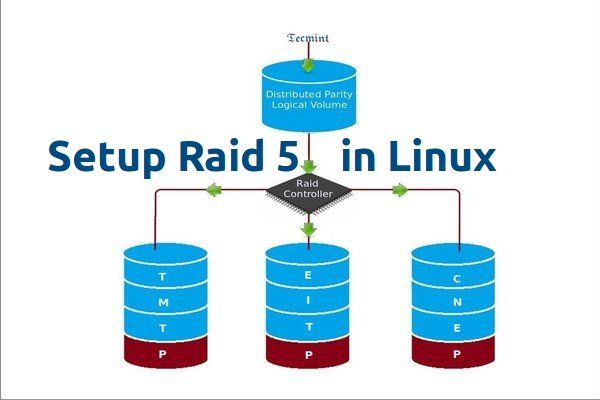
RAID 5 is a type of redundant array of independent disks (RAID) configuration that combines disk striping with distributed parity (Source: https://www.techtarget.com/searchstorage/definition/RAID-5-redundant-array-of-independent-disks). It requires a minimum of three disks, with data blocks striped across the disks and parity information distributed across all disks.
The key benefits of RAID 5 include (Source: https://en.wikipedia.org/wiki/Standard_RAID_levels):
- Good performance – data is striped across multiple disks for faster reads/writes
- Redundancy – parity allows data recovery in case of disk failure
- Efficiency – does not require as much disk space for redundancy compared to RAID 1 mirroring
RAID 5 is commonly used in situations where redundancy is desired without sacrificing too much disk space or performance. Typical use cases are for storage servers, databases, and other applications requiring high availability and recoverability (Source: https://www.ionos.com/digitalguide/server/security/raid-5/).
Hardware Requirements
RAID 5 requires a minimum of three hard drives to implement, though most configurations use four or more drives for additional storage capacity and performance benefits (Source). All of the drives in the array should be of similar capacity to fully utilize the total available storage. For optimal performance, it is recommended to use enterprise class hard drives designed for RAID configurations, which typically offer better reliability and higher input/output operations per second (Source).
The RAID controller is a key hardware component, providing the interface between the drives and computer system. Most dedicated RAID controllers support RAID 5, though some integrated motherboard controllers may lack RAID 5 capability. The RAID controller should have enough ports to connect the number of drives required (Source).
OS Requirements
The main operating system compatibility considerations for RAID 5 are driver support and partition size limits. Most modern Windows, Linux, and Unix-based operating systems include built-in drivers to support RAID 5 configurations. However, you may need to install additional RAID drivers for your specific RAID controller if the built-in OS drivers do not detect or configure the array properly.
For Windows, RAID 5 is supported in Windows 8/8.1, Windows 10, Windows Server 2012 and newer versions. Make sure to install the latest RAID driver from your hardware vendor during OS installation. Some limitations around partition sizes exist in older Windows versions when using large capacity hard drives in a RAID 5 array. Refer to Microsoft’s documentation on partition alignment and size limits.
For Linux, most common distros like Ubuntu, Debian, CentOS have RAID 5 capability built-in via mdadm or other tools. The Linux RAID wiki provides an extensive overview of configuring software RAID on Linux.
On Mac OS X, SoftRAID and AppleRAID can configure RAID 5 arrays. Third-party tools may be required for more advanced management capabilities.
Overall, RAID 5 compatibility and driver support is quite mature across operating systems. Just be aware of any partition alignment or size limits based on your OS version and disk capacity.
BIOS Configuration
The first step in configuring RAID 5 is to enable RAID mode in the BIOS. This allows the motherboard’s RAID controller to detect the drives and configure them into a RAID array. To enable RAID mode:
1. Restart your computer and enter the BIOS setup utility by pressing the designated key during boot, often Delete or F2.
2. Navigate to the Advanced menu and locate the setting for SATA Operation Mode. Set this to RAID mode rather than AHCI or IDE mode. The setting may also be labeled RAID/AHCI Mode or similar.
3. Save changes and exit BIOS. The system will briefly enter the RAID configuration utility before booting to the OS.
Enabling RAID mode allows the necessary low-level communication between the drives and RAID controller. With RAID mode active, you can proceed to creating the RAID 5 array within the RAID configuration utility.
For more details, refer to your motherboard manual or manufacturer’s instructions for accessing BIOS and enabling RAID mode. Steps may vary across systems.
RAID Controller Configuration
To configure RAID 5 on a Dell server, you will need to enter the RAID configuration utility. This is done by pressing F10 during system boot to access the Dell PERC configuration menu.
Once in the PERC configuration, select the RAID controller you wish to configure. Then select the drives you want to include in the RAID 5 array by checking the boxes next to each drive.
After selecting the drives, choose the option to create a new virtual disk. On the next screen, select RAID 5 as the RAID level. You can also configure additional options like stripe size on this screen before confirming to create the RAID 5 array.
According to Dell’s instructions, once you have selected the RAID type, disk format, media type, interface, and sector size, confirm the configuration to build the virtual disk.
The controller will then initialize and begin building the RAID 5 array in the background. You can monitor the progress if desired. But once initialized, the RAID 5 configuration will be active on the next reboot.
Creating the Array
The first step in creating a RAID 5 array is initializing the disks that will be part of the array. This is done using the RAID configuration utility in the system BIOS or RAID controller configuration utility during system startup. The disks must be set to non-RAID or JBOD mode before being added to the RAID 5 array [1].
Once the disks are initialized, the next step is to create the RAID 5 array. This is done by selecting the option to create a new array and choosing RAID 5 as the RAID level. The configuration utility will then prompt you to select the disks to include in the array [2]. Be sure to select at least 3 disks for the RAID 5 array.
After selecting the disks, the utility will begin building the array by writing the RAID configuration information to the disks. This can take some time to complete depending on the size and number of disks. When finished, the RAID 5 array can be accessed, but it will need to be formatted before data can be stored.
The recommended format for RAID 5 arrays is NTFS for Windows or ext4 for Linux. Use the operating system’s disk management utility to format the RAID 5 array volume. Once formatted, the RAID 5 array is ready for data storage and usage as a normal disk volume [1].
Monitoring and Maintenance
Monitoring and performing routine maintenance is important for ensuring the health and performance of a RAID 5 array. There are several key things to monitor and maintain:
Checking Array Status
Most RAID controllers include software for monitoring array status. It’s important to regularly check the status to verify all drives are online and functioning properly. Look for any errors, failed drives, or degraded performance (Source).
Scheduling Regular Checks
Rather than manually checking array status, it’s better to schedule automatic checks on a daily or weekly basis. Most RAID software allows creating scheduled checks to proactively identify any developing issues (Source).
Handling Drive Failures
Inevitably, drives will occasionally fail in a RAID 5 array. When a drive fails, the array will switch to a degraded state and continue operating using parity data. However, the failed drive should be replaced as soon as possible to restore redundancy. The array will automatically rebuild using the new replacement drive (Source).
Expanding the Array
One advantage of RAID 5 is the ability to easily expand storage capacity by adding additional drives to the array (source: https://www.easeus.com/partition-master/expand-raid-5-array.html). This can be done without reformatting the existing disks or reconfiguring the array.
To expand capacity, simply add the new disks to empty bays in the RAID enclosure. Then use the RAID controller’s management software to identify the new disks and add them to the existing array. The RAID controller will re-stripe the data across all disks, including the new ones, transparently expanding the total capacity.
The process is straightforward, but there are some best practices to follow (source: https://serverfault.com/questions/274743/setting-up-a-raid-5-with-expansion-in-the-future-in-mind):
- Add drives of the same size as existing ones to avoid wasting space.
- Expand capacity gradually (e.g. one drive at a time) rather than all at once.
- Allow the RAID controller time to re-stripe data after adding new drive(s).
With proper planning and care, expanding a RAID 5 array can significantly increase storage capacity without downtime or data loss.
Migrating the Array
When migrating a RAID 5 array to a new server or controller, there are a few key considerations. The main challenge is moving the array while maintaining the existing configuration and data integrity. Here are the main steps for migrating a hardware RAID 5 array to new hardware:
First, it’s important to verify that the new controller or server hardware is compatible with the existing RAID 5 configuration. The new hardware should have the same or greater capacity to avoid issues (1).
Next, shut down the server gracefully and remove the physical hard drives. Be sure to label each drive according to its order and slot location. Then, install the drives in the same order in the new server hardware.
Boot into the RAID configuration utility on the new controller and import or migrate the existing RAID 5 array. The utility should detect the existing configuration on the drives. Accept any prompts to assemble or import the array.
Once the array is fully migrated, check the integrity and usability of the array. Run diagnostics tests and verify you can access the data as expected. It’s a good idea to back up critical data immediately in case there are any issues.
With proper planning and care, it is possible to migrate RAID 5 arrays to new hardware and retain full use of the data. Just be sure to follow precautions and verify compatibility and integrity at each step of the process.
Alternative RAID Configurations
RAID 5 is a popular RAID configuration for many use cases, but there are some alternative RAID configurations that have their own pros and cons compared to RAID 5:
RAID 10
RAID 10 combines mirroring and striping by creating a mirrored set of drives and then striping data across the sets in chunks. This provides high performance and fault tolerance, but has a high cost since it requires at least 4 drives (RAID 5 vs RAID 10 – Difference and Comparison).
Pros:
- Very high read/write performance
- High fault tolerance
Cons:
- High disk space overhead – uses at least 4 drives
- More expensive than RAID 5
RAID 6
RAID 6 is similar to RAID 5 but provides double distributed parity, allowing for two drive failures without data loss. This comes at the cost of reduced write performance (RAID 10 vs. RAID 5: When to use each level and why).
Pros:
- Can survive two drive failures
- Read performance similar to RAID 5
Cons:
- Slower write performance than RAID 5
- Higher disk space overhead than RAID 5