Initializing a new disk is an important step when setting up a computer system. It prepares the disk for use by creating partitions and file systems. This guide will walk you through the steps for initializing disk 1 on your computer.
What is disk initialization?
Disk initialization is the process of preparing a new, blank disk for use. It involves:
- Creating partitions on the disk
- Formatting partitions with a file system
- Assigning drive letters to the partitions
This process divides up the available space on the disk into sections that can store files and install operating systems. It also structures the space so the computer can read and write data.
When to initialize a disk
There are a few situations when you need to initialize a disk:
- Setting up a brand new storage drive
- Connecting an external USB drive or hard drive that needs to be formatted before use
- Repartitioning a drive to change the partition layout
- Reformatting a drive to completely erase its contents
For new drives, initialization is required before the drive can be used. For existing drives, initialization will erase all data on the drive, so important files should be backed up first.
How to initialize disk 1
The steps to initialize disk 1 may vary between different operating systems. Here are the general steps to follow:
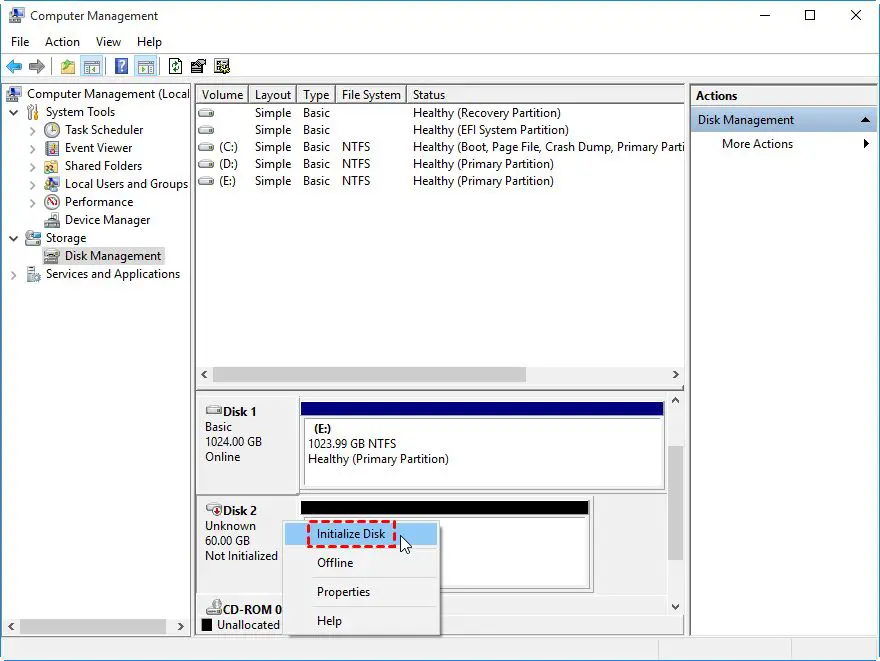
- Open the Disk Management utility. On Windows, right click the start menu and select “Disk Management”. On Mac, open Utilities and select Disk Utility.
- Locate disk 1 in the list. This will likely be labeled as “Disk 1” and have the size of the disk listed.
- Right click on the disk and select “Initialize”. This will launch the Initialize Disk wizard.
- Select the partition style – MBR or GPT. MBR is compatible with older systems while GPT supports larger disks.
- The disk will now be initialized. Right click it again to create new partitions.
- Select your desired partition sizes. Make at least one partition that fills most of the disk space.
- Assign drive letters to the partitions.
- Format the partitions using NTFS or exFAT file systems.
Partitioning and formatting the disk
As part of initialization, you will need to setup partitions on the disk. This divides the available space into sections for storing files and installing operating systems.
Common partition options include:
- A single large partition taking all available space
- A smaller system partition for installing OS files and a larger partition for data
- Multiple smaller partitions for organizing different types of files
You should also format each partition with a file system such as NTFS or exFAT. This structures the partition so it can reliably store files on your operating system.
MBR vs GPT partition styles
There are two main partitioning schemes used when initializing disks:
- MBR – Master Boot Record. The traditional style used for most disks. Supports up to 4 primary partitions.
- GPT – GUID Partition Table. A newer method required for larger disks. Supports unlimited partitions.
MBR has the following limitations:
- Supports disks up to 2 TB in size only.
- Only allows up to 4 primary partitions.
- Older systems may not recognize GPT disks.
GPT provides more flexibility for larger drives and has no real downsides for modern systems. But MBR may be better for compatibility with older computers.
MBR vs GPT – Comparison
| Method | MBR | GPT |
|---|---|---|
| Disk size limit | 2 TB | 9.4 ZB |
| Max partitions | 4 primary | Unlimited |
| Old OS support | All | Windows Vista+, Mac OS X 10.5+ |
File system options
Once partitions are created, you need to format them with a file system. This organizes the data so files can be stored, retrieved and accessed reliably from the disk.
Common file system choices include:
- NTFS – Modern Windows file system. Supports permissions and large files.
- exFAT – Compatible with Mac and Windows. No permissions or limits on file sizes.
- FAT32 – Older file system. Compatible with all OSes but has limits.
- APFS – Apple’s modern file system for SSDs.
- ext4 – Linux file system. Includes journaling for reliability.
For disks used solely on Windows, NTFS is recommended. exFAT is a good cross-platform choice for external disks used on Windows and Mac.
Common file systems comparison
| File system | OSes | File sizes | Permissions | Journaling |
|---|---|---|---|---|
| NTFS | Windows | Unlimited | Yes | Yes |
| exFAT | Windows, Mac | Unlimited | No | No |
| FAT32 | All | 4 GB max | No | No |
| APFS | Mac, iOS | Unlimited | Yes | Yes |
| ext4 | Linux | Unlimited | Yes | Yes |
Choosing disk initialization options
When initializing a disk, you will need to make choices about:
- Partition style – MBR or GPT. Use GPT for new large disks.
- Partitions – Number, sizes and types of partitions to create.
- File system – NTFS, exFAT, etc. Match this to your OS and needs.
- Drive letters – Assign letters like C: and D: to partitions.
Consider how you intend to use the disk. Here are some general tips:
- Use at least two partitions – one for OS and programs, one for data.
- Make the OS partition 30-50% of disk space.
- For Windows disks, format partitions with NTFS.
- For external disks, use exFAT for wide compatibility.
Initializing disk using DiskPart
DiskPart is a command line disk partitioning tool in Windows. Here are the steps to use it to initialize a disk:
- Open the Command Prompt as administrator.
- Type diskpart and press Enter.
- Type list disk to show disks. Identify disk 1.
- Type select disk 1 to select disk 1.
- Type clean to remove any existing partitions.
- Type create partition primary to create a primary partition.
- Repeat step 6 to create additional partitions.
- Type format fs=ntfs quick to format each partition with NTFS.
- Type assign to give drive letters to partitions.
This will initialize disk 1, create partitions, and format the partitions. Be sure to replace “ntfs” with your desired file system.
Initializing disk on Mac
To initialize a disk on Mac OS X, use the Disk Utility application:
- Open Disk Utility
- Select the new disk on the left sidebar.
- Click the Erase button.
- Enter a name for the disk.
- Select a compatible format like Mac OS Extended if for Mac only, or ExFAT for cross-platform.
- Click Erase to initialize the disk.
- The disk will now show available space that can be partitioned.
- Click the Partition button to create partitions.
- Select partition sizes and formats.
- Click Apply to create the partitions.
This will initialize the disk, erase any previous data, format it, and partition the available space on Mac.
Tips for initializing disks
Here are some useful tips when initializing a disk:
- Back up any important data first before initializing.
- Use GPT if supported by your OS and hardware.
- Leave room for additional partitions in case you need to expand.
- Use GUID partition types for added data redundancy.
- Format partitions with file systems optimized for your needs.
- Understand your OS disk formatting requirements.
- Use simple partition naming schemes for easy identification.
Take the time to consider your partitioning and format options carefully when initializing new disks. This will provide maximum flexibility and performance.
Troubleshooting disk initialization
If you run into issues initializing a disk, here are some troubleshooting tips:
- Use manufacturer tools to update disk controller or drive firmware.
- Check cables and connections to ensure disk is being detected properly.
- Try a different SATA port or cable if not being recognized.
- Use DiskPart clean command to erase any stubborn existing partitions.
- Convert between MBR and GPT if having style conflicts.
- Use disk management tools instead of command line if GUI fails.
- Consult hardware vendor forums if model specific issues.
Initialization failures are often due to connection problems, outdated firmware, or incompatible settings. Consult online resources if problems persist.
Conclusion
Initializing a disk is an essential first step before using new storage drives. Carefully consider partitioning schemes, file system choices, and operating system requirements when performing initialization. Following the steps in this guide for your specific OS will ensure disk 1 is correctly prepared for usage.