Seeing an SSD in BIOS but not in Windows is a frustrating issue that prevents you from using your solid state drive. The SSD is detected by the motherboard BIOS during boot, but once Windows loads, the drive is missing from File Explorer and Disk Management. There are several potential causes for this problem:
– Faulty SSD connection – The SATA data or power cable may be loose or damaged
– Outdated BIOS – An outdated motherboard BIOS version may lack support for the SSD
– Incorrect disk controller mode – If AHCI mode is not enabled, Windows won’t see the SSD
– Uninitialized SSD – A new SSD needs to be initialized before Windows can access it
– Missing storage drivers – Windows requires SATA/NVMe drivers to communicate with the SSD
– Improper SATA port – The SSD may be connected to a faulty SATA port on the motherboard
This article will provide troubleshooting steps to identify and resolve the SSD not showing up issue in Windows. We will cover BIOS settings, driver updates, disk initialization, changing SATA ports, and performing a clean OS install. The goal is to get your SSD fully accessible in Windows for programs and data storage.
Verify the SSD Connection
One of the most common reasons an SSD may show in BIOS but not Windows is because there is a loose connection or cable issue. Before troubleshooting other potential causes, first verify the SATA data cable and power cable are properly connected between the SSD and motherboard.
Make sure both ends of the SATA data cable are securely attached. The small L-shaped SATA connector should click into place on the SSD side. On the motherboard side, make sure it is plugged into the correct SATA port according to your motherboard manual.
Likewise, inspect both ends of the power cable. The SSD requires both SATA power and data connections to function properly. If the SSD is modular or built into an M.2 slot, ensure it is fully seated and locked in place according to your computer or motherboard manual.
If you recently installed the SSD yourself, re-connect all cables and retry. Loose connections are one of the most frequent reasons for drives not being detected. Refer to your motherboard manual on proper SATA cable and power connections if still not appearing after verifying the cables.
Update BIOS
Look for BIOS updates for your motherboard from the manufacturer’s website (source). An outdated BIOS version can sometimes fail to detect new storage devices like SSDs. Check the motherboard manual or support site for instructions on how to update the BIOS. The process usually involves downloading the latest BIOS version, putting it on a USB drive, rebooting into the BIOS menu, and selecting the update option. Make sure not to interrupt the update process. After completing the BIOS update, your SSD should appear in the BIOS boot options menu. A BIOS update can resolve SSD detection issues by upgrading the SSD driver modules and boot support.
Enable AHCI
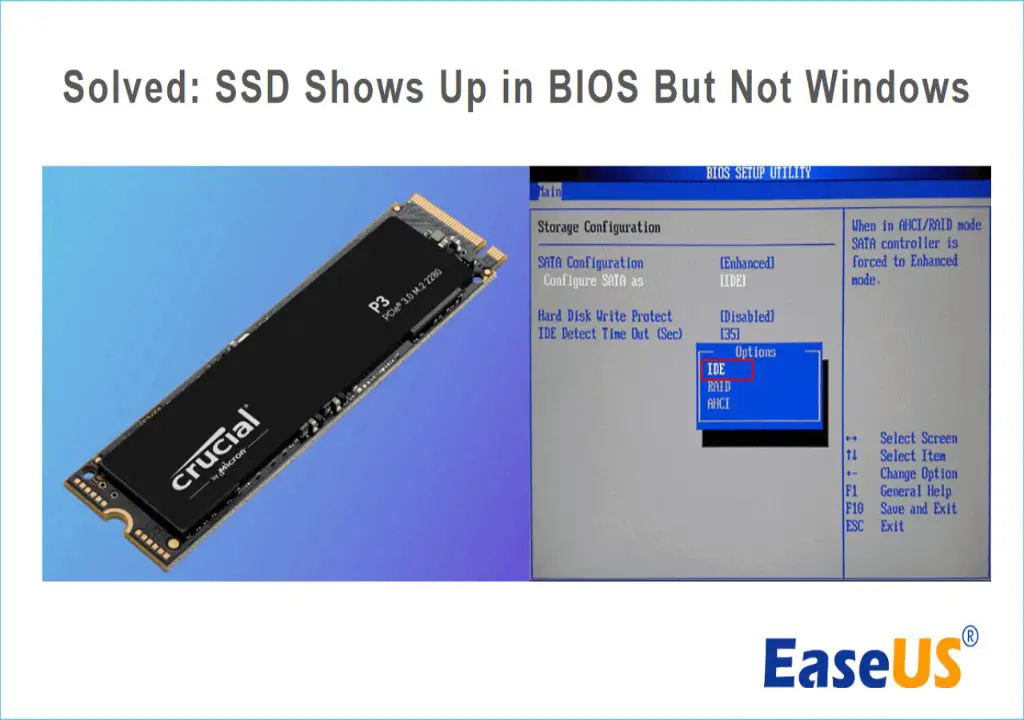
One potential reason an SSD may show in BIOS but not in Windows is if AHCI (Advanced Host Controller Interface) mode is not enabled in the BIOS. AHCI mode allows the operating system to take full advantage of an SSD’s performance capabilities. Older systems may default to IDE or RAID mode, which will not work properly with an SSD.
To enable AHCI:
- Restart your computer and enter the system BIOS, usually by pressing F2, F10 or Delete during bootup.
- Navigate to the “Advanced” tab and locate the SATA or Onboard Devices configuration menu.
- Change the SATA mode from IDE, RAID, or other settings to AHCI.
- Save changes and exit BIOS.
After rebooting, Windows should detect the SSD drive properly. You can verify AHCI mode is active by checking in Device Manager under Storage Controllers for an AHCI controller.
Enabling AHCI mode is crucial for SSD performance and stability. IDE mode can cause slow speeds, failed detection, and other issues. Always make sure AHCI is enabled if connecting an SSD.
Sources:
Check if my SSD in runing on AHCI mode inside Windows 7
AHCI on SSD:How to determine AHCI is working or not??
Initialize the SSD
One potential reason the SSD is not showing up in Windows but is detected in BIOS is because it needs to be initialized. Initializing prepares the drive by writing partition tables and file systems so the operating system can access it. To initialize the SSD, you can use the command-line tool diskpart.
To initialize the SSD with diskpart, follow these steps:
- Open the Command Prompt as administrator.
- Type diskpart and press Enter.
- Type list disk to display all disks. Note the disk number of your SSD.
- Type select disk X (replace X with your disk number).
- Type clean to delete all existing partitions on the disk.
- Type create partition primary to create a primary partition.
- Type format quick fs=ntfs to format the partition with NTFS.
- Type assign to give the partition a drive letter.
- Type exit to close diskpart.
After initializing the SSD with diskpart, it should now show up in Windows. You can open Disk Management to confirm it appears with a drive letter assigned.
Update Storage Drivers
One of the main reasons a SSD may show in the BIOS but not in Windows is outdated storage drivers. When installing a new SSD, it’s important to update the chipset and storage drivers to ensure proper compatibility and performance.
First, visit the manufacturer’s website and download the latest chipset driver for your specific motherboard model. Chipset drivers handle the communication between hardware components and the operating system. Installing the newest version can resolve SSD detection issues.
Next, get the most up-to-date storage drivers for the SSD from the manufacturer’s website as well. The storage driver manages the SSD’s functionality and an outdated version can prevent Windows from detecting the drive.
After downloading both chipset and storage drivers, install them by following the instructions provided. A system restart is required to complete the installation. With updated drivers, Windows should now properly recognize the new SSD.
For additional guidance, refer to the Storage Firmware Update driver documentation from Microsoft (https://learn.microsoft.com/en-us/windows-hardware/drivers/sfu/storage-firmware-update-driver). Updating drivers is a crucial step when installing a new SSD.
Change SATA Port
Try connecting the SSD to a different SATA port. Motherboards typically have multiple SATA ports that you can use to connect storage drives like hard drives and SSDs. If your SSD is not detected in one SATA port, switching it to a different open port may allow the system to detect it.
When changing SATA ports, be sure to fully power down the system first. Then disconnect the SATA data cable from the original port and connect it to a new port. Double check that the cable is properly seated. Power the system back on and check if the SSD is now detected in the BIOS.
According to forums on Tom’s Hardware, trying a different SATA port can resolve issues where an SSD is detected in BIOS but not showing up in Windows. The new SATA port may be better optimized for SSD communication. However, also try different SATA cables as a faulty cable could cause detection issues.
Additionally, some users on Reddit reported SSDs not being recognized after switching SATA ports. In these cases, resetting BIOS settings to defaults may restore proper drive detection. Overall, changing the SATA port is a useful troubleshooting step when an SSD is not being properly detected by the system.
ssd BIOS assignment
To make the SSD the boot drive in BIOS, you’ll need to:
1. Restart your computer and press the BIOS key, usually F2, F8, F11, or DEL, to enter BIOS settings.
2. Navigate to the boot options or boot order menu.
3. Use the arrow keys to move the SSD to the top of the boot order list. This assigns it as the primary boot device.
4. Save changes and exit BIOS.
Now when your computer starts, it should boot from the SSD instead of your old hard drive. Refer to your motherboard manual if you need exact steps for your BIOS.
Some key tips when assigning a boot drive in BIOS:
- Make sure the SSD is enabled and recognized in BIOS first.
- Watch for options like UEFI, Legacy, or CSM boot modes that may impact boot order.
- For Dell computers, press F12 on startup and select the SSD as the one-time boot device.
Properly configuring boot order in BIOS is crucial to utilizing that fast SSD drive for your operating system. Take a few minutes to get it set up right. Sources: https://www.easeus.com/partition-master/set-ssd-as-boot-drive.html, https://www.diskpart.com/articles/set-ssd-as-boot-drive-0825.html
Clean Install Windows
One solution that may resolve the issue is to do a clean install of Windows with only the SSD connected. Here are the steps:
- Disconnect any other hard drives and ensure only the SSD is connected.
- Boot from the Windows installation media and load into the setup screen.
- Delete all existing partitions on the SSD until it shows as an “Unallocated” drive.
- Create a new partition on the unallocated space.
- Format the partition.
- Proceed with a clean install of Windows on the formatted SSD partition.
Doing a clean install with only the target SSD connected forces Windows to install required storage drivers and initialize the disk properly. After Windows is up and running, you can reconnect other drives. For more details, see this guide: 3 Ways to Fix Windows Won’t Install on SSD or HDD
Conclusion
To summarize, there are various potential reasons why an SSD may show up in the BIOS but not in Windows. Some common causes include loose connections, driver issues, drive letter conflicts and compatibility modes. When troubleshooting, it’s important to methodically go through potential solutions like updating BIOS, changing SATA ports, installing the latest drivers and initializing the SSD in Disk Management. In some cases, performing a clean install of Windows may be necessary.
If the SSD still does not show up after trying the recommended steps, it’s possible the drive itself is defective and may need to be replaced. When an SSD is detected in BIOS but not Windows, don’t immediately assume the drive is beyond repair. In most cases, the issue can be resolved through careful troubleshooting and software tweaks. Persistence and checking all possibilities will eventually lead to a working SSD.
Some final tips are to always keep BIOS, chipset drivers and storage drivers updated, use the optimal SATA ports for SSD connections, maintain backup images of the system disk, and be prepared to do a fresh OS installation when drive issues arise. Following best practices for SSD care and maintenance will help avoid and resolve many startup problems.