Yes, it is possible to format a Mac hard drive to work with Windows. While Macs and Windows PCs have traditionally used different file systems, making it tricky to go back and forth, modern versions of macOS and Windows support reading and writing to each other’s disks. With a few steps, you can format your Mac’s hard drive so Windows recognizes it.
Requirements for Formatting a Mac Drive for Windows
To successfully format your Mac’s drive for Windows, you’ll need:
- An external drive or a Mac running macOS High Sierra 10.13 or later
- Administrative access on your Mac
- The desired version of Windows or the installation media
- Time and patience!
As long as your Mac meets the system requirements, you can use Disk Utility or Terminal to format the boot drive or an external drive in a Windows-compatible format. Then you can install Windows on your Mac or use the external drive with a Windows PC.
How Macs and Windows PCs Format Hard Drives
Understanding the difference between Mac and Windows disk formats helps explain why you can’t just plug a Mac’s drive into a Windows PC and expect it to work.
By default, Macs use APFS or HFS+ to format their internal SSDs and HDDs. Meanwhile, Windows PCs rely on NTFS and, in some cases, FAT32. That’s why if you plug a Mac drive into a Windows computer, it won’t recognize the disk or be able to access any of its files.
Luckily, both macOS and Windows now include native support for reading and writing disks in the other OS’s format. So with a quick reformat, you can prep a Mac drive for use with Windows.
Mac File Systems
Current Macs running macOS High Sierra 10.13 or later use the Apple File System (APFS) to format SSDs and HDDs. APFS replaced the older HFS+ file system because it offers:
- Stronger encryption
- Faster file operations
- Space efficiency optimizations
HFS+ dates back to 1998 when Apple introduced the iMac. It stands for Hierarchical File System Plus and optimizes storage on mechanical HDDs. Older Macs may still use HFS+ instead of APFS if they haven’t been upgraded to 10.13 High Sierra or later.
Windows File Systems
Consumer versions of Windows predominantly rely on two file systems to format hard drives:
- NTFS (NT File System) – The modern Windows file system used for internal HDDs and SSDs. Offers performance and security enhancements over FAT32.
- FAT32 (File Allocation Table) – An older file system still used on some external drives. Compatible with both Mac and Windows.
That’s why external hard drives usually come pre-formatted in FAT32, even though NTFS is more modern. FAT32 works seamlessly with Macs and PCs, while NTFS requires extra software on Mac.
How to Format a Mac Drive for Windows Using Disk Utility
The easiest way to format a drive to use with Windows is to use Disk Utility. Disk Utility is an app included with all versions of macOS used for erasing, partitioning, and repairing disks.
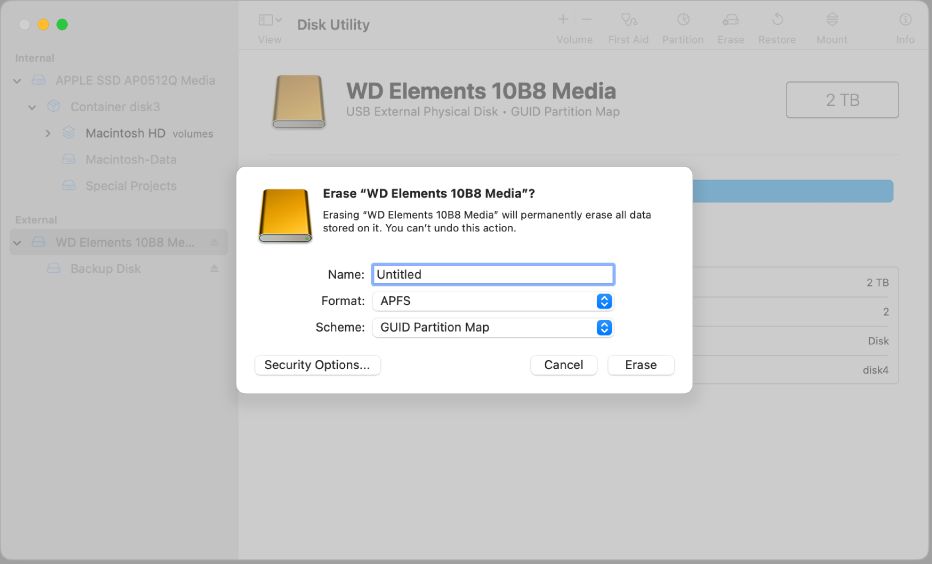
Here are the steps to format a drive in Disk Utility:
- Connect the Mac drive you want to format and launch Disk Utility.
- Select the drive from the sidebar.
- Click Erase across the top.
- Rename the drive if desired.
- Select “MS-DOS (FAT)” or “ExFAT” format.
- Click Erase to confirm.
That’s all there is to it! Once complete, the drive will be formatted to work with Windows PCs.
Picking the Right Disk Utility Format
Disk Utility gives you a couple choices for formatting your drive to work with Windows:
- MS-DOS (FAT) – FAT32 format. Compatible with all versions of macOS and Windows.
- ExFAT – Optimized for flash drives. Compatible with macOS 10.6.5 and up and Windows XP SP3 and up.
In most cases, FAT32 is the best option since it offers maximum compatibility. However, if you need support for individual files over 4GB in size, go with ExFAT instead.
When to Use Disk Utility to Format for Windows
You can use Disk Utility to format any of the following for use with Windows:
- Internal Mac hard drives
- External USB drives
- Thunderbolt drives
- RAID arrays
- SD cards
- USB flash drives
As long as your Mac runs OS X 10.6.5 Snow Leopard or later, Disk Utility can format any drive to FAT32 or ExFAT for Windows compatibility.
How to Format a Drive for Windows Using Terminal
In certain cases, it may be necessary to use Terminal instead of Disk Utility to format a drive for Windows. Reasons include:
- Disk Utility is malfunctioning or won’t recognize the drive.
- You need to format using NTFS instead of FAT32.
- You want to automate the formatting process.
Here is the basic syntax for using the diskutil command to format a drive from Terminal:
diskutil eraseDisk FORMAT NAME /dev/diskX
Replace FORMAT with NTFS, FAT32, or ExFAT as needed. Replace NAME with the volume name you want. And replace diskX with the identifier for the actual drive, such as disk2.
For example, to format “WorkDrive” as FAT32, use:
diskutil eraseDisk FAT32 WorkDrive /dev/disk2
Formatting the Startup Drive
You can also use Terminal to format your Mac’s built-in startup drive. This allows you to install Windows or another operating system in place of macOS.
To format the startup drive, first unmount it with:
diskutil unmountDisk /dev/diskX
Then run eraseDisk as usual, specifying the startup disk identifier.
Keep in mind this will delete all data on the startup drive and leave your Mac unable to boot without external media! Be sure you have backups first.
How to Install Windows on a Mac Formatted Drive
Once you format a Mac hard drive or external disk to a Windows-compatible format, you have a couple options for installing and running Windows:
- Use Boot Camp Assistant to dual boot Windows/macOS
- Install Windows directly to an external drive
- Connect the external drive to a Windows PC
Which method works best depends on your specific goals and setup.
Option 1: Use Boot Camp Assistant
The best way to run Windows on a Mac is using Boot Camp, Apple’s official dual boot utility. Boot Camp Assistant allows you to install Windows directly to your Mac’s internal drive alongside macOS, without overwriting your macOS installation.
To use Boot Camp Assistant:
- Format the startup drive as FAT32 using Disk Utility.
- Open Boot Camp Assistant and follow the on-screen instructions.
- Insert your Windows installation disk and install Windows to the partition Boot Camp created.
- Configure the startup disk in System Preferences.
Now your Mac can boot natively to either macOS or Windows. No need for an external drive!
Option 2: Install Windows to an External Drive
If you don’t want to native dual boot, formatting an external drive lets you install Windows itself to the drive. Then whenever you want, you can connect the drive and boot from it to run Windows on your Mac.
To install Windows to an external formatted Mac drive:
- Connect the external drive while holding the Option key to start from external media.
- Boot from your Windows installation disk.
- When prompted, select the external drive to install Windows to.
- Finish the Windows installation.
This approach lets you access Windows on any Mac, without dual booting a single Mac. Just connect the drive and reboot!
Option 3: Connect the Formatted Drive to a Windows PC
You can also format an external Mac drive and then connect it directly to a Windows PC. Since it’s formatted in a Windows-compatible file system, the PC will recognize the drive and be able to fully access the contents.
This approach lets you use a spare Mac drive as expanded storage space for accessing files from a Windows computer. Just connect the drive, access the files you want, and disconnect when done.
Tips for Using a Mac Drive with Windows
Following some best practices helps ensure compatibility and performance when using a formatted Mac drive with Windows:
- Use NTFS for Boot Camp or external Windows installations, FAT32 for simple file transfers.
- Allow Windows to run its own disk checks, don’t skip chkdsk.
- Install the latest macOS and Windows updates.
- Don’t force dismount the Windows volume from macOS.
- Use a Windows antivirus and firewall software.
While using Windows on a Mac has gotten much easier, it still requires care to avoid file system corruption or other issues. Allowing Windows to check the disk it’s installed to on boot helps avoid problems.
Troubleshooting Windows Detection of a Formatted Mac Drive
In some cases, you may format a Mac drive for Windows but find Windows still doesn’t recognize the drive. Some troubleshooting tips include:
- Try a different cable or USB port if it’s an external drive.
- Restart both the Mac/PC and drive.
- Repartition the drive using Disk Management in Windows.
- Open Disk Utility and verify/repair the disk.
- Reformat the drive using a Windows PC.
If those basic steps don’t resolve the issue, you may need to repartition the drive and reformat as NTFS instead of FAT32 for better compatibility.
Conclusion
While Macs and Windows PCs have not always played nice together, modern versions include much improved cross-compatibility. With just a quick format, you can prepare any Mac hard drive for use with Windows.
The best methods are using macOS’s Disk Utility or Terminal to format a drive as FAT32 or ExFAT. From there, you can install Windows directly to the formatted startup or external drive. Or connect the external disk to a Windows PC to access the contents.
With just a few clicks or commands, any Mac disk can be ready to work seamlessly with Windows. So reformatting a spare Mac drive is an easy way to expand your Windows storage or try out macOS and Windows side-by-side.
| Format | Compatible OS | Max File Size |
|---|---|---|
| FAT32 | Windows, macOS | 4GB |
| exFAT | Windows Vista SP1+, macOS 10.6.5+ | 16EB |
| NTFS | Windows | 16EB |