Formatting a hard drive erases all data on the drive and prepares it for use with a specific operating system. You may want to format a Mac hard drive on a Windows PC in order to use that drive interchangeably between both operating systems. By formatting the drive to be compatible with Windows and Mac, you can easily share files and transfer data between computers running either OS.
Formatting a drive erases all existing data, so it’s important to back up any files you want to keep before formatting. Once formatted for dual use, the hard drive can then be used to transfer files or share storage space on both Macs and Windows PCs.
Compatibility Issues
By default, Mac hard drives use the HFS+ file system format which is proprietary to macOS. Windows cannot directly recognize or interact with HFS+ formatted drives. When you connect a Mac HDD to a Windows PC, it will not show up in File Explorer or Disk Management without additional software.
This incompatibility exists because Apple utilizes the HFS+ format while Microsoft’s Windows operating systems use NTFS formatting. These two file systems differ in their structures and protocols, which prevents cross-platform operability. Essentially, Windows lacks the ability to natively read, write, or modify partitions and data on an HFS+ formatted drive. This can make it challenging to access files stored on a Mac hard drive when using Windows.
According to this Quora post, Microsoft has not added native HFS+ support to Windows 10 and is unlikely to do so in the future due to competitive factors with Apple.
Requirements
To format a Mac HDD on a Windows PC, you will need the following:
- A Windows PC – You will need access to a Windows PC in order to format the Mac HDD. The Windows PC needs to be running Windows 7 or later.
- The Mac HDD – The internal or external hard drive that you want to format so it can be used with both Mac and Windows computers.
- A USB interface/enclosure – If you are formatting an internal Mac hard drive, you will need to remove it and connect it to your Windows PC using a USB enclosure or adapter cable. This allows the Windows PC to access the Mac drive.
Make sure you have these three key requirements before attempting to format the Mac HDD on a Windows PC. Having the necessary equipment will allow the process to go smoothly.
Using Disk Management
Windows Disk Management is a built-in Windows tool that allows you to manage internal and external drives. It can be used to format HDDs and SSDs, change drive letters, create partitions, and more. Disk Management can format Mac HDDs, but only to the NTFS or exFAT file systems – not to the native Mac formats HFS+ or APFS.
When connecting a Mac HDD to a Windows PC and opening Disk Management, the drive may show up as an “Unknown” and “Not Initialized” disk. To format it, simply right-click on the disk and select “Initialize Disk”. Choose the partition style (MBR or GPT) and then right-click on the unallocated space to create a new simple volume. When prompted, select NTFS or exFAT as the file system.
While Disk Management provides a simple way to format a Mac drive to NTFS/exFAT on Windows, it does not allow formatting to HFS+ or APFS. To write to the native Mac formats, third-party tools or a Mac computer are required. Overall, Disk Management is convenient for basic formatting tasks, but lacks full compatibility with Mac drives.
Sources:
https://discussions.apple.com/thread/3978437 [1]
https://toolbox.easeus.com/ntfs-mac-tips/format-disk-to-ntfs-on-mac-using-terminal.html [2]
Third-Party Tools
There are several third-party tools available that allow Windows users to format drives to HFS+. Some popular options include:
Paragon HFS+ for Windows is a software program specifically designed to enable read and write access to HFS+ drives on Windows. It allows you to format drives to HFS+ directly within Windows.
MacDrive is another program that enables Windows to recognize HFS+ drives and mount the volumes for access. It can also be used to format drives to HFS+.
Tools like HFSExplorer provide read/write access to HFS+ volumes and allow formatting drives as well. They offer an alternative to paid solutions like Paragon HFS+.
Overall, third-party tools provide the simplest way for Windows users to format to HFS+ without needing a Mac. They handle the formatting process directly within the Windows environment.
Boot Camp
One way to format a Mac HDD for Windows compatibility is by using Apple’s Boot Camp Assistant software. Boot Camp allows you to install Windows directly onto your Mac’s internal or external hard drive by creating a partition specifically for Windows.
To use Boot Camp Assistant, first make sure you have a Windows ISO file and enough storage space on your Mac’s HDD. Then launch Boot Camp Assistant and follow the onscreen instructions to partition your drive. Boot Camp will automatically format the Windows partition using the NTFS file system required by Windows.
Once Boot Camp partitions and formats part of your Mac HDD for Windows, you can install Windows by booting from the Windows installer USB drive. The Windows partition will be visible and accessible once Windows is fully installed. This allows your Mac to dual boot into either macOS or Windows.
For more details, see Apple’s guide on using Boot Camp Assistant: https://support.apple.com/hr-hr/guide/bootcamp-assistant/bcmp09f5f773/mac
Virtual Machine
One option for formatting a Mac HDD on a Windows machine is to use a virtual machine (VM). A VM allows you to run macOS within your Windows operating system. This gives you access to Disk Utility and other Mac tools to format the drive. Some ways to create a Mac VM on Windows include:
Using software like VMware Workstation Player or VirtualBox to install macOS on the VM. You’ll need access to a macOS installer image.
Using a prebuilt macOS VM solution like macOS Unlocker for VMware. This can simplify the VM setup process.
Once the VM is running macOS, you can connect the Mac HDD and launch Disk Utility to erase, reformat, and partition the drive for use with both Windows and macOS.
Running macOS in a VM allows you to format the HDD without access to a real Mac. But performance may be slower than using Boot Camp or a real Mac. The VM software and macOS license also cost money to purchase legally.
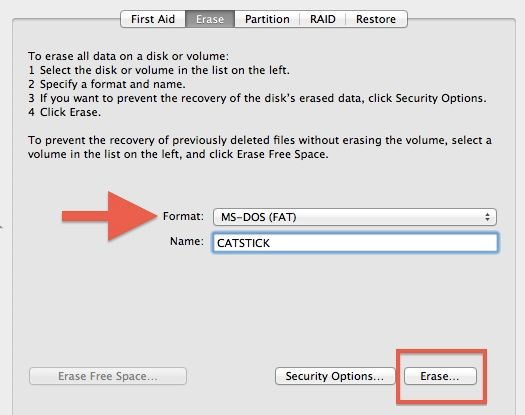
On a Mac
The easiest way to format a hard drive to work with a Mac is to use the built-in Disk Utility application. Disk Utility allows you to erase, partition, and reformat drives connected to your Mac. Here’s how to use Disk Utility to format a drive:
1. Connect the external hard drive to your Mac.
2. Open Disk Utility (located in Applications > Utilities).
3. Select the external hard drive on the left side of the Disk Utility window.
4. Click “Erase” at the top of the window.
5. Choose a name, format (APFS or Mac OS Extended (Journaled) are recommended for Macs), and scheme for the drive.
6. Click “Erase” to confirm and format the drive.
Formatting with Disk Utility is the preferred method since it’s built into macOS and optimizes the drive to work seamlessly with Apple computers. The process is quick, easy, and ensures maximum compatibility [1].
Limitations
There are some limitations to consider when formatting a Mac HDD on Windows. The main one is the lack of full HFS+ support. HFS+ is the default file system for Mac OS, but it is read-only on Windows without additional software. Windows cannot be installed onto an HFS+ formatted drive. This presents compatibility issues if you need to use the external drive between Mac and Windows regularly. While options like exFAT and FAT32 work on both operating systems, they lack some of the more advanced features of HFS+ like journaling and case sensitivity.
Conclusions
To summarize, it is possible to format a Mac HDD on Windows but there are some limitations. The best options are to use Windows built-in Disk Management utility, third-party formatting tools designed for this purpose, or create a Boot Camp partition to have a Windows system on your Mac.
The most seamless way is to format the drive as exFAT which has the benefit of being compatible on both Windows and Mac operating systems. However, there are downsides like lack of journaling and file size limits.
For full Windows compatibility, NTFS is recommended but it requires installing additional software on Mac to enable write capabilities. FAT32 is an option too but has the downside of a maximum 4GB file size.
In conclusion, for external storage exFAT is generally the best option for sharing between Windows and Mac. For Boot Camp, NTFS is preferred. And for internal Mac drives, APFS or Mac OS Extended are recommended depending on your Mac OS version.