What is NTFS?
NTFS, which stands for New Technology File System, is a proprietary file system developed by Microsoft for its Windows NT operating system. It was introduced in 1993 with Windows NT 3.1 and continues to be the default file system for later Windows NT-based operating systems, including Windows 10 and Windows Server 2016. (Source: NTFS definition)
NTFS uses a file allocation table and metadata to organize and manage files. It supports advanced file management capabilities such as file compression, encryption, permissions, auditing and journaling. Compared to older file systems like FAT32, NTFS allows for larger file and partition sizes and offers improved reliability and disk space use. (Source: Wikipedia)
Overall, NTFS provides modern features for increased performance, security and data integrity. Its journaling file system checks disk integrity and quickly recovers from crashes or power outages. This makes NTFS well-suited for server, workstation and high-end PC environments. However, it is proprietary to Windows systems.
Benefits of NTFS for USB drives
NTFS offers several key advantages that make it a good choice for USB drives, especially compared to the older FAT32 file system.
One major benefit of NTFS is support for large file sizes. While FAT32 limits individual files to 4GB, NTFS supports much larger file sizes – up to 16 exabytes theoretically. This makes NTFS ideal for use with large media files, disk images, backups, and other large data transfers via USB drive.
NTFS also provides more advanced security features like file permissions, encryption, and auditing. You can restrict access to sensitive files on an NTFS formatted USB drive. This helps protect your data if the drive is lost or stolen.
Additionally, NTFS offers better cross-platform compatibility compared to FAT32. While not natively supported on macOS, NTFS drives can be accessed on Mac computers through the use of third-party software drivers. This allows the same NTFS formatted drive to be used between Windows and Mac machines.
So in summary, the key advantages of using NTFS on USB drives are: support for large files beyond 4GB, built-in security features, and wider compatibility between operating systems. These make NTFS a robust modern file system well-suited for external storage devices.
Challenges of formatting to NTFS on Mac
Unlike Windows, macOS does not include built-in support for reading and writing to NTFS drives. The native macOS file system is HFS+, while NTFS is developed by Microsoft for Windows operating systems. This means that Macs cannot format drives to NTFS or write files to NTFS-formatted drives without additional software.
By default, Macs can only read NTFS drives in a limited fashion. You can view files on the drive but cannot edit, delete, move, or rename them. To fully access NTFS drives, you need to install third-party NTFS drivers on your Mac.
Some common challenges when formatting NTFS drives on Mac include:[1]
- Lack of full read/write access without additional software
- Issues writing data and saving files to NTFS drives
- Corrupted data or unmountable drives after forced writes
- Problems ejecting and remounting NTFS drives
- Adding/deleting files can cause crashes or data loss
- Loss of permissions and access controls on files/folders
To overcome these challenges, specialized NTFS drivers for Mac need to be installed and configured correctly. Paid solutions like Paragon NTFS for Mac generally offer better reliability and compatibility versus free options.
Methods for formatting NTFS on Mac
There are a few different methods Mac users can employ to format a drive to NTFS:
Using Terminal
The Terminal app that comes pre-installed on all Macs provides a way to format drives to NTFS using command line tools. While this method is free, it does require some comfort with using Terminal commands. Instructions typically involve identifying the disk you want to format, unmounting it, and then using the ‘diskutil’ command to erase and format the drive to NTFS. Here is a good step-by-step guide: How to Format Disk to NTFS on Mac Using Terminal.
Third-party apps
There are a number of third-party utilities available that provide a graphical interface to format drives as NTFS. Popular options include Paragon NTFS for Mac and Tuxera NTFS for Mac. These tools make the process easier than using Terminal but do require purchasing the software. There are also some free apps like NTFS for Mac by Sysgeeker, but they can be more limited in functionality.
Paid third-party apps like Paragon NTFS typically offer a 10-day free trial period to test them out before purchasing. They also provide additional features like enabling NTFS write support, which isn’t natively offered in macOS.
Step-by-step formatting instructions
Formatting a USB drive to NTFS on Mac can be done using the Terminal or third-party apps. Here are the detailed steps:
Using Terminal:
- Open Terminal from Applications > Utilities
- Type
diskutil listand note the disk identifier for your USB drive (e.g. disk2) - Type
diskutil eraseDisk ExFAT "MyDrive" disk2replacing “MyDrive” with your desired volume name and disk2 with your disk identifier - After formatting to ExFAT, type
diskutil eraseDisk NTFS "MyDrive" disk2to reformat to NTFS
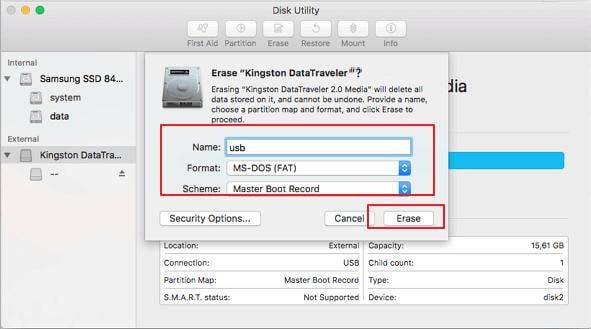
Using a third-party app like EaseUS NTFS for Mac:
- Download and install EaseUS NTFS for Mac
- Launch the app and select the USB drive
- Click “Erase” and select “MS-DOS (FAT) / ExFAT / NTFS” from the format dropdown
- Give the drive a name and click Erase
Be sure to backup any important data first before formatting. Follow the steps carefully to avoid deleting the wrong disk. The process is straightforward but requires admin privileges on Mac.
Optimizing NTFS Drives for Mac
To optimize NTFS drive performance on Mac, there are several tweaks you can try:
Enable caching for the NTFS drive in System Preferences > Disk Utility. This caches read/write operations and can significantly improve speed.
Disable Spotlight indexing for the NTFS drive to avoid performance hits from constant reindexing. Do this in System Preferences > Spotlight > Privacy.
Use a third party NTFS driver like Tuxera NTFS for Mac which offers better performance than the native macOS NTFS driver.
Connect the NTFS drive directly to your Mac if possible rather than through a hub. The direct USB connection will be faster.
Make sure no other demanding tasks are running on your Mac when accessing the NTFS drive. Close any unused apps and browser tabs.
Check for disk errors on the NTFS drive by running First Aid in Disk Utility. Fix any problems to restore full performance.
Keep the NTFS drive formatted using the default allocation unit size, which is optimized for performance. Avoid tinkering with this advanced setting.
Update to the latest version of macOS and your Mac’s firmware for potential NTFS optimizations from Apple.
Finally, make sure your Mac is plugged into power when accessing NTFS drives to ensure full USB bus power and speed.
Limitations of NTFS on Mac
Despite the benefits, using NTFS on Mac also comes with some limitations. The biggest limitation is the lack of native NTFS support in macOS. By default, Mac can only read NTFS drives – writing to them is not supported. This means you won’t be able to modify, edit, delete, or add new files on an NTFS drive without a third party solution.
Another key limitation is that Time Machine backups are not supported on NTFS drives. Time Machine requires a Mac formatted drive to work, so you cannot use NTFS volumes as backup destinations. If you want to leverage Time Machine for backups, you will need a separate HFS+ or APFS formatted drive.
While third party tools can enable full read/write support, there may still be minor compatibility issues or performance slowdowns compared to a native Mac filesystem. File metadata and permissions may not fully translate between Windows and Mac as well. Proceed with caution if relying heavily on NTFS for cross-platform use.
Alternative file systems for USB drives
When formatting a USB drive for use between Mac and Windows computers, there are a few main file system options to consider: ExFAT, FAT32, and NTFS. Each has their own pros and cons.
ExFAT is generally considered the best option for external USB drives used for both Mac and Windows. ExFAT was introduced in 2006 specifically as an optimized file system for flash drives. It allows for large file sizes over 4GB and has fewer limitations compared to FAT32. ExFAT is supported natively on recent versions of macOS and Windows without any additional software. However, one downside of ExFAT is that it lacks some of the more advanced features of NTFS like file compression and encryption.[1]
FAT32 is the oldest and most compatible file system between Mac and Windows. It is limited to file sizes under 4GB, but it has the widest device support. Older versions of macOS and Windows support FAT32 without any additional software. However, the file size limit makes FAT32 impractical for larger external USB drives. FAT32 also lacks features like file permissions, encryption, and others offered by more modern file systems.
In general, ExFAT strikes the best balance of compatibility and features for most external USB drives today. It supports large file transfers while still working seamlessly between Mac and Windows with no additional software required.
Maintaining NTFS Drives on Mac
NTFS drives formatted on Windows can develop errors and problems over time when used on Mac. To keep your NTFS drives healthy and optimized for cross-platform use, it’s important to perform regular maintenance.
The Disk Utility app included with Mac can be used to verify and repair NTFS drives. Open Disk Utility, select your NTFS drive, click “First Aid” and then click “Run”. This will scan for errors and attempt repairs. If any corruption is found, Disk Utility may be able to fix it (1).
Third party tools like iBoysoft NTFS for Mac also include disk repair features specifically optimized for maintaining NTFS drives on Mac. The tool can be scheduled to run regular scans to proactively detect and fix any developing issues.
If you experience any unusual behavior like slow performance or crashing when accessing an NTFS drive on Mac, try repairing the disk first before investigating other potential causes. Repairing right away can often resolve minor corruption before it leads to bigger problems.
Make sure to safely eject NTFS drives before disconnecting them from your Mac to avoid possible file system damage or data loss. Always use the eject icon next to the mounted drive or right-click the drive and select “Eject”. Avoid unplugging the physical drive without properly ejecting first.
Following these tips will keep your NTFS drives healthy and ensure maximum compatibility between Windows and Mac. Performing occasional maintenance checks will help you avoid and correct any minor issues before they result in serious file system problems or data corruption.
Frequently asked questions
Here are some common questions and answers about using NTFS drives on Mac:
Is NTFS supported on Mac?
NTFS is read-only by default on Mac. To get full read/write support, you need third party software like Paragon NTFS or Tuxera NTFS.
Can I format NTFS on Mac?
Yes, you can format a drive to NTFS on Mac using Disk Utility or third party software like Paragon NTFS.
Is NTFS safe on Mac?
NTFS is generally considered safe on Mac as long as you use reputable third party software like Paragon NTFS. Avoid unauthorized or hacked NTFS drivers which could cause data corruption.
Will NTFS work with Time Machine?
No, Time Machine does not support NTFS and requires a Mac OS Extended format drive. You can backup selective files to NTFS but not full system backups.
Can I use NTFS with Bootcamp?
Yes, Bootcamp supports reading and writing to NTFS so you can share drives between Windows and Mac.