Removing the hard drive from your laptop before recycling it is generally recommended. This allows you to securely wipe any personal data stored on the drive so it cannot be recovered by someone else later. There are a few things to consider when removing a hard drive from a laptop being recycled:
Quick Answers
Yes, you can remove the hard drive from your laptop before recycling it. This is recommended to protect any personal data stored on the drive.
The steps to remove a hard drive from a laptop are:
- Backup any important data on the drive
- Open the laptop case and locate the hard drive
- Disconnect the drive cables and mounting screws
- Carefully remove the hard drive
- Securely wipe the drive or destroy it if desired
Be sure to research the proper process for your specific laptop model. Improper drive removal could damage the laptop.
Should I Remove The Hard Drive Before Recycling My Laptop?
Yes, it is highly recommended to remove the hard drive from your laptop before recycling it. This is for security reasons, as there could be sensitive personal or company data stored on the hard drive. Identity theft is a major concern if such information gets into the wrong hands.
When you recycle your laptop through normal channels, there is no guarantee what will happen to the internal components like the hard drive. The recycling company may resell functional hard drives or components, and faulty drives may still have recoverable data on them. While reputable companies will try to wipe drives, there is always a data security risk involved.
By removing the hard drive yourself before recycling, you can securely wipe, encrypt or even physically destroy the drive as needed to protect your data. This will mitigate the security risks involved with letting your drive end up in unknown hands.
Benefits of Removing Hard Drive
- Total control over your sensitive data – you can wipe or destroy the drive
- Avoid data security risks with recycling companies
- Peace of mind knowing your data will not be compromised
- Prevent identity theft or privacy violations
- Optional: Reuse working drive for other purposes if needed
The minimal extra effort to remove the drive is worth it to properly dispose of or reuse your storage device. Overall, removing the hard drive before recycling a laptop is highly recommended from a data security standpoint.
What Should I Do With the Hard Drive After Removing it?
Once you have physically removed the hard drive from your laptop, you have a few options on what to do with it:
1. Securely wipe the drive
Using drive wiping software, you can overwrite the drive with 0s, random data, or multiple passes to make your previous data unrecoverable. This is recommended if the drive is still in good working condition and you want to reuse it.
2. Physically destroy the drive
If you want to ensure absolutely no data can ever be recovered, you can physically destroy the drive through methods like smashing with a hammer, drilling holes, or high-powered shredding/disintegration devices.
3. Encrypt the drive
You can encrypt the entire hard drive whichscrambles and locks the data so no one can access it without the password. This allows reuse while still protecting sensitive information.
4. Sell or donate the drive
Drives that have been securely wiped and tested can potentially be sold or donated for reuse. Just be absolutely sure no recoverable data remains.
5. Recycle the drive
If the drive is faulty or not worth reusing, you may want to just properly recycle it after taking data security precautions. Some metal components can be recovered this way.
Be sure to research local data disposal laws as well, as some regions have regulations around properly destroying sensitive information.
Steps to Removing a Hard Drive from a Laptop
When removing a hard drive from a laptop, it’s important to follow proper steps to avoid damaging components. Here is an overview of the process:
1. Backup important data
Before removing the hard drive, be sure to backup any important files or data you may need to transfer to a new device.
2. Prepare workspace
Clear a clean, well-lit workspace to dismantle the laptop. Have small containers on hand to organize screws and components.
3. Disconnect power sources
Power off the laptop, unplug the charger, and remove the battery to avoid electric shock hazards.
4. Open the laptop case
Refer to manufacturer instructions to open up the outer shell and access the internal components.
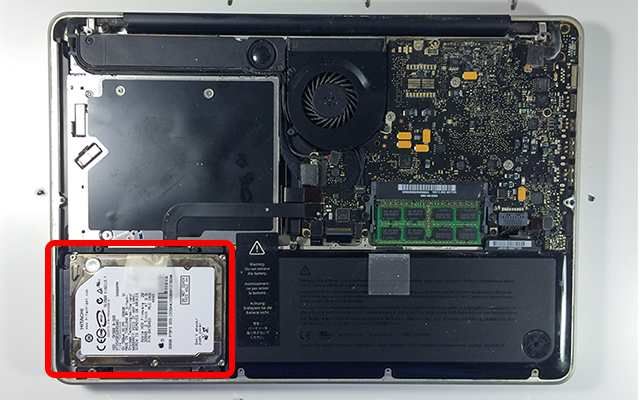
5. Locate the hard drive
Identify the hard drive among other components like the CPU, RAM, wireless cards etc. It is usually a flat rectangular box.
| Hard Drive Form Factors | Description |
|---|---|
| 2.5 inch | Smaller, commonly used in laptops |
| 3.5 inch | Larger, commonly used in desktop PCs |
6. Disconnect cabling and mounts
Carefully disconnect any ribbon cables or power cables connected to the drive. Also remove any small screws securing the drive in place.
7. Slide drive out
Once fully detached, gently slide the hard drive unit out from its bay or mounting position inside the laptop.
8. Place in protective enclosure
Immediately place the removed bare drive in a static-proof bag or protective enclosure for storage and transportation.
Avoid touching sensitive chips or components on the bare drive.
9. Reassemble laptop
If disposing of the whole laptop, carefully reassemble all components and cases so no small pieces are loose when being recycled.
How to Wipe a Hard Drive Before Recycling
Before recycling a removed laptop hard drive, it is crucial to properly wipe all data from it. Here are the main steps involved:
Backup Important Data First
Before wiping your hard drive, be sure to fully backup all important files, documents, photos and data you want to preserve. Transfer these to another storage device.
Use Drive Wiping Software
Specialized software like DBAN (Darik’s Boot and Nuke) can completely overwrite all data on a drive multiple times. This is more secure than a quick format.
Overwrite With 0s, Random Data, Multiple Passes
For thorough wiping, overwrite the drive with all 0s first, followed by random data, then multiple passes of mixed 1s and 0s. This leaves no recoverable data.
Check Wipe Progress and Status
Monitor the wipe process until fully completed. Most software provides a progress bar and status indicator to confirm when finished.
Destroy Drive If Extra Paranoid
For ultimate data destruction, you can drill holes through or smash the drive after wiping as extra protection. This physically destroys the platters.
Proper drive wiping removes any recoverable data before recycling and protects your privacy and security.
What Tools Do I Need to Remove a Laptop Hard Drive?
You only need a few simple tools to safely remove the hard drive from most laptops:
- Phillips screwdriver – A precision Phillips-head screwdriver is essential for removing the small mounting screws that hold drives and components in place inside laptops.
- Plastic pry tools – Pry tools with plastic tips help pop open snap-fit covers and pry components loose carefully without scratching.
- Anti-static wrist strap – Wearing an anti-static wrist strap grounds yourself and prevents static discharge from damaging computer components.
- Small containers/ziploc bags – Have containers or bags ready to organize and store the small screws and components as your disassemble.
Other helpful items include tweezers, latex/nitrile gloves, head-mounted magnifier, and a clean microscope slide for handling the drive safely once removed.
Avoid using too much force and prying on components as this can damage the laptop. The right tools help make removal easy and damage-free.
Can I Damage the Laptop When Removing the Hard Drive?
It is possible to damage your laptop if proper precautions are not taken when removing the hard drive, however you can avoid this with careful disassembly:
- Follow manufacturer disassembly instructions closely. Do not force components.
- Use plastic pry tools instead of screwdrivers to pop open snap-fit casings. This prevents breakage.
- Disconnect batteries and power sources to prevent electric shock and static discharge.
- Organize and label screws/parts to avoid mix-ups when reassembling.
- Detach cables gently – don’t yank. Zero force should be needed.
- Avoid prying on circuit boards or wire connections.
- Wear an anti-static wrist strap grounded to the metal laptop frame.
- Place removed drive in anti-static bag for protection.
Overall, be slow and gentle during the process. With proper tools and care, the laptop should come apart and go back together without any problems or damage.
Conclusion
Removing the hard drive before recycling your laptop is a simple process that provides important data security and privacy protections. With the right tools and proper precautions, you can remove the drive without damaging components. Be sure to securely wipe and/or destroy the drive after removal to protect your sensitive information from improper access.
