What Does Read-Only Mean for USB Drives?
Read-only is a status applied to USB flash drives and other storage devices that prevents files from being modified or deleted. When a drive is set as read-only, it allows data to be read from the drive but restricts writing or saving any new data.
On a read-only drive, existing files can be viewed, opened, and copied off the drive. However, attempting to edit, delete, format, or add new files to the drive will fail with an error about the read-only status. The data already written on the drive cannot be altered or erased.
Enabling read-only protects the data from accidental changes or corruption. It acts as a safeguard for important files you need to access but not modify. The only way to add, edit or remove files on a read-only drive is to disable the read-only status first.
Why Make a USB Drive Read-Only?
There are several key reasons why you may want to make a USB drive read-only:
Prevent viruses/malware: Making a USB drive read-only prevents any files from being written or changed on the drive. This protects the drive from malware or viruses that may try to infect and spread through the USB drive.
Protect sensitive data: Read-only access guarantees that sensitive files and data on the USB drive cannot be altered, overwritten, or deleted. This helps keep important information secure and unmodifiable.
Prevent accidental deletion: Locking down the USB drive to be read-only removes the risk of accidentally deleting or changing files on the drive. The read-only state acts as a safeguard against unintentional file operations.
Overall, making your USB drive read-only gives you greater control over the data on the drive and protects against tampering, malware, and human error. For distributing software, sharing files, or storing sensitive information, a read-only USB drive has clear security and stability benefits.
How to Make a USB Drive Read-Only on Windows
There are a few different methods to make a USB drive read-only on Windows operating systems.
Using Device Manager
One way is to use the Device Manager in Windows. Here are the steps:
- Open Device Manager (right-click Start menu and select Device Manager)
- Expand the Disk drives section
- Right click on the USB drive and select Properties
- Go to the Policies tab
- Check the option for “Read-only”
- Click OK to save the changes
This will prevent files from being modified or deleted on the USB drive.[1]
Using Registry Editor
You can also make a USB drive read-only by editing the Windows registry:
- Open Registry Editor (type regedit in the Start menu)
- Navigate to HKEY_LOCAL_MACHINE\SYSTEM\CurrentControlSet\Control\StorageDevicePolicies
- Right click and create a new DWORD named WriteProtect
- Right click WriteProtect and set the value to 1
- Reboot your computer for changes to take effect
This will make all USB drives connected to the computer read-only.[2]
Using Group Policy
For business environments, administrators can use Group Policy settings to set USB drives as read-only. Steps include:
- Open the Group Policy Management Console
- Right click the Group Policy Object you want to configure and edit it
- Navigate to Computer Configuration > Policies > Administrative Templates > System > Removable Storage Access
- Enable the setting for “Removable Disks: Deny write access”
- Click OK and let the policy update clients
The USB drives will now be read-only when users connect them to computers with this policy applied.[3]
Making a USB Drive Read-Only on Mac
There are a couple ways to make a USB drive read-only on a Mac. The easiest is by changing permissions in Finder:
- Connect the USB drive to your Mac.
- Open Finder and locate the USB drive.
- Right click on the USB drive and select “Get Info.”
- In the Info window, click the lock icon in the bottom right corner to make changes.
- Deselect the “Read & Write” checkbox next to your user account.
- Close the Info window. The USB drive is now read-only.
You can also make a USB drive read-only from the command line (1):
- Open Terminal.
- Type
diskutil listto identify the disk number of the USB drive. - Type
diskutil readonly enable disk#, replacing # with the disk number. - Type
diskutil unmountDisk disk#to complete the process.
This will make the entire USB drive read-only until the command is reversed. Keep in mind that making a disk read-only in OS X does not encrypt it.
Making a USB Drive Read-Only on Linux
There are a couple ways to make a USB drive read-only on Linux operating systems like Ubuntu, Debian, Fedora, etc. Using the command line is the easiest method.
First, identify the drive name by running lsblk. This will list all storage devices and partitions. Locate your USB drive, which will likely be named something like /dev/sdb1.
Then, to mount the drive read-only, use the mount command like this:
mount -o ro /dev/sdb1 /media/usb
The -o ro option mounts the drive read-only. /dev/sdb1 is the example drive name, and /media/usb is the mount point location.
You can also edit /etc/fstab to automatically mount the USB drive read-only each time. Add a line like this:
/dev/sdb1 /media/usb auto ro 0 0
The ro option will mount it read-only. Be sure to use the correct drive name for your system.
This will make the entire USB read-only and protect files from being edited or deleted. To reverse it, remount the drive without the ro option or remove the line from /etc/fstab.
Sources:
https://askubuntu.com/questions/563764/usb-devices-showing-as-read-only
https://forums.linuxmint.com/viewtopic.php?t=350805
Physical Ways to Make a USB Read-Only
There are a few physical methods to make a USB drive read-only without changing software settings:
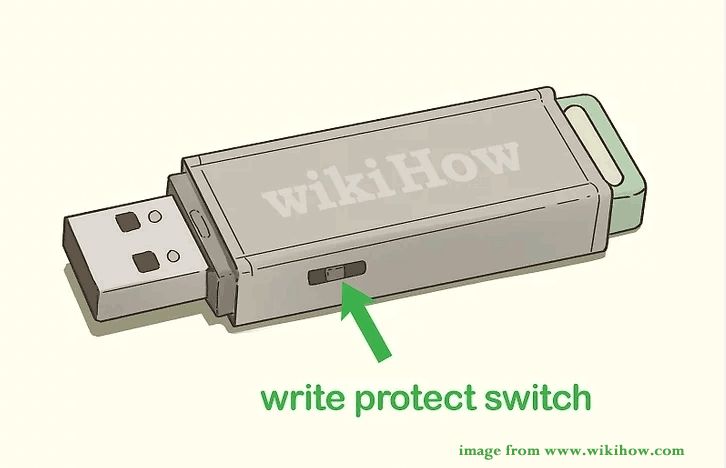
Slide Write Protection Switch
Some USB drives have a physical switch on the housing that toggles between read/write and read-only modes. Sliding the switch to the read-only position will prevent files from being modified or deleted on that drive (Kanguru). This gives you hardware-level protection against any changes being made to the data.
Tape Over USB Contacts
If your USB drive doesn’t have a write protection switch, you can cover the physical contacts on the drive with tape. Taping over the bottom row of small square contacts will block the ability to write data while still allowing the drive to be read. Just be sure not to cover the entire USB connector or the drive won’t be readable at all.
Hardware Write Blockers
Forensic software tools like Tableau write blockers sit between the USB drive and computer, acting as a physical barrier that blocks any commands to modify data on the drive (Minitool). These are often used by IT professionals to analyze potentially infected drives safely.
Alternatives to a Read-Only USB Drive
While making a USB drive read-only can be useful for protecting sensitive data, there are a few alternative methods that provide similar benefits without some of the limitations:
Encryption
Encrypting the contents of a USB drive offers strong protection for data in transit. Popular encryption software like VeraCrypt [1] allows creating encrypted containers or encrypting an entire USB drive. The data remains securely encrypted until the correct password is entered to unlock it. This provides protection in case the drive is lost or stolen.
Cloud Storage
Storing files in the cloud rather than locally on a USB drive means they can be securely accessed from anywhere with an internet connection. Cloud storage services like Google Drive, Dropbox, and OneDrive also include features like automatic backups and version history [2]. Administrators can set permissions on folders and files to control access.
OS Permissions
On operating systems like Linux and macOS, users can set file permissions to restrict write access to specific users or groups. For example, the root user may have full read/write access while standard users can only view files in a read-only mode. This protects against accidental changes without needing special USB drives.
When to Avoid Making a USB Read-Only
While making a USB drive read-only has its benefits, there are some cases where you’ll want to avoid doing so:
Need to frequently update/modify files: If you need to frequently add, remove, or modify files on the USB drive, making it read-only will be inconvenient. You’ll have to temporarily remove the read-only status every time you need to make a change.
Archiving/backup purposes: If you plan to use your USB drive to regularly backup or archive files from your computer, you’ll want it to be writable so new files can be added. Read-only would prevent adapting the drive contents as your backup needs change.
In general, avoid making drives read-only if you’ll need to frequently change their contents. The extra steps to temporarily remove read-only status can become a nuisance. For drives used to transport or store data that only needs to be read, not modified, a read-only configuration makes more sense.
How to Reverse Read-Only Status
If you need to reverse the read-only status of your USB drive, there are a few methods you can try depending on your operating system.
Via Device Manager
On Windows, you can use Device Manager to change the read-only attribute back to read/write. To do this:
- Open Device Manager.
- Expand the Disk drives section.
- Right click on your USB drive and select Properties.
- Go to the Policies tab.
- Uncheck the Read-only checkbox.
- Click OK to save the changes.
This will remove the registry edit that made your drive read-only and restore write capabilities.[1]
Via Finder
On Mac OS:
- Open Finder and navigate to your USB drive.
- Get Info on the drive by right-clicking and selecting “Get Info.”
- Uncheck the box next to “Locked” at the bottom of the info window.
- Click the lock icon to authenticate and save changes.
This will remove write protection on the USB drive.[2]
Via Command Line
On Linux, use the blockdev command to view and change read-only status:
$ sudo blockdev --setrw /dev/sdb1
Replace /dev/sdb1 with your USB drive path. This will remove write protection.
Remove Physical Protections
If your drive has a physical write-protect switch, slide the switch back to the writable position. If you’ve applied tape or other physical protections, carefully remove them to regain write access.
FAQs About Read-Only USB Drives
Here are some frequently asked questions about making a USB drive read-only:
Why is my USB drive suddenly read-only?
There are a few common reasons a USB drive may suddenly become read-only:
– The physical write-protect switch on the drive is enabled.
– The drive is corrupted and Windows is preventing writes to avoid further damage.
– There is a permissions issue preventing you from writing to the drive.
How do I make my USB drive writable again?
To make a read-only USB drive writable again on Windows, try using the Diskpart utility to remove the read-only attribute. On Mac or Linux, you can use the terminal/command line to remove read-only permissions. You can also try reformatting the drive.
Can I still add files to a read-only USB drive?
No, a read-only USB drive prevents any writing to the drive. You cannot add, modify, or delete files until you disable the read-only status.
Is there a way to permanently make a USB read-only?
Yes, you can permanently make a USB read-only by flipping the physical write-protect switch on the drive casing, if it has one. Some tools like Diskpart also support write-protecting the drive more permanently.[1]
Can I still open and view files on a read-only USB drive?
Yes, you can open and view files normally on a read-only USB drive. The read-only status only prevents modifying or deleting files – you can still access anything already written to the drive.
