What is Time Machine?
Time Machine is an automatic backup software utility that is built into macOS (https://support.apple.com/en-us/HT201250). It allows users to store incremental backups of their system files, applications, settings, and other data to an external storage device like an external hard drive or Apple’s Time Capsule wireless router.
Time Machine works by creating hourly backups for the past 24 hours, daily backups for the past month, and weekly backups for everything older than a month (https://support.apple.com/guide/mac-help/back-up-files-mh35860/mac). This allows you to restore your Mac to a previous state in case something goes wrong or a file is accidentally deleted or changed. It provides a safety net for users to recover lost or damaged data.
Overall, Time Machine is an easy-to-use, set-it-and-forget-it backup solution that comes included with macOS. It gives users peace of mind knowing they have versions of their important files over time that can be restored if needed.
Why partition a drive for Time Machine?
There are a few key reasons why users may want to partition an external drive specifically for Time Machine backups:
First, it’s recommended to keep backups separate from other data stored on the drive. Storing backups and personal files on the same volume can lead to issues with corruption or failed backups. Having a dedicated partition isolates Time Machine data.
Second, partitioning allows users to organize backups from multiple Macs. Each computer can have its own partition on the same physical drive. This keeps everything neat and separate.
Finally, partitions enable users to allocate a set amount of space specifically for backups. The Time Machine partition can be sized appropriately without impacting other data on the drive.
In summary, partitioning a drive for Time Machine helps keep backups intact, organized, and appropriately sized.
Partitioning an external drive
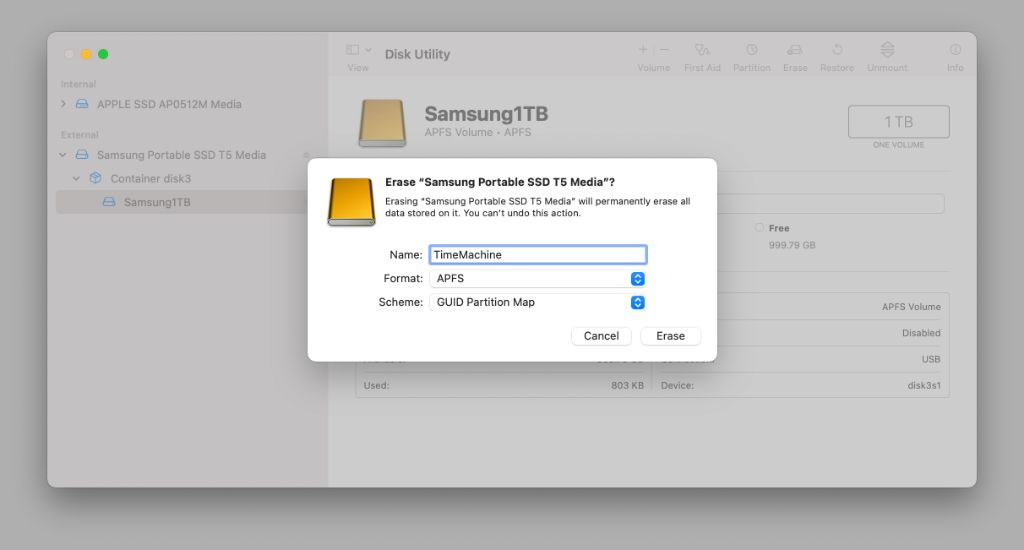
To partition an external drive on a Mac, you can use the built-in Disk Utility app. Disk Utility allows you to divide your external drive into separate volumes or partitions. This is useful if you want to create dedicated partitions for backups versus general storage.
To partition a drive in Disk Utility:
- Connect your external drive to your Mac and launch Disk Utility.
- Select the external drive from the sidebar.
- Click the “Partition” button.
- Under Volume Scheme, choose the number of partitions you want to divide the drive into.
- Give each partition a name and format it as “Mac OS Extended (Journaled)”. This is the best format for Time Machine backups.
- Click “Apply” to partition the external drive.
Once partitioned, you can designate one partition exclusively for Time Machine backups. The other partitions can be used for general file storage and transfers.
It’s generally recommended to divide backup drives from storage partitions to keep your data segregated and avoid conflicts.
Using a partition for Time Machine
Once you have partitioned your external drive, you need to select the partition you want to use for Time Machine backups in the Time Machine preferences:
First, open Time Machine preferences by going to System Preferences > Time Machine. Click “Select Backup Disk” and choose the partition on your external drive that you want to use for backups.
It’s highly recommended to select the option to encrypt your Time Machine backups for security reasons. Check the box for “Encrypt backups” when prompted after selecting your disk partition.
Once selected, Time Machine will automatically back up your Mac data to the selected partition on the schedule you specify in System Preferences.
Managing Partitions
It’s important to periodically monitor disk usage on your Time Machine partition to ensure it doesn’t get full. According to Apple, “Time Machine alerts you when your backup disk is nearly full. If your backup disk fills up completely, Time Machine removes the oldest hourly backups to make space for newer backups” (source).
If you notice the partition is close to the maximum size, you may need to adjust the partitions to allocate more space to Time Machine. You can use Disk Utility to modify partitions on an external drive (source). Just be careful not to exceed the total capacity of the physical disk.
It’s generally recommended to not let a Time Machine partition completely fill up. Ideally, keep at least 10-20% of the partition free to allow continuous backups without having to delete older backups prematurely. Monitor disk usage regularly to avoid running out of space.
Restoring from a backup
One of the main benefits of partitioning a drive for Time Machine is having the ability to easily restore your Mac from a backup. Time Machine keeps hourly backups for the past 24 hours, daily backups for the past month, and weekly backups until your backup drive is full. This allows you to go back in time and restore your entire Mac or individual files from a backup.
To restore your entire Mac, you can boot into macOS Recovery and select “Restore from Time Machine Backup”. This will let you navigate your Time Machine backups and choose a point in time to restore from. All of your apps, settings, and data will be restored to that previous state.
To restore individual files or folders, you can open the Time Machine interface directly within macOS. The timeline on the right shows snapshot versions of your files from different backup points. You can browse through these versions and restore a file or folder from an earlier backup if you lost or deleted something.
Having these incremental backups on a dedicated partition means you always have access to past versions of your data. If you accidentally delete a file or need to recover from a major crash, Time Machine’s backup history can save the day.
Potential downsides
While partitioning an external drive for Time Machine backups may seem convenient, there are some potential downsides to consider:
No redundancy across partitions – With a partitioned single drive, if one partition fails, you lose all backups stored on that partition. There is no redundancy across partitions on the same physical drive. As this video explains, it’s better to use separate physical drives to have full redundancy for your backups.
Backups may be lost if partition fails – If the partition you designate for Time Machine backups fails, you risk losing all the stored backup data on that partition. This is riskier than using separate drives.
Need to manage partition sizes – With a partitioned drive, you’ll need to manage the partition sizes for Time Machine versus storage. This may require periodically resizing partitions as needed. It’s simpler to use separate drives with dedicated purposes.
Alternative Options
There are a few alternatives to partitioning a single external drive for both file storage and Time Machine backups:
One option is to use a single external drive for general storage and purchase a separate external drive just for Time Machine backups. This keeps backups separate from your working files and prevents storage space issues on the backup drive.
Another alternative is to use network attached storage (NAS) for Time Machine backups. A NAS allows multiple devices to backup over the network to a central location. This removes the need to connect an external drive directly to your Mac.
Finally, cloud backup services like Backblaze and Carbonite offer an online backup solution. They automatically backup your Mac’s data and files to the cloud. Cloud backups provide offsite protection and make it easy to restore your data to a new Mac or if your local backup fails.
Recommendations
If you want to use a single external drive for Time Machine backups of multiple Macs, partitioning can help organize the backups. Create a separate partition for each Mac, with partition sizes large enough to accommodate expected growth over time. The general recommendation is that your Time Machine partition should be 2-3 times larger than the data being backed up. However, you may want to make the partitions even bigger to allow flexibility for growing backup sizes.
While partitioning can help organize multi-system backups, it’s still important to maintain regular backups and test restores periodically. Time Machine will automatically delete old backups as the drive space fills up, but verifying backups can save headaches if you ever need to restore. You can test restoring files or use the Time Machine interface to step back in time and ensure your backups are intact.
Overall, partitioning an external drive can work well for Time Machine backups. Just be sure to allocate enough space during partitioning to accommodate backup growth over time. And as always with backups, regularly verifying and maintaining them is key to avoiding problems down the road.
Conclusion
Partitioning an external drive is an option for using the same disk for both Time Machine backups and file storage. There are benefits to this approach like organization and isolation of the backup data. However, it also requires proper management to avoid potential downsides.
Creating separate partitions on the external drive keeps the Time Machine backups separate from personal files and data. This can make it easier to manage the backups without accidentally deleting or altering files. The partitions act as isolated containers, helping to safeguard the integrity of the backups.
However, partitioning does require some care. The backup partition needs to have enough storage space to accommodate Time Machine’s local snapshots and versioning. The partitions also need occasional maintenance to avoid becoming unbalanced. File system corruption is also a possibility if the drive is unplugged improperly.
Overall, partitioning an external drive for Time Machine can work if done carefully. It provides organization and segregation of backup data, but requires proper setup and management. As long as capacities and filesystems are handled correctly, it can be a useful option for some users.