Yes, it is possible to retrieve photos from iCloud that were taken on an iPhone. iCloud automatically backs up photos taken on an iPhone, so those photos can be accessed from any device by signing into the same iCloud account. There are a few different ways to retrieve iPhone photos from iCloud – downloading them directly on the iPhone, using the Photos app on a Mac, or accessing iCloud.com from any web browser.
Quick Ways to Retrieve Photos from iCloud
Here are some quick answers to common questions about getting iPhone photos from iCloud:
– On the iPhone, open the Photos app, go to the Albums tab, and look for the All Photos album. This contains all photos synced from iCloud.
– On a Mac, open the Photos app, go to the Photos tab on the left, and look for the iCloud Photos album. This contains all photos synced from iCloud.
– Sign in to iCloud.com from any web browser, click on Photos, and all synced photos will be available to view and download.
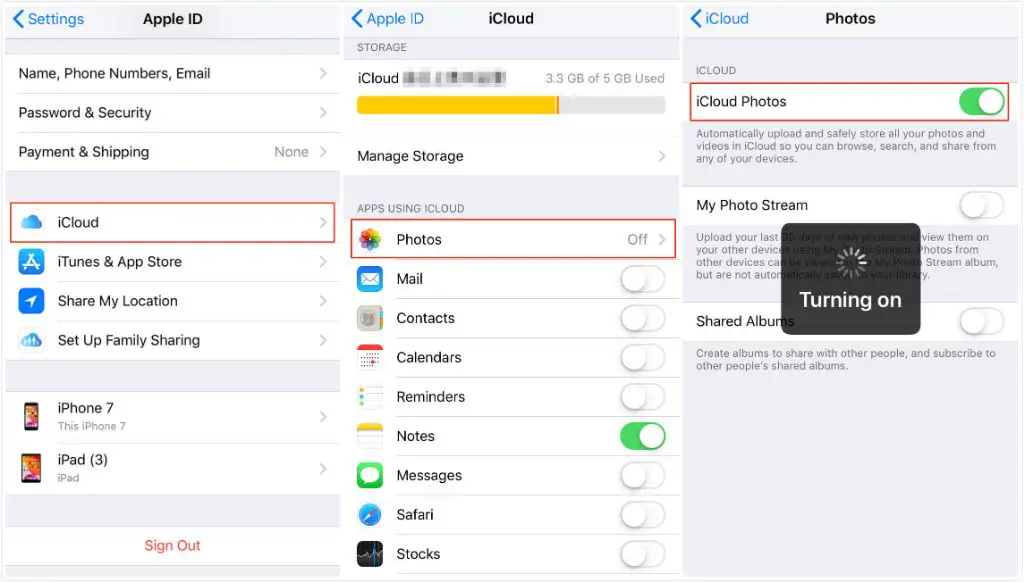
Accessing iCloud Photos on an iPhone
If you want to view photos stored in iCloud on your iPhone, follow these steps:
1. Make sure your iPhone is running the latest version of iOS. Go to Settings > General > Software Update to check for and install any available updates.
2. Enable iCloud Photos by going to Settings > [your name] > iCloud > Photos. Toggle the switch for iCloud Photos to the ON position.
3. Connect your iPhone to power and Wi-Fi. Photos will begin uploading to iCloud if they haven’t already.
4. Open the Photos app on your iPhone.
5. Tap on the Albums tab at the bottom of the screen.
6. Scroll down until you see an album named All Photos. This contains all of your photos that have been backed up to iCloud.
7. Tap on a photo to view it. You can browse, view and share photos as needed directly from the All Photos album.
If you don’t see the All Photos album, your photos may not have finished uploading to iCloud yet. Leave your iPhone connected to a power source and Wi-Fi until the upload is complete. The number of photos left to upload will be displayed on the iCloud Photos screen under Settings.
Downloading Photos to Your iPhone
In addition to viewing your iCloud photos directly within the Photos app, you can also download photos and videos from iCloud to the local storage on your iPhone. Here’s how:
1. Go to Settings > [your name] > iCloud > Photos.
2. Tap on the Download and Keep Originals switch under the iCloud Photos heading.
3. Photos and videos in your iCloud account will begin downloading to your iPhone, progress will be displayed on the iCloud Photos screen.
4. Once the download is complete, you can access photos and videos directly from the Photos app even without an internet connection. They will be stored on your device storage.
This gives you the flexibility of storing frequently accessed photos and videos locally while keeping your overall iCloud storage use under control.
Retrieving Photos on a Mac
Follow these steps to access your iCloud photo library on a Mac:
1. Make sure your Mac is running the latest version of macOS. Go to the Apple menu > System Preferences > Software Update to check for and install any available updates.
2. Enable iCloud Photos on your Mac. Go to Apple menu > System Preferences > iCloud and click the checkbox next to Photos.
3. Sign in to iCloud using your Apple ID if prompted. Make sure to use the same Apple ID as your iPhone.
4. Open the Photos app on your Mac.
5. In the sidebar, click Photos to view your iCloud photo library.
6. By default, all of your iPhone photos will be displayed here after being synced from iCloud.
7. Double click on any photo to open it at full size on your screen.
8. Right click on a photo and choose Import to download the original high-resolution version to your Mac instead of just a preview.
Importing Photos to Your Mac
Rather than just viewing iCloud photos within the Photos app, you can also import them to save permanently on your Mac’s local storage:
1. In the Photos app, click File > Import from iCloud Photos.
2. Your iCloud photo library will open. Select the photos you want to import.
3. Click Import Selected or Import All New Photos to start downloading original versions to your Mac.
4. Photos will be saved in full resolution to your Mac’s Pictures folder or another location you select.
Importing allows you to access photos on your Mac even when you are offline, while still keeping storage optimized on your iPhone camera roll.
Downloading Photos from iCloud.com
You can download your iPhone photos from iCloud through any web browser by taking the following steps:
1. Go to iCloud.com and sign in using your Apple ID credentials.
2. Click on the Photos icon. This will open your iCloud photo library.
3. Locate the photos you wish to download and select them. You can select multiple photos by holding down Command while clicking.
4. Click the Download button at the bottom of the screen.
5. Choose Download Selected to download only the photos picked, or Download All to retrieve every photo in your library.
6. The photos will download as a zip file to your default Downloads folder.
7. Unzip the file to access the downloaded photos on your computer.
Sharing Photos from iCloud.com
iCloud.com also makes it easy to share photos with friends, family or on social media:
1. After signing in to iCloud.com, click on Photos then locate the images you want to share.
2. Click the Share button below the photo.
3. Choose how you would like to share the photo – Message, Mail, AirDrop, etc.
4. Follow the on-screen prompts to send the photo to a recipient or share on sites like Facebook and Twitter.
5. You can share original full resolution versions of your photos this way.
This provides an easy way to access your iPhone photo library for sharing from any computer without needing the Photos app installed.
Removing Photos from iCloud
If you need to delete photos from your iCloud storage due to space constraints or privacy concerns, you can do so from iPhone, Mac, or the iCloud web interface:
On iPhone:
1. Open the Photos app and locate the photos you wish to remove.
2. Tap Select, then tap the photos to select them.
3. Tap the Delete icon in the bottom left and confirm deletion.
4. The photos will be removed from both iPhone storage and iCloud.
On Mac:
1. In the Photos app, click Photos in the sidebar then locate the photos.
2. Right click on each photo and choose Delete Photo. Confirm deletion.
3. The photo will be deleted from iCloud and any synced devices.
On iCloud.com:
1. Sign in to iCloud.com, click Photos and locate the photos.
2. Click the gear icon and choose Delete Photo.
3. Confirm deletion when prompted.
4. The photo will be removed from iCloud and synced devices.
Deleting a photo through any of these methods will remove it from all synced devices and iCloud simultaneously. Your photo will no longer take up iCloud storage space.
Managing iCloud Photo Storage
With high resolution photos and videos, your iCloud storage can fill up quicker than expected. Here are some tips for managing iCloud photo storage:
– Review photos regularly and delete unwanted items from all devices.
– Use iCloud.com to selectively download only the photos you need to your computer instead of your entire library.
– Optimize your iPhone storage under Settings > [your name] > iCloud > Photos to offload full resolution versions from your device while keeping thumbnails.
– Consider upgrading your iCloud storage plan for more space. Plans start at $0.99 per month for 50GB.
– Transfer photos to a separate cloud storage provider or physical storage if you want to keep them long term.
– Use the Optimize [device] Storage setting on iPhone to automatically offload full resolution versions while retaining smaller previews.
Carefully managing the photos taking up space in iCloud will ensure you don’t run out of storage room for backups and synced data.
Troubleshooting iCloud Photo Issues
If you are unable to view or download photos from iCloud, here are some troubleshooting steps:
Photos not syncing:
– Check that iCloud Photos is enabled on all devices under settings.
– Make sure devices have sufficient storage space for syncing.
– Confirm devices are connected to WiFi and able to communicate with iCloud.
– Restart devices and verify photos are syncing after.
Unable to access photos:
– Double check you are signed in to iCloud with the same Apple ID as your iPhone.
– Try accessing iCloud Photos on another device signed in to your account.
– Reset your iCloud password if needed in case your account was compromised.
– Contact Apple Support if still unable to view photos after resetting password.
Photos disappeared from iCloud:
– Browse Recently Deleted folder on iCloud.com to see if photos were accidentally deleted.
– Check if optimize storage is enabled on iPhone and shifted photos to local storage only.
– Restore photos from a previous iCloud backup if needed.
Storage full errors:
– Delete unwanted photos to free up iCloud space.
– Review and optimize storage with Apple recommendations.
– Upgrade your iCloud storage plan if you consistently need more space.
– Transfer photos to alternative storage and remove from iCloud.
Following troubleshooting steps can typically resolve most issues accessing photos from iCloud. Contact Apple Support if problems persist.
Conclusion
The key takeaways around retrieving iPhone photos from iCloud are:
– Enable iCloud Photos on your iPhone and Mac to automatically sync photos.
– View synced photos in the Photos app on devices or visit iCloud.com.
– Selectively download only needed photos to save local storage space.
– Manage iCloud storage by removing unwanted photos and videos.
– Troubleshoot issues accessing photos by checking settings and account access.
With some consistent iCloud photo management, you can easily retrieve and share photos taken on your iPhone from anywhere. Storing photos primarily in the cloud allows you to optimize local device storage without losing access to treasured memories.