Taking apart a MacBook Pro is possible for most users, but it requires care, the right tools, and an understanding of the complex internal components. While Apple does not recommend users open their laptops themselves, doing so carefully allows you to clean the fans, replace parts, or troubleshoot issues. This guide will walk through the steps, tools, and safety precautions for dismantling a MacBook Pro.
Should you take apart your MacBook Pro?
There are a few key reasons you may want to open up your MacBook Pro:
- Cleaning the internal fans and heat sinks. Dust buildup can cause overheating.
- Replacing failed components like the RAM, hard drive, or battery.
- Performing general troubleshooting of hardware issues.
However, there are also good reasons not to take apart your MacBook Pro:
- Risk of damage – Opening the case can damage cables or components.
- Voiding the warranty – Any unauthorized repairs void Apple’s warranty.
- Better left to professionals – There is a safety risk if repairs are done incorrectly.
So proceed with caution. Cleaning fans or upgrading RAM is doable for most users. But more complex fixes like replacing the logic board may be best left to experienced technicians.
What you’ll need to take apart a MacBook Pro
Gather these tools and supplies before disassembling your MacBook Pro:
- A philips head screwdriver – To remove case screws.
- A plastic spudger – To carefully pry open the case. Avoid using metal tools.
- Tweezers – For manipulating small cables and screws.
- ESD-safe mat – Protects against static discharge which could damage components.
- Adhesive tabs – For reattaching any loose cable connectors.
You may also want isopropyl alcohol and compressed air to clean the internal components.
Precautions when taking apart a MacBook Pro
Follow these safety steps before dismantling your laptop:
- Ensure the battery is fully discharged – This eliminates risk of shocks.
- Use an ESD mat – As noted, this dissipates static electricity buildup.
- Back up your data – Just in case anything goes wrong or data is corrupted.
- Organize your workspace – Have enough clear, clean space to place all the open components.
- Go slowly and gently – Don’t force anything open, which could break cables.
How to take apart a MacBook Pro
With the proper supplies and safety steps completed, you’re ready to open it up. Follow these steps:
- Shut down and unplug your MacBook Pro.
- Place the laptop upside down and remove the 10 bottom case screws with your screwdriver. Set them aside safely.
- Gently pry up the bottom case starting at the vents. Go slowly and stop if you meet resistance.
- Once inside, disconnect the battery cable first – this prevents shorts.
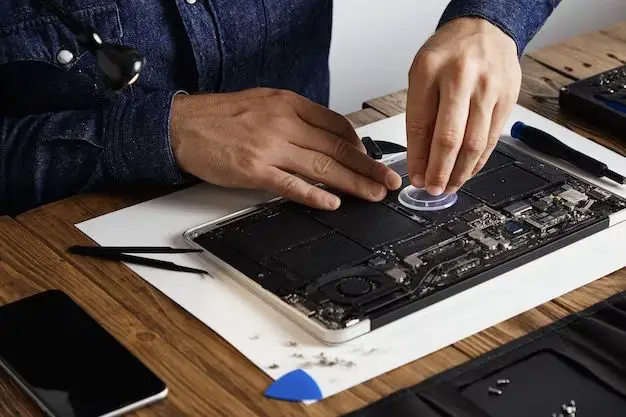
- From here you can access components like the fans, RAM, hard drive bay, speaker assemblies, logic board, heat sinks, etc.
- Use your plastic spudger to gently detach connectors and pry up components. Be extremely careful not to strain any cables.
- Thoroughly clean out dust using compressed air before reassembling.
- Carefully reattach all connectors and cables as you put components back in.
- Replace the bottom case, reinsert screws, and power on to test functionality.
With patience and care, you can successfully open your MacBook Pro, perform repairs or cleaning, and reassemble it again without issues. Just be slow and gentle to avoid any component damage.
Cleaning the fans
One of the most common tasks when taking apart a MacBook Pro is cleaning dust from the internal fans and heat sinks. Over time, these can become clogged with dust, pet hair, etc. which causes overheating. Here’s how to clean them out:
- Follow the full disassembly steps above.
- Use a can of compressed air to blow out the fans and heat sinks.
- You can also use a small brush like a toothbrush to dislodge stuck on debris.
- Rub down with a lint-free cloth dampened slightly with isopropyl alcohol.
- Ensure no fibers or dust remain before reassembling.
This can restore normal operating temperatures and fan noise levels.
Replacing the RAM
Upgrading your RAM is a straightforward component swap once you’re inside your MacBook Pro:
- Follow the steps above to open up the case.
- Locate the RAM modules secured in place with clips.
- Gently spread the clips outward to release the RAM stick.
- Lift to remove the module and insert your replacement RAM.
- Re-engage the clips to secure the new memory module.
Make sure to buy compatible RAM for your specific MacBook Pro model. Installation takes just minutes once inside.
Replacing a failed hard drive
If your hard drive has failed, here is how to swap in a replacement:
- Open the case following the full disassembly steps.
- Disconnect the drive cables and unscrew the drive from the bay.
- Attach cables to the replacement drive and secure into place with screws.
- Boot into macOS Recovery to format the new drive and install a fresh copy of the OS.
Try to get an identical model hard drive to your original. Be extremely gentle when manipulating internal cables.
Replacing the battery
If your battery capacity is depleted, replacing it involves disconnecting cables:
- Open the case according to the main disassembly steps.
- Disconnect the old battery cable from the logic board.
- Unscrew and remove the old battery from the case.
- Place the new battery into position and screw it securely in place.
- Attach the battery cable to the logic board.
Only use a genuine Apple replacement battery to ensure correct connections. Third party batteries may not properly interface with macOS.
Common issues during MacBook Pro disassembly
Some common problems you may encounter include:
- Stripped screws – Avoid forcing screws open, use the proper screwdriver fit.
- Broken cables – Don’t pull or strain cables, detach them gently.
- Cracked case – Go slowly when prying the bottom case, don’t force it.
- Incorrect connections – Double check all cable connections match original.
- Misaligned components – Ensure parts align properly before reassembling.
Take your time, follow each step carefully, and stop if anything seems jammed or forced to avoid damage.
Do’s and don’ts when taking apart your MacBook Pro
Keep these do’s and don’ts in mind:
Do:
- Use ESD protection
- Organize and label components
- Refer to technical/repair manuals
- Work slowly and gently
Don’t:
- Force anything open
- Touch components with your bare hands
- Work in a cluttered space
- Work over carpets/fabrics
Conclusion
Taking apart a MacBook Pro is an involved but doable process for many users. Just be sure to follow all the proper precautions, work slowly, and stop if anything seems damaged. In most cases, cleaning or replacing a few components can restore performance and extend the life of your laptop.
However, more advanced repairs like logic board swaps are best performed by experienced technicians. And liquid damage or major component failures may make the repair cost exceed the value of an older machine.
With the right tools, workspace, technical knowledge, and gentle care, you can safely open and service the inside of a MacBook Pro. Just evaluate whether the specific repair you need is within your technical comfort zone before proceeding.