Quick summary
Yes, the internal hard drive on the Xbox One can be replaced. The process involves opening up the console, removing the existing hard drive, and installing a new 2.5″ laptop-style SATA hard drive. Users can upgrade to a larger capacity drive up to 2TB to gain more storage space. The process is fairly straightforward but does require some technical skill and comfort working inside electronic devices.
Can you replace the hard drive in an Xbox One?
Yes, the internal hard drive in the Xbox One can be replaced. Microsoft designed the Xbox One to allow users to swap out the internal hard drive relatively easily compared to other consoles. This allows you to upgrade to a larger drive for more storage capacity.
The Xbox One uses a standard 2.5 inch SATA hard drive, the kind commonly found in laptops. So you can easily find replacement hard drives from electronics retailers. As long as the drive meets Microsoft’s requirements, it will work fine as a replacement Xbox One hard drive.
Xbox One hard drive specifications
Here are the requirements for an Xbox One compatible replacement hard drive:
- 2.5 inch form factor
- SATA interface
- At least 256GB capacity
- Up to 2TB maximum capacity
- 5400RPM or 7200RPM spin speed
As you can see, the drive specifications are quite flexible other than the limit on maximum size. The Xbox One will format and set up any drive to work correctly once installed.
Opening the Xbox One case
The first step to replacing the hard drive is to open up the Xbox One case. This requires a few simple tools:
- Small flathead screwdriver
- Plastic spudger tool
There are clips hidden around the seam of the Xbox One case. You need to slide the spudger tool into the seams on the sides and back of the console to release the clips.
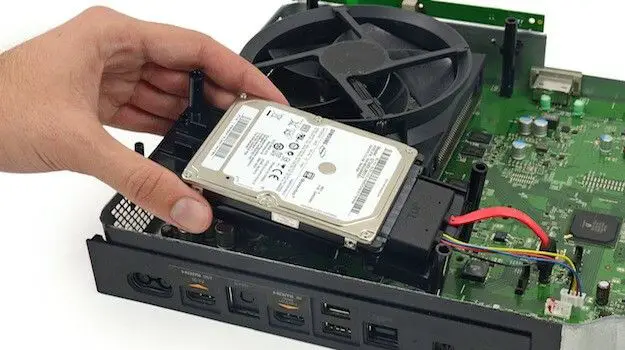
Once unclipped, the top and sides of the case will lift off easily. Inside you will see the hard drive mounted on the right side of the console. There are four more screws securing the drive bracket.
Removing the old hard drive
With the case open, removing the old hard drive involves a few simple steps:
- Unplug the SATA data and power connectors from the back of the hard drive.
- Remove the four screws holding the drive bracket in place.
- Lift the drive out along with its bracket.
Now you are ready to install the replacement drive.
Installing a new hard drive
To install a new hard drive:
- Place the replacement hard drive in the drive bracket.
- Screw the bracket back in place with the four screws.
- Attach the SATA data and power connectors to the back of the new drive.
- Double check that everything is securely installed.
Once screwed into place properly, you are ready to close up the Xbox One case.
Closing the Xbox One case
To reassemble the Xbox One console:
- Lower the top case piece back down into position, aligning the clips into the seam grooves.
- Firmly press down around the edges of the top case to snap the clips back into place.
- Reinstall any screws that were removed earlier.
- Double check that the case is fully closed and clipped back together properly.
At this point you have completed the physical hard drive replacement. Next, you need to configure the drive within the Xbox One OS.
Configuring a new hard drive
After booting up the Xbox One with the new drive installed, the console will detect that it does not have an active operating system.
The Xbox One will automatically launch the hard drive initialization and OS installation process. All you need to do is follow the on-screen prompts:
- The Xbox One will download the latest OS version from Microsoft and install it on the new drive.
- It will format and partition the drive as necessary.
- You will go through a fresh OS setup and configuration flow for the new hard drive.
- Your game and app content will need to be re-installed after this process.
Allow at least 1-2 hours minimum for the OS initialization and setup on the replacement drive. Once completed, your Xbox One will boot up normally with the new hard drive active.
Now you can start downloading games, apps, and DLC content to take advantage of that larger storage capacity.
Transferring content to a new Xbox One hard drive
After replacing your Xbox One drive, you will need to re-download your games, apps, and DLC content. This can take a while if you have a large digital library.
To help speed up the process, you can transfer content over from your old Xbox One drive using an external hard drive. Here is how that process works:
- With both the old and new drives installed, format an external USB hard drive on the Xbox One.
- Use the Xbox One’s built-in tools to copy your installed games and apps from the old drive to the external drive.
- Once the content is copied, power down the console and swap out the old drive for the new one.
- With the new drive installed, boot up the Xbox One and sign into your account.
- Connect the external USB hard drive which contains your game data.
- The Xbox OS will detect the existing game files and allow you to copy them over to the new drive.
This process prevents you from having to re-download terabytes of game data. An external USB 3.0 hard drive can make the transfer much quicker compared to downloading over the internet.
Reasons to replace an Xbox One hard drive
Here are some of the main reasons you may want to replace the internal drive on your Xbox One:
- Upgrade storage capacity – The stock Xbox One hard drives are only 500GB or 1TB. Replacing it with a 2TB drive provides much more room for games, DLC, saved files, and media.
- Drive failure – If the internal drive fails or becomes corrupted, replacing it will get your Xbox One working again.
- Improve speed – Upgrading to a 7200RPM drive or even an SSD will improve loading times for games stored on the internal drive.
For most users, upgrading to a bigger drive for more storage is the main motivation for replacing their Xbox One hard drive.
External hard drive vs. internal replacement
Besides replacing the internal hard drive, Xbox One owners also have the option of using an external USB hard drive for expanded storage. So which upgrade method is better?
External hard drives offer simplicity and flexibility:
- Easier to set up since they just plug in.
- No need to take apart the console.
- Can easily upgrade capacity later by buying a bigger external drive.
However, internal drive replacement has some advantages:
- Faster read/write speeds since SATA is much faster than USB.
- Everything is contained inside one console unit.
- Better airflow and cooling without external drive hanging off the side.
In the end, replacing the internal drive makes more sense if you are comfortable performing the hardware installation. External drives are best for casual users who want a quick storage upgrade without opening their console.
Tips for replacing an Xbox One hard drive
If you do decide to replace the internal hard drive on your Xbox One, here are some useful tips:
- Watch video tutorials online to see the full process before attempting.
- Use a clean and well-lit workspace to open up the console.
- Organize the screws and brackets as you remove them to avoid mixing them up later.
- Use plastic pry tools and handles rather than metal tools to avoid scratching.
- Be gentle when handling the hard drive circuit board to avoid electrostatic discharge damage.
- Do not touch the circuit board contacts where the SATA connectors plug in.
Take your time and be patient when opening up your console and switching out the hard drive. With the right precautions, you can avoid any hardware mishaps during the process.
Conclusion
While not quite as simple as plugging in an external drive, replacing the internal hard drive on an Xbox One is a straightforward DIY upgrade project for any console owner comfortable with some basic hardware tasks.
The ability to swap out the stock 500GB or 1TB drive for a much roomier 2TB hard drive makes it worthwhile for players who want to maximize their storage capacity for games. And the performance boost from a 7200RPM or SSD upgrade provides an added incentive.
As long as you select an appropriate SATA hard drive meeting Microsoft’s requirements, follow all the safety precautions, and take your time during disassembly, the process should go smoothly. So for Xbox One users wanting to expand storage or improve speed, replacing the internal hard drive delivers big benefits.
