Solid state drives (SSDs) have become increasingly popular in recent years as prices have dropped and performance has improved. Many people upgrading their computer storage are switching from traditional hard disk drives (HDDs) to SSDs. This raises an important question – should you defrag an SSD like you would a HDD? The short answer is no, you should not run traditional defrag utilities on SSDs. However, some special considerations apply when optimizing SSDs in Windows 10.
What is defragging?
Defragmentation, or defragging, is the process of rearranging data on a storage device to optimize read/write speeds. When a HDD is used over time, the data stored on it becomes fragmented. Files and directories get broken up into pieces scattered around the drive. This fragmentation slows down operations like loading files and applications. Defragging collects all these scattered pieces and consolidates them together for faster access.
Defragging works by examining the logical clusters used to store files and directories. It reorganizes them so that all the clusters for a given file are arranged sequentially. This consolidation makes it easier for the HDD head to read the full file without having to move back and forth excessively.
Why defragging is not recommended for SSDs
SSDs are very different from HDDs in their underlying technology. HDDs use spinning platters and read/write heads to access data. This mechanical nature means optimized data placement is important for performance. SSDs have no moving parts – they use flash memory chips to store data electronically. Reading data is very fast no matter where it is located on an SSD. So defragging provides little to no benefit for SSDs.
Not only is defragging ineffective for SSDs, it can actually be harmful in some cases. The flash memory cells in SSDs have a limited lifespan. Each cell can endure only a certain number of erase/write cycles before it fails. Defragging forces unnecessary writes as data is relocated repeatedly. This extra write activity shortens the usable life of the SSD. So defragging should be avoided to preserve longevity.
Trim and garbage collection
Windows 10 and modern SSDs use two maintenance processes specifically designed to keep SSDs running efficiently – TRIM and garbage collection.
The TRIM command allows the operating system to notify the SSD which data blocks are no longer considered in use. This happens when a file is deleted or overwritten. TRIM tells the SSD it can wipe these blocks internally and prepare them to be rewritten. Enabling TRIM prevents blocks from being reserved for old data that is no longer needed.
Garbage collection is a process SSD controllers run in the background. It searches for unused blocks that can be consolidated together. By erasing these blocks, free space is created in larger contiguous sections instead of small fragmented pieces. This improves write performance by reducing the need for the SSD controller to break up writes.
TRIM and garbage collection optimize SSDs automatically without defragging. Windows 10 enables TRIM support by default for compatible SSDs. And SSD firmware runs background garbage collection as needed.
Manually optimizing an SSD
Although defragging is ill-advised for SSDs, some minor manual optimization can be beneficial in certain situations. This is useful if your SSD’s performance has degraded substantially or you are preparing to securely erase all data from the drive.
Restart
Restarting your computer gives the SSD a chance to complete pending internal maintenance routines. Pending TRIM commands are executed on restart, clearing out blocks no longer needed. Any queued garbage collection processes will also run. Restart periodically if your SSD seems sluggish.
Run the TRIM command
Windows enables regular TRIM support by default, but you can also choose to manually issue a TRIM command at any time. This immediately tells the SSD to mark unused blocks for erasing without waiting for a restart.
To manually TRIM an SSD in Windows 10:
- Open the Command Prompt as administrator.
- Type “defrag /L” and hit Enter to get a list of all drive letters and types.
- Identify the drive letter for your SSD.
- Type “defrag
: /L /O” and hit Enter to trim the entire SSD.
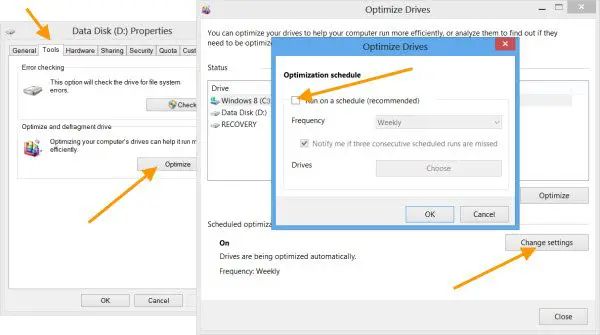
Run the Optimize Drives utility
Windows 10 has a built-in Optimize Drives utility that can perform some helpful SSD maintenance. To run it:
- Open the Start Menu and search for “Defragment”.
- Select “Defragment and Optimize Drives”.
- In the utility, locate your SSD, select it, and click “Optimize”.
- The optimize run will trim any unused blocks and consolidate free space.
Enable Write Caching
Enabling write caching in Windows 10 can improve SSD write speeds. Write caching collects data headed for the SSD and caches it in volatile memory first. This allows the writes to be consolidated together, minimizing fragmented data placement.
To enable write caching:
- Go to the Windows 10 Control Panel.
- Select System and Security > System.
- In the left sidebar, select Device Manager.
- Expand Disk drives and locate your SSD.
- Right click your SSD and select Properties.
- Go to the Policies tab and check Enable write caching.
- Click OK to save and exit.
Always safely eject or shut down the SSD before powering off your system to avoid risk of data loss when write caching is enabled.
Secure erase
If you want to wipe your SSD completely before disposing of it or giving it away, you can use the secure erase function. This fills the entire drive with zeros to permanently delete all data. It also restores SSD performance to factory fresh levels.
The easiest way to securely erase an SSD is using third-party disk utility software designed for the purpose. Follow the software instructions to perform a secure erase.
You can also use the command line to securely erase an SSD in Windows 10. This uses a feature called Enhanced Secure Erase specific to SSDs. It works by issuing the ATA command “SECURITY ERASE UNIT” directly to the SSD drive.
To securely erase from the command line:
- Open the Command Prompt as administrator.
- Type “diskpart” and hit Enter.
- Type “list disk” to show all disks. Identify your SSD.
- Type “select disk X” where X is your SSD number.
- Type “clean” to perform the secure erase.
- Type “exit” when done and close the command prompt.
Third-party defrag tools
Some third-party defrag tools claim they are specially designed to properly defrag/optimize SSDs. Examples include Diskeeper, PerfectDisk, and O&O Defrag. In general, such tools go beyond traditional defragging. Key features they offer for SSDs include:
- TRIM support – Manually issue TRIM rather than waiting for automatic Windows TRIM.
- Overprovisioning – Keep extra unused space to allow garbage collection.
- Wear leveling – Ensure all flash cells evenly wear over time.
- Free space consolidation – Rewrite used blocks together to reduce fragmentation.
Tools that only do traditional defragging should still be avoided on SSDs. But some tools provide SSD-specific optimization methods that can offer additional performance tuning beyond what Windows provides out of the box. The benefits are usually minor, but these tools can be helpful for squeezing extra performance out of an aging SSD.
Key recommendations
Based on the information provided above, here are some key recommendations for SSD optimization best practices:
- Avoid traditional defragmentation utilities designed for HDDs – they provide little to no benefit for SSDs.
- Let Windows handle TRIM, garbage collection, and other automatic optimization features for SSDs.
- Periodically restart your computer to allow pending maintenance tasks to run.
- Manually issue a TRIM command if your SSD seems sluggish.
- Use Optimize Drives occasionally for additional free space consolidation.
- Enable write caching to improve SSD write performance.
- Securely erase your SSD before disposal to wipe all data and restore peak performance.
- Consider third-party tools only for extra optimization features beyond Windows defaults.
Frequently asked questions
Is defragging bad for SSDs?
Traditional defragging utilities designed for HDDs should not be run on SSDs. The extra write activity can shorten the lifespan of SSDs. TRIM, garbage collection, and other SSD-specific optimization features are better suited than defragging.
Should I defrag my SSD Windows 10?
Windows 10 enables TRIM and other optimization features for SSDs automatically. You do not need to run traditional defrag tools. The built-in Optimize Drives utility can trim unused blocks and consolidate free space manually if desired.
What is the best SSD optimization software?
For basic SSD optimization, the Windows 10 utilities are sufficient. Third-party tools like PerfectDisk and Diskeeper offer extra features like manual TRIM control and overprovisioning. But the benefits over Windows defaults are usually small.
How often should I optimize my SSD?
There is no set optimal frequency for SSD optimization. Running Optimize Drives every month or two is reasonable for additional maintenance. If your SSD seems slow, try restarting your PC and optimizing it first before taking other measures.
Is it safe to defrag an SSD?
It is technically safe in terms of data integrity, but traditional defragging shortens the lifespan of SSDs by forcing unnecessary writes. SSD-specific optimization features like TRIM are better options that improve performance safely.
Conclusion
Defragging is not recommended for SSDs. The mechanical nature of HDDs makes defragging useful for them, but it provides little benefit for SSDs. At worst, it can shorten SSD lifespan by needlessly overwriting cells. Windows 10 provides TRIM, garbage collection, and other optimization features specifically designed for SSDs. Manual optimization via restarts, TRIM commands, and Optimize Drives can further improve performance. Traditional defrag utilities should be avoided, but some third-party tools offer helpful SSD-specific optimization features.