What is RAID?
RAID stands for “Redundant Array of Independent Disks.” It is a data storage technology that combines multiple physical disk drives into a single logical unit to improve performance and/or reliability (TechTarget). The different disk drives can be hard disk drives (HDDs), solid state drives (SSDs), or a combination of both.
The main goals of RAID are to provide increased data reliability through redundancy, improve performance, or both. Some key benefits of RAID include:
- Increased data reliability and fault tolerance – If a single disk fails, the data can still be accessed from the other disks.
- Faster read and write performance – Spreading data across multiple disks can improve input/output speeds.
- Capacity aggregation – Multiple smaller disks can be combined into a larger logical volume.
There are several standard RAID levels that provide different combinations of performance and redundancy:
- RAID 0 – Data is striped across disks for faster performance, but there is no redundancy.
- RAID 1 – Disk mirroring for 100% redundancy, but no performance gain.
- RAID 5 – Data is striped across disks with distributed parity for redundancy and improved read performance.
- RAID 6 – Similar to RAID 5, but with double distributed parity for higher fault tolerance.
- RAID 10 – Combination of RAID 0 striping and RAID 1 mirroring for both performance and redundancy.
RAID Options for Mac
There are several options for setting up RAID on a Mac computer. The native software RAID option is Apple RAID, which allows you to create RAID arrays directly in Disk Utility. Some key features of Apple RAID include:
- Supports RAID 0, 1, and JBOD configurations
- Set up RAID arrays with internal or external drives
- Easy to manage through Disk Utility
For more advanced RAID options, there is commercial software like SoftRAID from SoftRAID, Inc. SoftRAID provides features like:
- Supports wider range of RAID levels including RAID 5 and 6
- Additional data protection features
- Cross-platform compatibility
Lastly, Mac users can utilize dedicated hardware RAID devices and enclosures. These external devices handle the RAID calculations and configurations, providing high performance RAID without taxing system resources. Popular options include RAID enclosures from vendors like Promise and Western Digital.
Using Apple RAID on Mac
Mac computers running macOS High Sierra 10.13 or later have built-in software RAID capabilities through Apple’s Disk Utility app. Here are the steps to set up and configure Apple software RAID on Mac using Disk Utility:
1. Open Disk Utility on your Mac. It’s located in Applications/Utilities.
2. Click File > RAID Assistant in the menu bar.
3. Select a RAID type – RAID 0, 1, or 10. RAID 5 and 6 are not supported.
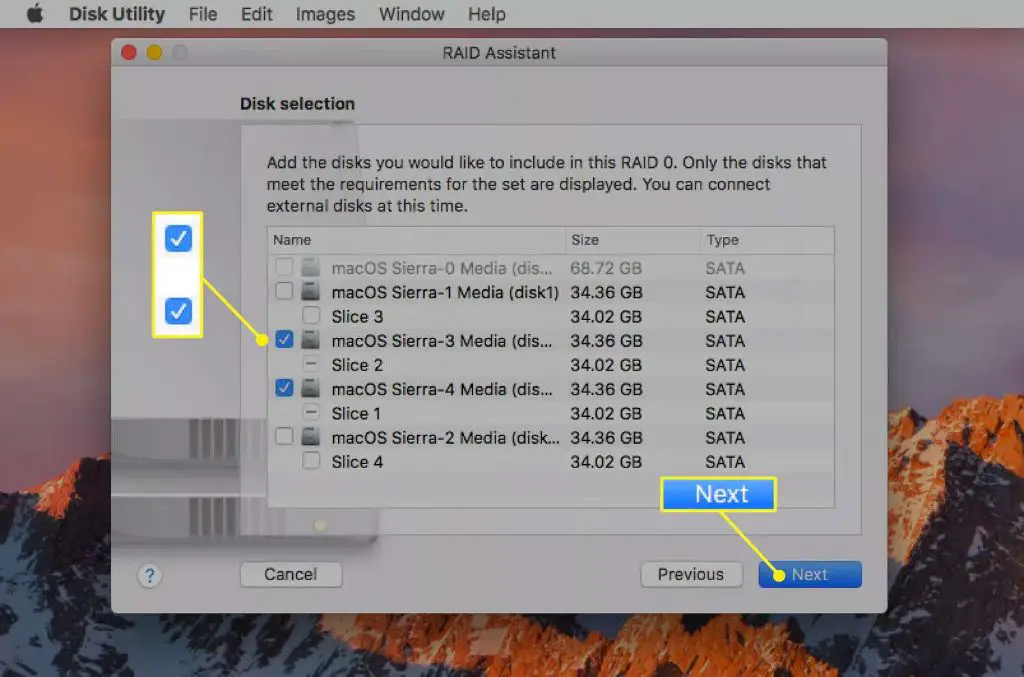
4. Select the checkbox for each disk you want to include in the RAID set.
5. Enter a name for the RAID set and click Create.
6. The disks will format and the RAID set will be created.
This built-in software RAID is supported on all Macs running High Sierra or later with at least 2 internal disks. The Apple T2 security chip found in newer Macs starting with the iMac Pro and MacBook Pro 2018 models allows for faster encryption.
For step-by-step visual guidance, refer to Apple’s Disk Utility documentation.
Third Party Software RAID
In addition to Apple’s built-in RAID functionality, there are third party software RAID options for Mac such as SoftRAID. SoftRAID is a popular software RAID solution that offers more flexibility and features compared to Apple’s RAID.
Some key benefits of using SoftRAID instead of Apple RAID include:
- Support for RAID levels 5 and 6, which Apple RAID does not offer
- Better performance for certain RAID configurations like RAID 1
- Ability to read data in parallel from multiple disks for faster throughput
- More configurable options for things like stripe size
- Additional features like scheduled verification of RAID integrity
The main downside is that SoftRAID costs money, while Apple RAID is free. SoftRAID also adds additional software complexity compared to using the built-in solution.
Overall, SoftRAID provides more flexibility and control over RAID setups on Mac, with increased performance in some scenarios. But Apple RAID may be sufficient for more basic RAID 0 or 1 configurations.
Hardware RAID Options
For Mac users who require higher performance or more robust RAID configurations, hardware RAID offers some advantages over software RAID options like Apple RAID or third party software.
One popular hardware RAID option is to use an external Thunderbolt RAID enclosure. These enclosures allow you to install multiple drives and configure them into a hardware RAID array while connecting to your Mac via a fast Thunderbolt interface. Some examples of Thunderbolt RAID enclosures include the OWC Mercury Elite Pro Quad and Promise Pegasus32.
For Mac Pro users or those with a PCIe slot, installing a dedicated PCIe RAID card is another option. These cards allow you to connect multiple internal drives and configure RAID in hardware. Popular PCIe RAID cards for Mac include the Sonnet Fusion R800 and HighPoint RocketRAID series cards.
The advantage of hardware RAID is that it offloads the RAID calculations and management from your Mac’s CPU, allowing for faster performance. Hardware RAID also supports more advanced configurations like RAID 5/6 for redundancy.
Choosing the Right RAID Option
When choosing the right RAID option for your Mac, there are a few key factors to consider:
Performance – Some RAID levels like RAID 0 offer faster disk performance by striping data across multiple drives. But there is no redundancy. RAID 1 and 5 provide redundancy but lower disk performance.Apple Support
Redundancy – RAID 1 mirrors drives while RAID 5 stripes data with parity for one drive failure tolerance. RAID 6 offers two drive failure tolerance but lower performance. You need to weigh the importance of redundancy vs performance.Apple Insider
Cost – Hardware RAID cards are more expensive than software RAID options. But they may provide better performance and compatibility. Software RAID using Apple’s Disk Utility is cheaper but has some limitations.
Ease of Use – Apple’s Disk Utility software RAID is easier to setup than third party or hardware solutions which require more configuration. Hardware RAID cards simplify management compared to software RAID.
By evaluating your budget, performance needs, redundancy requirements and technical skills, you can determine the ideal RAID solution for your Mac.
RAID 0 on Mac
RAID 0, also known as striping, is a RAID configuration that splits data evenly across two or more disks with no parity or redundancy (Apple Support). The benefit of RAID 0 on Mac is that it can significantly improve disk performance by spreading the load across multiple disks. This allows for faster read and write speeds compared to a single disk.
Some key benefits of using RAID 0 on a Mac include:
- Increased disk performance and speed for read/write operations
- Full utilization of combined storage capacity across disks
- Ideal for applications that demand high disk performance like video editing or 3D rendering
However, RAID 0 also comes with drawbacks:
- No fault tolerance – if one disk fails the whole array fails
- Increased risk of data loss since parity and redundancy are not used
- Diskrebuild is not possible since data is split across disks
Overall, RAID 0 can deliver noticeable speed improvements but lacks protection against disk failure. It’s best suited for non-critical data where performance is the priority over redundancy.
RAID 1 on Mac
RAID 1, also known as disk mirroring, is a popular RAID option for Mac users who want redundancy and protection against drive failure. With RAID 1, data is written to two or more identical drives simultaneously, creating a mirrored set. If one drive fails, the data remains safe on the other mirrored drive(s).
The main benefits of using RAID 1 on a Mac are:
- Data redundancy – With two or more mirrored drives, you have a built-in backup so data is not lost if one drive fails.
- Increased read performance – Reads can be distributed across multiple drives for potentially faster performance.
- Easy to recover from drive failure – If a drive fails, simply replace it and rebuild the RAID to restore full redundancy.
Some potential drawbacks of RAID 1 include:
- No increased write performance – Writes have to go to all drives, so write speeds remain similar to a single drive.
- Higher cost – RAID 1 requires at least two hard drives, doubling the storage cost.
- Half storage efficiency – The total capacity is equal to the size of the smallest drive. With two 1 TB drives, capacity is 1 TB.
On Macs, you can setup RAID 1 using Apple’s Disk Utility or third party RAID management software. Overall, RAID 1 provides excellent redundancy for Mac users who require a mirrored backup of their data.
RAID 5 and 6 on Mac
RAID 5 and 6 are popular choices for Mac users looking to balance performance, capacity, and redundancy for data storage. Both offer striping with distributed parity, which means data is split across multiple drives with parity information distributed across the array to allow for drive failure without loss of data.
Some key benefits of using RAID 5 or 6 on Mac include:
- Increased read and write speeds compared to a single drive, since data is striped across multiple disks.
- Ability to withstand one (RAID 5) or two (RAID 6) drive failures without data loss.
- More storage capacity efficiency than mirroring (RAID 1), since only a portion of the capacity is used for parity.
- Can be implemented via software RAID utilities or with a hardware RAID controller.
There are some downsides to consider as well:
- RAID 5 and 6 rebuild times can be lengthy if a drive fails. Larger capacity drives mean a longer rebuild.
- Write speeds may be impacted during rebuilds or if too many concurrent writes occur.
- Inability to withstand a second disk failure during a RAID 5 rebuild, leading to data loss.
- Increased storage overhead compared to JBOD or RAID 0 since parity data needs to be stored.
Overall, RAID 5 and 6 provide a good blend of performance, capacity, and redundancy for many Mac users. Choosing software vs. hardware RAID, drive types, number of drives, and capacity depends on budget, performance needs, and data protection requirements.
Conclusion
In summary, Mac users have several options for implementing RAID storage solutions. The native software RAID through Disk Utility is the easiest option for most users, providing RAID 0 and 1 configurations. For more advanced RAID modes like RAID 5/6, third party software or hardware RAID controllers are required.
For the average Mac user looking for improved performance or basic redundancy, Apple’s built-in RAID capabilities should suffice. Power users with more demanding storage needs may want to invest in a dedicated hardware RAID controller for maximum flexibility and performance. When implemented correctly, RAID can provide Mac users with increased storage speed, capacity, and fault tolerance.
Overall, RAID can benefit many Mac users if applied properly to match their goals. With a basic understanding of the different RAID types and implementations, both novice and expert Mac users can build solutions to enhance their storage performance and reliability.