The Mac OS Extended (Journaled) file system, also known as HFS Plus, is the default format used for volumes on Mac computers since 1998 [1]. It was designed by Apple specifically for Mac OS and is optimized for use on macOS devices. The “journaled” aspect refers to the file system’s journaling capability, which tracks file system metadata changes and can restore the volume to a consistent state in case of crashes or power loss [2]. This makes Mac OS Extended (Journaled) a very reliable and resilient file system for Macs.
Compatibility Overview
By default, Windows cannot natively read or write to volumes formatted with Mac OS Extended (Journaled). This Apple proprietary file system uses a different structure than NTFS and other Windows file systems, making it incompatible without additional software.
However, while Windows can’t directly mount and access Mac OS Extended volumes, there are some solutions that enable limited compatibility between Mac OS Extended and Windows.
Some key factors regarding compatibility include:
- Without any additional software, Windows cannot mount Mac OS Extended volumes with read/write access.
- Using third-party utilities, Windows can mount Mac OS Extended volumes as read-only.
- With extra drivers installed, Windows can mount Mac OS Extended with full read/write access.
- Boot Camp allows dual booting into macOS to directly access Mac OS Extended from a Mac.
So in summary, Mac OS Extended is not natively supported by Windows, but compatibility can be enabled through various workarounds.
Limitations
There are some important limitations to be aware of when using Mac OS Extended journaled drives with Windows.
By default, Windows cannot directly read or write to HFS+ drives like Mac OS Extended (journaled) without additional software. According to a SuperUser post, “Windows can’t read or write HFS+J (Mac OS Extended, Journaled) natively. Neither can the Windows installer. So you won’t even be able to install Windows on such a drive.”1
This means that to utilize Mac OS Extended drives on Windows, you need to install third-party utilities to enable read/write support. Without these extra drivers, the drives will be read-only in Windows by default.
Furthermore, Windows cannot be installed onto or booted from a Mac OS Extended drive out of the box. Boot Camp and other utilities are required to allow booting Windows from HFS+.
There are also file system limitations to be aware of. According to Quora, Mac OS Extended lacks “support for some of the advanced features available in the NTFS file system that Windows utilizes.”2 So some file attributes may not translate fully between Mac OS Extended and NTFS.
Third-Party Drivers
Although Windows cannot natively read or write to disks formatted as Mac OS Extended (HFS+) out of the box, there are a few third-party solutions that provide Windows compatibility.
One popular option is MacDrive by MediaFour. This utility installs a driver on Windows that enables full read and write access to HFS+ formatted drives. It works on all modern versions of Windows. MacDrive is a paid software utility, but offers a free trial period.
Another choice is Paragon HFS+ for Windows by Paragon Software. Similar to MacDrive, this utility provides drivers that let you mount HFS+ drives in Windows with full access. There is a free trial available, after which it requires a paid license.
Overall, these third-party utilities provide the necessary HFS+ driver support to enable Windows PCs to fully access Mac OS Extended formatted disks and drives. Without them, Windows can only read HFS+ disks in a limited, read-only capacity.
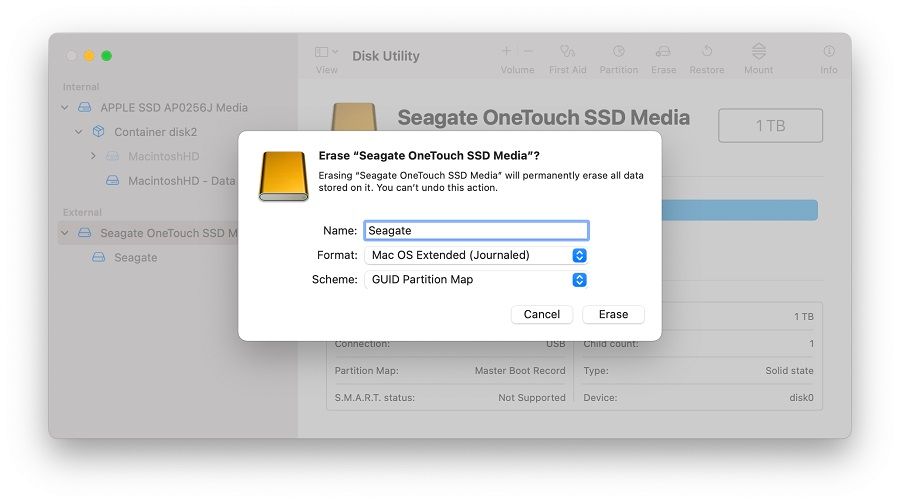
Using Disk Utility
To format a drive in Mac OS Extended (Journaled) on Mac, use the built-in Disk Utility application.
Follow these steps (source):
- Open Finder, and launch Disk Utility from the Applications > Utilities folder.
- Select the drive you want to format from the left sidebar.
- Click Erase at the top of the Disk Utility window.
- Choose “Mac OS Extended (Journaled)” as the format.
- Type a name for the drive.
- Click Erase to start the formatting process.
This will completely erase the drive and format it to work optimally with Mac computers and macOS. The process may take a few minutes depending on the drive size.
Read-Only Access
Connecting and accessing Mac volumes in read-only mode is fairly straightforward. When connecting an HFS+ formatted drive to a Windows PC, Windows will automatically mount the drive in read-only mode since it does not natively support writing to HFS+ file systems. You can view and open files on the HFS+ drive, but will not be able to modify, delete, or add new files.
Some solutions for gaining read-write access include using third-party drivers like Paragon HFS+ (https://www.paragon-software.com/home/hfs-windows/) or HFSExplorer (https://www.catacombae.org/hfsexplorer/), or reformatting the drive to a cross-platform file system like FAT32 or exFAT that both macOS and Windows support.
It’s also possible to manually mount some HFS+ drives in read-write mode on Windows using the command line, but this is an advanced process and can risk data corruption if not done properly.
Overall, while Windows does not officially support writing to HFS+ volumes, read-only access works seamlessly out of the box, providing a way to transfer files through a common exchange format.
Write Access
By default, Windows cannot write to Mac OS Extended (HFS Plus) volumes. However, third-party drivers can enable write support.
Software like Paragon HFS+ for Windows, MacDrive, and HFSExplorer install a driver that adds HFS Plus read/write capability to Windows. This allows Windows to mount HFS Plus drives with full access for reading and writing files.1
With one of these drivers installed, Windows can mount the HFS Plus drive and directly modify, add, edit, or delete files on the volume. The driver translates between Windows and Mac file systems.2
However, third-party HFS Plus drivers don’t necessarily provide flawless write support and may struggle with permissions or certain Mac-specific features. Test first before relying on full compatibility.3
Transferring Files
Copying files between Mac OS Extended and Windows can be done in a few different ways. The most straightforward method is to use a third party tool like Parallels Desktop. Parallels allows you to run Windows side-by-side with MacOS, making it easy to simply drag and drop files between the two operating systems.
You can also copy files over a network connection. By connecting both your Mac and Windows computer to the same local network, you can access the Public sharing folders on each device. This allows you to copy files back and forth.
Finally, you can use an external drive formatted as exFAT. This format is readable and writable by both MacOS and Windows. Just connect the external drive, copy files to it from each OS, disconnect, then connect to the other OS to access the files.
While there are some limitations, with the right tools it is possible to transfer files between Mac OS Extended and Windows partitions or devices. Care just needs to be taken to use the proper file transfer methods.
Boot Camp
Boot Camp allows you to install Windows on your Mac computer alongside the existing macOS operating system. This setup is known as “dual booting” and provides the ability to choose between macOS and Windows when restarting your Mac.
The free Boot Camp Assistant application from Apple guides you through partitioning your drive for Windows, downloading drivers, and installing Windows 10 or later versions. After setup is complete, you can select your preferred operating system each time your Mac boots up.
To install Windows using Boot Camp:
- Make sure you have at least 55 GB of free storage space on your Mac.
- Use Boot Camp Assistant to partition your drive and install Windows.
- Download the required Windows support software, which contains drivers and other tools to allow Windows to run smoothly.
- Boot into Windows and complete the installation.
Now you’ll be able to access Windows applications and games on your Mac. An important thing to note is that while in Windows, you won’t have access to macOS features and apps. You’ll need to restart to switch between the two operating systems.
Dual booting with Boot Camp provides the full Windows experience on your Mac. It can be very useful for Mac users who need access to Windows-only software for work, school, or gaming (https://support.apple.com/en-us/HT201468).
Conclusions
In summary, Mac OS Extended (HFS+) journaled volumes can be read natively in Windows but cannot be written to without additional software. There are a few options for gaining full read/write access on Windows:
- Use a third-party HFS+ driver like Paragon HFS+ or MacDrive
- Use Disk Utility on a Mac to format the drive to ExFAT instead, which is fully compatible between Mac and Windows
- Use Boot Camp to install Windows directly on a Mac and have full access to the native macOS volumes
The easiest cross-platform solution is to format external drives to ExFAT instead of Mac OS Extended. However, you lose some macOS-specific features like Time Machine compatibility and journaling. For internal macOS volumes, the best option is to use Boot Camp to run Windows natively when needed while preserving HFS+ formats.
Overall, reading HFS+ drives in Windows is straightforward but writing to them requires jumping through some hoops. With the right tools and preparation, you can achieve full compatibility between macOS and Windows.