Quick Answer
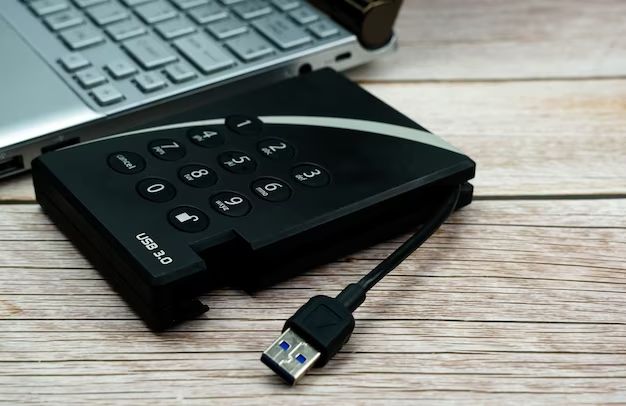
Yes, you can password protect a WD (Western Digital) hard drive to secure your data. WD hard drives come with built-in password protection and encryption features that allow you to set a password to restrict access to your drive.
Overview of WD Drive Utilities
WD (formerly Western Digital) is one of the leading manufacturers of external and internal hard disk drives. Most WD hard drives come with WD Drive Utilities, a software suite that allows you to configure drive settings, run diagnostics, and manage your drive.
A key feature of WD Drive Utilities is the ability to password protect and encrypt your WD hard drive. This allows you to secure your sensitive files and prevent unauthorized access. Here are some of the key things you can do with WD Drive Utilities:
- Set up a password – Add a password to restrict access to your WD drive. Only those who enter the correct password can access the drive’s contents.
- Enable hardware encryption – Encrypt your drive to scramble its contents. Even if the drive is removed, the data will remain secure.
- Customize the unlock drive mode – Choose to have your drive unlock automatically on system startup or prompt for the password every time.
- Erase the drive – Securely wipe your drive by overwriting the data with zeroes to prevent recovery.
These features allow you to balance drive security and convenience as per your specific needs.
Password Protecting a WD Hard Drive
Password protecting your WD hard drive is simple and straightforward using WD Drive Utilities. Here are the step-by-step instructions:
- Connect your WD hard drive to your computer and open WD Drive Utilities. This can be done either by:
- Going to the Start menu and searching for WD Drive Utilities
- Opening the WD Drive Utilities app that came bundled with your drive
- In WD Drive Utilities, go to the ‘Security’ tab. Here you will find the password protection options.
- Under ‘Password Protection’, check the box next to ‘Enable Password Protection’.
- Enter your desired password in the ‘Password’ and ‘Verify Password’ fields. Your password should meet the following criteria:
- Must be between 8-64 characters
- Should contain letters, numbers and special characters
- Should not contain repeating or sequential characters
- Under ‘Unlock Drive’ select your preferred unlock mode:
- Auto Unlock Drive – The drive will unlock automatically on system startup without prompting for password
- Prompt for Password – Requires you to enter password everytime to access drive contents
- Click ‘Set Password’ to apply the password protection settings.
- You will get a prompt to re-enter the password to confirm. Enter the same password again.
- Click ‘OK’ to complete the process. Your WD drive is now password protected.
- Safely eject and disconnect the drive. When you reconnect it next time, you will be prompted to unlock the drive by entering the password.
Once password protection is enabled, you must enter the correct password whenever you connect the WD drive to access its contents.
Changing or Removing WD Drive Password
If required, you can change or remove the password set on your WD drive. Here’s how to do it:
Changing Password
- Reconnect your password protected WD drive to the computer.
- Open WD Drive Utilities and go to the ‘Security’ tab.
- Enter your current password under ‘Change Password’ and click Update Password.
- Now set your new password and click ‘Set Password’ to apply the changes.
Your WD drive will now have the new password.
Removing Password
- Reconnect your password protected WD drive and launch WD Drive Utilities.
- On the Security tab, enter your current password under ‘Remove Password Protection’.
- Check the box to ‘Disable Password Protection’ and click Update Security Settings.
- You will get a prompt to re-enter your current password. Enter it correctly.
- Click ‘OK’ to confirm. Your WD drive’s password protection is now disabled.
The drive will no longer prompt you for a password on next connection.
Forgotten WD Drive Password
If you forget the password set on your WD drive, you will be locked out of the drive with no way to access the contents. Unfortunately, there is no built-in way to recover or reset your forgotten WD drive password.
Here are two options in case you lose your WD drive password:
Data Recovery Service
You can contact a data recovery service provider. They can attempt to bypass the password protection and recover your data. However, this can be an expensive process with no guarantee of success.
Format Drive
The other option is to completely format your WD drive. This will erase all the data but also remove the password allowing you to reset and reuse the drive. You can format the drive using WD Drive Utilities or Disk Management on Windows.
Clearly, avoiding password loss is critical. Make sure to keep your WD drive password in a safe and accessible place. Never use very complex passwords that are hard to remember.
WD Drive Unlock Software
If you use WD external portable hard drives like the My Passport or Elements series, there is a handy utility called WD Drive Unlock.
It lets you easily unlock your WD external drive without having to type in your password every time. Here’s how it works:
- Download and install WD Drive Unlock from the WD Support site.
- Run the program and select your locked external WD drive.
- Enter the correct password to unlock the drive.
- WD Drive Unlock will now save your drive credentials.
- When you reconnect the locked drive next time, WD Drive Unlock will automatically unlock it for you.
This allows you to access your protected WD external drive seamlessly while still keeping it securely locked when not connected to your system.
Using BitLocker for Password Protection
BitLocker is the built-in drive encryption software in Windows. It offers an alternative way to password protect your WD drives:
- BitLocker can password protect both internal and external drives
- Enables strong AES-128 or AES-256 bit hardware encryption
- Integrates tightly with Windows for improved convenience
- Lets you store the recovery key in your Microsoft account for backup
Here are the steps to use BitLocker to password protect a WD drive:
- Connect your WD drive to the computer
- Go to Start > Settings > Update & Security
- Select BitLocker from the left pane and click ‘Turn on BitLocker’
- Select the WD drive you want to encrypt
- Choose the encryption mode – Used Space Only or Entire Drive
- Specify how you want to store the recovery key
- Enter your password to proceed
- The drive will start encrypting in the background
- Once done, reboot your PC. The WD drive will now prompt for the BitLocker password
The drive will remain locked and accessible only via the BitLocker password.
Hardware Encryption vs Software Encryption
WD drives use advanced hardware encryption to secure your data. This is different than software encryption solutions like BitLocker. Here’s a comparison:
| Hardware Encryption | Software Encryption |
|---|---|
| Encryption is handled transparently by a dedicated chip on the WD drive | Your computer’s CPU has to encrypt/decrypt data |
| No impact on system performance | Can affect computer’s speed and responsiveness |
| Higher security – Hardware key is separate from data | Slightly lower security |
| Configure easily with WD Drive Utilities | Requires using Windows BitLocker |
For optimal performance and enhanced security, it is recommended to use the built-in hardware encryption capabilities of WD drives.
Conclusion
Password protecting your WD hard drive is critical to keep your sensitive data safe from unauthorized access. WD drives make it easy to set up password protection and hardware encryption using the intuitive WD Drive Utilities software. For external drives, WD Drive Unlock offers added convenience by automatically unlocking the drive on your computer. Alternatively, you can also use Windows BitLocker to password protect WD drives. Just make sure to store your password carefully and use strong protection combinations.