File recovery refers to the process of restoring a file that has been accidentally deleted or replaced. This is often necessary when a user overwrites an important file, not realizing they have lost the original version. For example, a user may save changes to a document, replacing the original file without intending to do so.
There are a few main reasons a user may accidentally replace an important file on their Mac:
- Saving edits to a file and overwriting the original version
- Copying content from one file to another, replacing the target file
- Restoring an older version of a file from backup, losing recent changes
- Deleting a file then saving a new file with the same name
File recovery allows users to restore their lost files and recover important data that may otherwise be permanently deleted. When a file is replaced, the original contents are not totally erased immediately, so recovery is often possible with the right tools.
How Replacing Files Works on Mac
On the macOS operating system, when you replace an existing file by saving a new file with the same name, the original data is not immediately erased from your storage device. Instead, macOS simply marks the space occupied by the original file as available for new data. The original data still physically exists on the drive until that space is overwritten by new files.
This occurs because macOS uses a file management system that does not actually delete file data when you replace a file. The directory entries are updated to point to the new file data, but the original data remains in place until the storage space it occupies is needed for other files. Even though the original file seems to be “gone” after replacement, its data still resides on the physical drive and can often be recovered using the right tools.
Knowing this fact about how macOS handles file replacement is key to understanding why it may be possible to recover a replaced file. The original file contents still exist as digital data on the drive, even if they are no longer accessible through the file system directory. Recovery software can scan the drive and find this residual data, allowing you to restore a previous version of the file.
Enabling File Recovery Utilities
MacOS comes with some built-in file recovery utilities that can help recover replaced files under certain conditions. Two key utilities are Time Machine and Versions.
Time Machine is Mac’s built-in backup software that can continuously or periodically back up your Mac’s data to an external drive. If you have Time Machine enabled and set up prior to replacing a file, you may be able to restore that file from a previous backup.
To recover a replaced file using Time Machine:
- Open Finder and select Enter Time Machine from the Time Machine menu
- Navigate to a backup made prior to replacing the file
- Locate and select the replaced file
- Click Restore to recover the file
Versions allows MacOS to save document history when using certain apps, like Pages, Numbers, and Keynote. You can browse previous versions of a document and restore an earlier iteration.
To restore a previous version:
- Open the overwritten document
- Click File > Revert To > Browse All Versions
- Select the version to restore
- Click Restore
Enabling these utilities ahead of time can make it much easier to recover replaced files. However, they may not help if the original was not backed up or versioned prior to being replaced.
Using Data Recovery Software
Third-party Mac data recovery software provides an effective way to recover deleted or replaced files on your Mac. Some popular Mac data recovery apps include:
Disk Drill (https://www.macgasm.net/data-recovery/10-best-data-recovery-software-mac/): Disk Drill can recover lost data from internal and external hard drives, SSDs, USB drives, SD cards, etc. It provides features like Quick and Deep Scan recovery methods, Protection tools to prevent future data loss, and Guaranteed Recovery service.
Stellar Data Recovery (https://www.reddit.com/r/datarecovery/comments/11q8vj7/what_software_should_i_use_for_mac_file_recovery/): Stellar Data Recovery offers recovery from deleted, lost, corrupted, or formatted volumes. It supports APFS, HFS, HFS+, NTFS, and FAT file systems. It can recover from hard drives, SSDs, SD cards, RAID arrays, and optical media.
Data Rescue (https://discussions.apple.com/thread/255226326): Data Rescue is designed specifically for Macs and offers customizable deep scanning and targeted file recovery. It works even if your system won’t boot and has advanced options like cloning.
To use Mac data recovery software, first download and install the app. Connect the drive you want to recover files from. Select the drive and scan type, then run a scan. You can preview found files before choosing which ones to recover. Finally, select a save location and recover your lost files.
Recovering from Time Machine
Time Machine is an in-built backup utility on macOS that can help recover previous versions of replaced or deleted files. Here is a step-by-step guide to recovering replaced files using Time Machine:
1. Open Finder and navigate to the folder where the original file was overwritten. https://www.macgasm.net/data-recovery/recover-replaced-files-mac/
2. Click on the Time Machine icon in the menu bar and select “Enter Time Machine”. This will open up the Time Machine interface showing snapshots of your disk from different time periods.
3. Navigate to the time snapshot that contains the original version of the replaced file. You can click through different time periods to find the right snapshot.
4. Once you locate the original file, select “Restore” to retrieve the file from that time snapshot. This will recover the previous version of the file to its original location.
5. The replaced file will now be overwritten with the recovered older version from your Time Machine backup. You have successfully recovered the lost file.
Time Machine stores hourly backups for the past 24 hours, daily backups for the past month, and weekly backups for everything older. So as long as the replacement happened in a time period covered by your backups, you should be able to recover the original file.
Recovering Previous Versions
One way to recover a replaced file on Mac is by using the Versions feature. This allows you to restore previous iterations of a file if you have made changes or replacements over time.
To recover a previous version of a file using Versions:
- Open the file in its associated application (e.g. Word, Excel, etc.).
- Click on the File menu and select “Revert To”.
- Choose “Browse All Versions”.
- A timeline will appear showing past versions of the file. Click on the checkmarks to preview different versions.
- When you find the version you want to restore, click “Restore” to revert back to that iteration of the file.
This allows you to dig into a file’s history and find an earlier unaltered version before changes or replacements were made. Versions is enabled by default for apps like Word, Excel and PowerPoint. Just be sure to save iterations as you work for maximum recoverability.
For more info, refer to Apple’s support guide.
Using Data Recovery Software
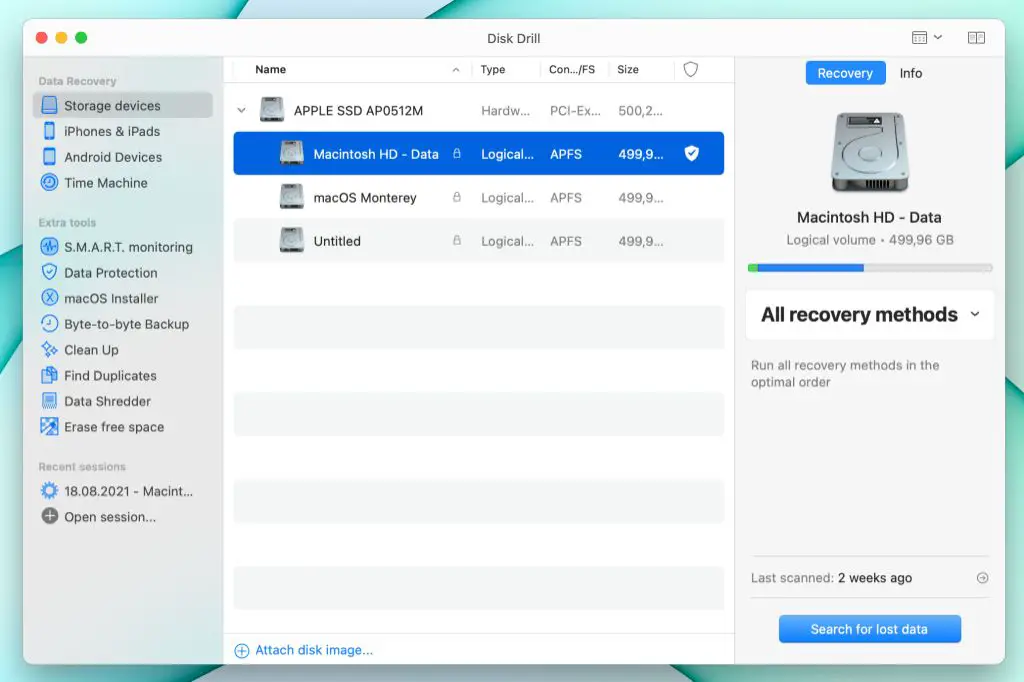
One of the most effective ways to recover an overwritten file on Mac is by using data recovery software. Applications like Disk Drill are specifically designed to dig deep and find deleted files that may still be recoverable.
Here is a step-by-step guide for recovering overwritten files using Disk Drill:
- Download and install Disk Drill from the official website: https://www.cleverfiles.com
- Open Disk Drill and select the drive you want to scan for lost data
- Click “Search for lost data” to begin the scan. This may take some time depending on the size of your drive.
- Once the scan completes, click “Review found items”. Disk Drill will display a list of recoverable files.
- Browse through the list and preview files to find your overwritten document. Select it to recover.
- Choose a recovery destination and click “Recover” to restore your overwritten file.
With data recovery software, overwritten files can often be recovered as long as they haven’t been completely overwritten by new data. But it’s important to stop using the drive with the lost file, as continued usage decreases the chances of recovery.
Recovering from Trash
If you recently replaced a file and emptied the Trash, you may still be able to recover the old file from the Trash before it is permanently deleted. On a Mac, when you empty the Trash, the files are not immediately removed from your system. Instead, they are held in a secondary ‘invisible’ Trash for a period of time before being completely deleted. This gives you a window where you can rescue deleted files.
To recover a recently replaced file from the Trash on Mac:
- Open the Trash folder – you can find it in the Dock or by searching Finder.
- Right click in the empty Trash folder and select ‘Browse Trash’ from the menu.
- A window will open showing the invisible Trash contents. Look for your replaced file here.
- Drag the file out of the Trash back to its original location or another safe spot.
This allows you to rescue an accidentally replaced file even if you already emptied the Trash. However, there is only a limited window before the invisible Trash is cleared, so act quickly. This method won’t work if too much time has passed since emptying the Trash.
Preventing Accidental File Replacement
While recovering an overwritten file may be possible in some cases, it’s always best to take steps to prevent replacing important files in the first place. Here are some tips to help avoid accidentally overwriting files on Mac:
Enable Time Machine backups. Time Machine can help you easily restore previous versions of a file if you accidentally replace it. Make sure Time Machine is actively backing up your important files [1].
Use versioning in apps. Many apps like Microsoft Word have automatic versioning that saves previous iterations as you work. You may be able to restore a previous version if you overwrite the current file.
Make use of iCloud. If you have desktop and documents syncing enabled in iCloud, you may be able to restore a previous version of a file from iCloud.com [2].
Be careful with Save As. Avoid using ‘Save As’ when saving an existing file with edits. Instead, use ‘Duplicate’ first to create a separate copy.
Disable auto-save if possible. Some apps auto-save changes which could lead to a file being unintentionally overwritten.
Leverage extra confirmation prompts. Some apps like Excel can be configured to prompt for confirmation before overwriting a file.
When File Recovery is Not Possible
In some cases, it may not be possible to recover a replaced file on Mac. This typically occurs when the replaced file’s data has been completely overwritten by new data, making the original contents unrecoverable.
When a file is deleted on a Mac, the operating system simply marks the space that file occupied as available for new data. The original contents still exist on the drive until that space is overwritten. However, once new data fully overwrites the space, the original file becomes essentially unrecoverable.
According to EaseUS, “The state of unrecoverable means that all data clusters have been overwritten or the file length is zero.” [1] If every byte of a deleted file has been overwritten by new data, there is no way for data recovery software to retrieve the original contents.
As one Reddit user explained, “Any data which has been overwritten is completely unrecoverable regardless of what software you use.” [2] Once overwritten, the original data is simply gone.
According to the CCleaner community forums, “Overwritten simply means that since the file was deleted some or all of the data clusters previously allocated to it have been allocated to other files/directories.” [3] When fully overwritten, none of the original data remains.
So in summary, if a deleted file has been completely overwritten by new data, it is generally unrecoverable by any means. The original contents no longer exist intact on the storage media. Preventing accidental overwrites is key to maintaining the ability to recover deleted files.