Restoring an iPad to factory settings is often necessary to fix software issues, remove installed apps and data, or prepare an iPad for sale or gift. However, a full restore also deletes all of the iPad user’s data, documents, photos, music, and other files stored on the device. Many iPad owners are hesitant to restore their device because they don’t want to lose their personal content and memories. Fortunately, there are a few different methods to restore an iPad without losing data.
Back Up iPad Data Before Restoring
The easiest way to restore an iPad without losing data is to back up the iPad content before performing the restore. There are two main options for backing up an iPad:
- iCloud backup
- iTunes backup
With an iCloud backup, all of an iPad user’s photos, videos, documents, app data, messages, and device settings are stored securely in iCloud. iCloud backups happen automatically when the iPad is connected to WiFi and power, or can be manually triggered at any time. As long as iCloud Backup is enabled, all current iPad data will be safe before a restore.
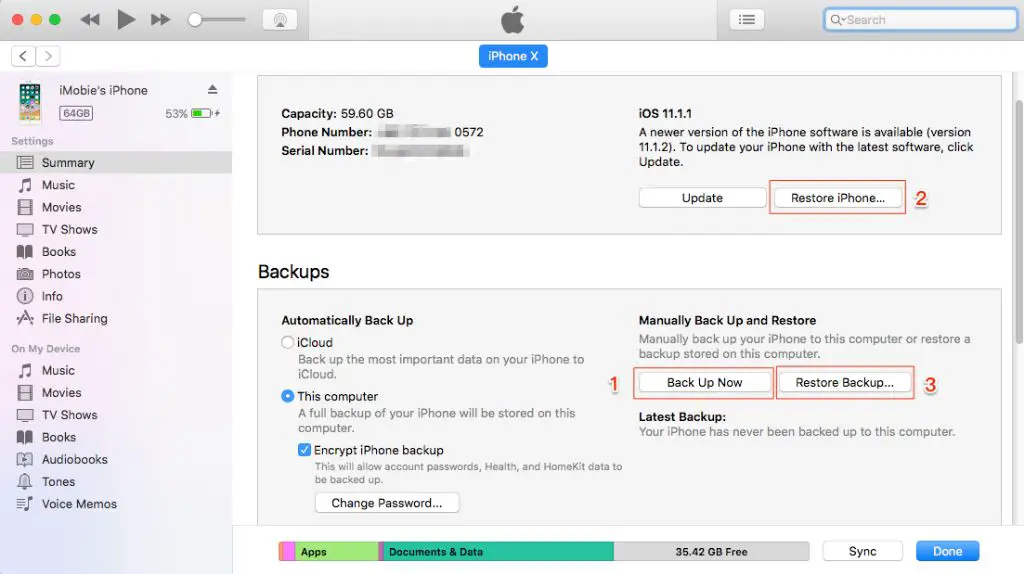
iTunes provides a similar wired backup option by connecting the iPad to a computer with iTunes installed. An iTunes backup will also preserve the iPad user’s content and settings. After backing up the iPad via iCloud or iTunes, it can then be safely restored to factory conditions without permanent data loss.
How to Backup an iPad
Here are the steps to backup an iPad using iCloud or iTunes before a restore:
- Open the Settings app and tap on your Apple ID profile at the top of the screen.
- Select “iCloud” and ensure that iCloud Backup is enabled.
- Tap “Back Up Now” to manually trigger an iCloud backup if desired.
- Alternatively, connect the iPad to a computer with iTunes installed.
- Open iTunes on the computer, select your iPad, and click “Backup Now.”
As long as a current iCloud or iTunes backup exists, you can safely restore the iPad knowing your data is protected.
Restore iPad from Backup After Reset
Once the iPad restore is complete, you can then restore your data from the iCloud or iTunes backup:
- Setup the freshly restored iPad until you reach the Apps & Data screen.
- Tap “Restore from iCloud Backup” or “Restore from iTunes Backup.”
- Sign in with your Apple ID and select the desired backup.
- Allow time for the backup data to fully restore.
Your iPad data including apps, documents, photos, settings, and more will all reappear after the restore backup process finishes. It’s that easy to reset an iPad without permanently losing any personal information or customized configurations.
Use Selective Backup and Restore
For users that only need to preserve specific iPad data instead of the entire backup, it’s possible to selectively backup certain apps and content before a restore. Here are two ways to restore an iPad with only selected data:
iCloud Selective Restore
- On the iPad, open the Settings app and tap your profile.
- Go to iCloud > Manage Storage > Backups.
- Tap on your iPad backup, then choose “Select Data to Restore.”
- Choose which apps and data to restore.
This will allow you to restore only your messages, contacts, calendars, bookmarks, and more without everything else.
iTunes Selective Restore
- Open iTunes on your computer and connect the iPad.
- Click on your iPad in iTunes, then choose “Restore Backup.”
- Check the box for “Encrypt local backup” if it’s not already checked.
- Click Restore and wait for the backup process to finish.
- Go to the iTunes menu and choose Preferences.
- Click on Devices and select “Prevent backups.”
- Connect the freshly restored iPad to iTunes.
- When asked if you want to set up as new or restore, choose “Restore from this backup.”
- Finally, click the Restore button.
You will then have the option to individually select which content to restore selectively. This is an alternative way to restore only certain iPad data instead of everything.
Restore from iCloud Website
For users who have performed an iCloud backup, certain data like Contacts, Calendars, and Bookmarks can also be restored directly from iCloud.com without having to restore the entire iPad backup:
- Go to iCloud.com and login with your Apple ID.
- Navigate to the appropriate app section such as Calendars or Contacts.
- Click the settings icon or gear button to access Restore options.
- Click Restore to transfer data back to your device.
While limited compared to full iCloud and iTunes restores, the iCloud website does provide another way to directly restore some iPad information as needed.
Restore iPad Using Device-to-Device Transfer
For users with multiple iPads, you can directly transfer your iPad data to another device before a restore via Apple’s device-to-device migration process:
- Start by backing up your old iPad to iCloud or iTunes as usual.
- Power on your new iPad and follow the Setup Assistant prompts.
- On the Apps & Data screen, tap the “Move Data from [Old iPad]” button.
- Place the two iPads near each other and point the camera on the new device at the old iPad screen.
- The Quick Start process will automatically transfer your data between the two iPads via device-to-device migration.
After your data is copied to the new iPad, you can safely restore the old iPad knowing your apps, data, and settings are preserved.
Restore iPad Using Third-Party Apps
There are various third-party apps on the App Store that provide alternative methods to backup and restore specific data from your iPad. For example:
- WhatsApp: Backs up your WhatsApp chats and messages to iCloud or Google Drive.
- Chrome: Syncs your Chrome bookmarks, browsing history, and open tabs to your Google account.
- Dropbox: Stores iPad photos, videos, and other files in the cloud.
While not full iPad backups, these apps do allow restoring selective data if needed.
Restore iPad Using Local iTunes or Finder Backup
If you don’t want to backup your iPad to iCloud, you can create a local backup using iTunes on a Windows PC or Finder on a Mac. Then restore from that local backup after the iPad reset.
To backup an iPad locally:
- Connect the iPad to your computer via USB.
- Open iTunes on a Windows PC or Finder on a Mac.
- Select your iPad under the Devices list.
- Click Back Up Now to save a local backup file.
You can then restore this iTunes or Finder backup to your iPad even without an internet connection. Just reconnect the device after resetting and select Restore from Backup.
Extract iPad Backup Data to Your Computer
If you need to access specific apps and data from your iPad backup, you can use software like iMazing to extract and save iPad backup files to your computer as a temporary archive.
With iMazing installed on your Mac or Windows PC, you can:
- Preview the contents of iCloud and local iTunes backups.
- Selectively extract data like messages, voicemails, and photos.
- Export and save backup data to your computer.
- Transfer extracted data back to your iPad after restore.
This provides a way to archive and extract iPad backup data to your computer as needed before a full restore erases everything.
Restore Deleted Photos with iCloud Photo Library
If you accidentally delete important photos or videos from your iPad, you may be able to recover them with iCloud Photo Library.
As long as you have iCloud Photo Library enabled, any photos you take on your iPhone, iPad, or iPod touch are automatically stored in iCloud. This allows you to restore deleted photos using iCloud.com:
- Go to iCloud.com and login to your account.
- Open the Photos app.
- Navigate to the Recently Deleted album.
- Select any photos or videos you want to recover.
- Click the Recover button to restore deleted photos from iCloud.
iCloud Photo Library provides a safety net against accidental or permanent photo loss on your iPad and other iOS devices.
Jailbreak iPad to Preserve Data
For advanced iPad users comfortable with jailbreaking their device, there are ways to backup and restore an iPad without completely resetting it in the process.
Tools like Cydia Impactor allow jailbreaking an iPad to uninstall apps and modifications while preserving user data. This represents a more direct restore method since it modifies the iPad system itself instead of resetting to factory default settings.
However, jailbreaking comes with inherent risks of bricking your device if the mods fail. Most average users should avoid jailbreaking unless absolutely necessary.
Consult a Professional Data Recovery Service
If your iPad is already wiped and none of the usual backup and restore options are available, you may need to enlist professional data recovery services as a last resort.
Data recovery specialists use forensic tools to scan your iPad’s storage at the lowest level to potentially extract remnants of deleted files. This is an expensive, time-consuming process with no guarantee of success, but can work as a final effort for irreplaceable lost data.
Some reputable iPad and iPhone data recovery services include:
- DriveSavers
- DataDoctors
- iPad Rehab
- Cipherlab Data Recovery
Keep in mind that successful data recovery from a wiped iPad is never guaranteed. Professional services cannot restore deleted data if those files have been completely overwritten by a restore or iOS update.
Prevent Data Loss Before Restoring
To avoid being in a position where you might permanently lose personal iPad data and memories, be proactive with regular backups:
- Enable iCloud Backup and check it frequently
- Backup to iTunes on a computer for redundancy
- Use iCloud Photo Library to protect photos
- Manually backup important iPad data to external storage
- Avoid using a passcode if possible to ensure backup access
Staying disciplined with multiple iPad backups provides peace of mind that you can always restore your device without data loss.
Conclusion
Restoring an iPad can be performed without losing any personal data, applications, or device settings if you understand the proper backup and restore procedures.
Key takeaways include:
- Always fully backup your iPad to iCloud or iTunes before a planned restore.
- Restore the iPad backup after the reset to repopulate your data.
- Selectively restore only certain apps and data if you don’t need the full backup.
- Use iCloud Photo Library to recover deleted photos if needed.
- Enlist professional data recovery only as a last resort option.
Following these iPad backup and restore best practices will ensure you can cleanly wipe your device without permanently losing any important information or memories in the process.