Securely erasing data from an SSD on a Mac is important to prevent sensitive or personal data from being recovered later. Secure erase overwrites existing data to make it unrecoverable. This is especially crucial for SSDs because they handle data deletion differently than traditional hard disk drives (HDDs).
While simply deleting files or reformatting an HDD renders the existing data difficult to recover, data remains in place on SSDs even after deletion. Their performance optimizations can allow deleted files to be easily recovered. Secure erase overwrites existing data at a low level to prevent this.
On Macs, you have a few different options to securely erase an SSD. macOS includes secure erase features like fast zero out as well as crypto erase. Alternatively, third party tools can securely erase either the free space or the entire drive. Understanding the different methods can help you choose the best secure erase option for your needs.
How SSDs Store Data Differently Than HDDs
SSDs (solid-state drives) store data differently than traditional HDDs (hard disk drives). Whereas HDDs record data magnetically to spinning platters, SSDs use flash memory chips to store data electronically.
Specifically, SSDs organize data in pages that are grouped into blocks. When data is written to an SSD, it fills up empty pages in mostly-empty blocks. This allows fast write speeds. However, it also means data can become fragmented over time as pages fill up.
When files are deleted on an SSD, their pages are marked as empty but the data itself remains intact in the flash memory. This is important to understand for securely erasing SSDs, as we’ll discuss next.
For more details on how SSDs work, see this useful resource: https://darwinsdata.com/how-do-i-recover-wiped-data-from-ssd/
Why Secure Erase Is More Complex On SSDs
Securely erasing data from SSDs is more complex than traditional hard disk drives (HDDs) due to the way SSDs handle data storage and garbage collection. SSDs use wear leveling, trim commands, and garbage collection which makes it difficult to fully remove data.
Wear leveling spreads out writes across all the blocks of the SSD evenly to improve longevity. This means that even after erasing data, remnants may exist in unused blocks [1]. Trim commands notify the SSD which blocks of data are no longer needed, but this data isn’t immediately erased. Garbage collection rewrites existing data to free up blocks, leaving traces of old data behind [2].
Performing a standard erase on an SSD doesn’t guarantee sanitization unlike HDDs. Advanced techniques are required to overcome these challenges and fully sanitize an SSD.
Using macOS Secure Erase Features
macOS includes some built-in tools that can help securely erase data from an SSD:
Disk Utility Secure Erase
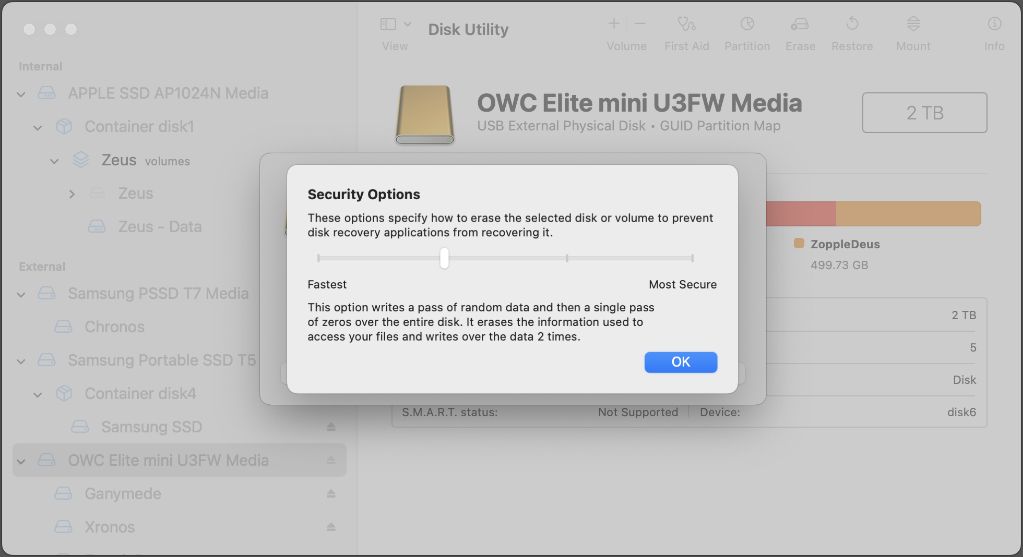
The Disk Utility application in macOS allows you to perform a secure erase on an entire SSD drive. This will overwrite all data on the drive to make it unrecoverable. To use this feature, open Disk Utility, select the SSD drive, click “Erase” and choose “Most Secure 3-Pass Erase” as the scheme. This will take several hours but will thoroughly wipe the drive (Source).
Firmware Password
You can set a firmware password on your Mac which prevents the SSD from being accessed if removed from the computer. This protects data in case the drive itself is lost or stolen. Enable this in System Preferences > Security. Be sure to remember the password as resetting it requires taking the Mac to an Apple store (Source).
FileVault Encryption
FileVault provides full-disk encryption for the SSD so all data is encrypted. This won’t erase data but prevents it from being read if the drive is removed. Enable FileVault in System Preferences > Security. Just be sure to avoid losing the password as data will be unrecoverable without it.
Third-Party Secure Erase Tools
In addition to the built-in secure erase features in macOS, there are third-party tools available that can securely erase an SSD on a Mac. Some popular options include:
Erase-it – This is a bootable tool that can completely erase SSDs by overwriting all data with random bit patterns. It works on macOS as well as Windows.
Disk Drill – Disk Drill has a “Wipe Disk” feature that can perform a secure erase on internal and external drives. It utilizes multiple overwrite passes to ensure data is unrecoverable.
Stellar Data Eraser – This Mac app provides advanced erase methods optimized for SSDs, including DoD 5220 and Peter Gutmann’s 35-pass algorithm. It can target individual partitions or the full drive.
These third-party tools provide advanced, customizable options for securely erasing SSDs. They implement erase standards designed specifically to combat SSD data recovery and make data unrecoverable, even with forensic methods. However, they do require rebooting into the tool rather than erasing from within the macOS system.
Erasing Free Space vs Whole Disk
When securely erasing an SSD on Mac, there are two main options: erasing only the free space or erasing the entire disk. Both methods can effectively remove sensitive information. However, there are some key differences between them.
Erasing only the free space https://discussions.apple.com/thread/251770507 is simpler and faster. It overwrites only the unused space on the SSD where deleted files may still reside. This leaves the user data intact. Erasing free space can be done using the standard Erase Free Space feature in Disk Utility https://csulb.teamdynamix.com/TDClient/KB/ArticleDet?ID=58444. However, if the SSD is encrypted with FileVault, erasing free space provides minimal benefit since encrypted data is indistinguishable from random data.
Erasing the entire disk overwrites all sectors on the SSD, removing all user data and formatting the drive. This takes much longer but ensures all potentially recoverable data is scrubbed. The downside is the SSD is wiped clean, requiring the OS and apps to be reinstalled. macOS includes a Secure Erase option that performs this task by overwriting all data with zeroes. Completely erasing the SSD provides maximum data removal assurance.
In summary, erasing only free space is faster but limited in scope, while fully erasing the disk is comprehensive but time intensive. The approach depends on factors like encryption usage and the sensitivity of erased data.
Securely Erasing Individual Files
When you want to securely erase specific files or folders on your Mac’s SSD, you have a few options:
You can use the Finder’s Secure Empty Trash feature to permanently delete files that have been moved to the Trash. Simply select “Secure Empty Trash” from the Finder menu after files have been moved to the Trash to overwrite those files’ data (source).
For files not already in the Trash, you can use the Terminal to securely erase them. The command rm -P filename will shred and overwrite a file before deletion (source).
There are also third party Mac file shredder apps like Permanent Eraser that can wipe individual files, folders, or entire drives. These tools use secure deletion methods like DoD 5220.22-M or Gutmann to scramble sensitive data (source).
The key is overwriting a file’s data multiple times before deletion so it cannot be recovered. For individual files containing sensitive information, these file shredder tools provide the most secure option.
Physically Destroying the SSD
If you need to securely erase an SSD beyond any chance of data recovery, physically destroying the drive is the most foolproof option. There are a few ways to physically destroy an SSD:
Disintegration: An SSD shredder or granulator can break down the SSD into small pieces through shredding, crushing, or grinding. This mechanically destroys the NAND flash memory chips where the data is stored.1
Degaussing: A powerful magnet can scramble and erase data on an SSD. However, degaussing is less reliable on newer SSDs with denser NAND flash memory.2 Special degaussing equipment may be needed.
Incineration: Burning the SSD in an industrial high-temperature furnace will ensure the NAND chips and data are completely destroyed through intense heat. This may not be practical for consumers.
Acid bath: Immersing the SSD in a corrosive acid can dissolve the internal components and data. However, this method is dangerous and not recommended.3
Hammer: As a more hands-on approach, physically smashing the SSD with a hammer can damage the internal chips and circuitry beyond repair.1
While physical destruction can seem extreme, it ensures no data can ever be recovered from the SSD. This may be important for highly sensitive information.
Recovering Data After a Secure Erase
While secure erase is designed to make data unrecoverable, there are some challenging methods that may allow partial data recovery in certain circumstances. However, successfully recovering meaningful data from an SSD after a proper secure erase is extremely difficult.
If the SSD controller still maintains some of the original mapping between logical block addresses and physical blocks after the secure erase, data fragments that have not been fully overwritten yet may be recoverable. Sophisticated scanning techniques may be able to find these leftover data remnants. However, this requires physical access to the SSD controller and specialized data recovery expertise.
Researchers have demonstrated limited success recovering small amounts of fragmented data using scanning electron microscopes and magnetic force microscopes. But this is an extremely costly and tedious process with low success rates. Typical consumer data recovery tools would not be able to recover anything meaningful after a full drive secure erase. Securely erasing individual files or free space is more prone to data remnants than a full drive overwrite.
While no data sanitization method is perfect, SSD secure erase following industry best practices is generally accepted to render data unrecoverable in any practical sense. If recovering highly sensitive data, physical destruction of the drive may provide extra assurance.
Conclusion
Securely erasing an SSD on a Mac requires more care than traditional HDDs. SSDs spread data across the drive in ways that make basic erasing ineffective. Use macOS built-in tools like secure erase free space or disk utility wipe, or third party tools specifically designed for SSD secure erase. Focus on wiping free space, or the whole disk if truly necessary. Avoid excessive erasing which wears the drive. Recovering data after a proper secure erase of an SSD is difficult to impossible. With the right steps, you can feel confident your SSD data has been securely wiped from a Mac.