Microsoft Excel is one of the most popular and widely used spreadsheet programs available today. With Excel, users can create complex spreadsheets, charts, calculations, and more to help analyze data and make more informed decisions.
One very useful feature in Excel is the ability to track changes made to a workbook. Excel’s change history allows you to see what edits have been made, when they were made, and by whom. This provides transparency and accountability when multiple people are editing the same workbook.
Viewing Change History in Excel
Excel makes it easy to view the change history of a workbook. Here are the steps to see tracked changes:
- Open the Excel workbook for which you want to check the history of changes.
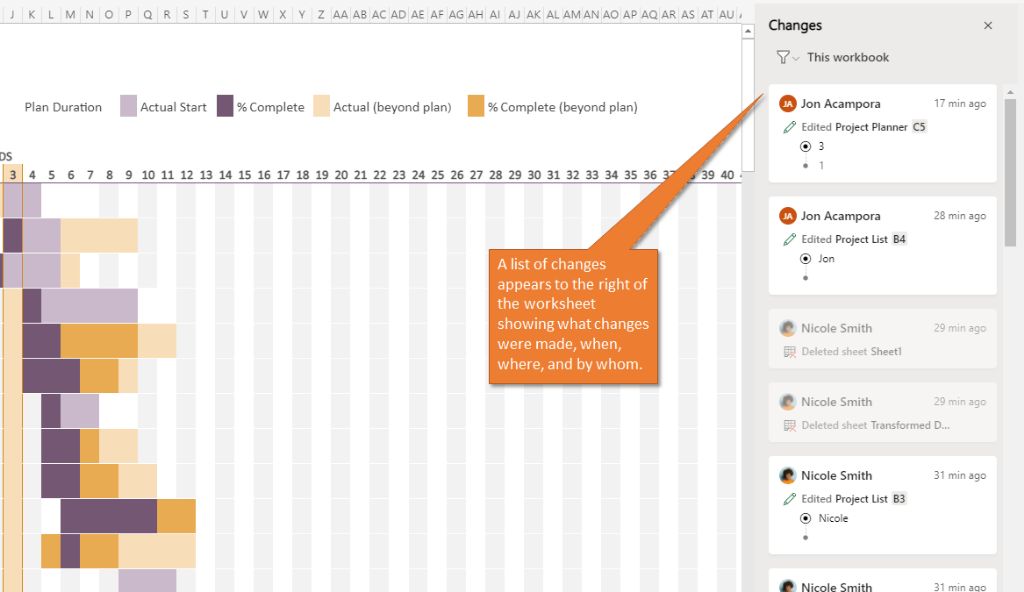
- On the Review tab in the ribbon, click on Track Changes then Highlight Changes.
- This will open the Highlight Changes dialog box.
- In the box, you can select when tracking began and the type of changes you want to highlight.
- Click OK. This will turn on change highlighting in the worksheet.
- Any changes that meet the criteria you selected will be highlighted in the document.
- To view specific details about a change, right click on it and select Show Revision.
- This will display information such as when the change was made, who made it, and what exactly changed.
- You can toggle through all the changes individually this way.
As you can see, Excel offers a robust change tracking capability to see alters made to a workbook directly within the program.
Who Can See Change History
By default, change history tracking is turned off in Excel. To enable it, users will have to actively turn on the feature. Once enabled, any user who opens the Excel file can view the change history if they desire.
However, being able to see the change history depends on the user’s editing permissions in the file. There are three levels of editing access in Excel:
- Read-only – Users can only read the workbook. They cannot make any changes, so change tracking does not apply.
- Sharing changes – Users can make edits to the workbook which are then tracked. But they cannot finalize changes until the workbook owner accepts them.
- Full access – Users can freely modify and save changes to the workbook. All changes are tracked.
So a user must have at least sharing changes or full access permission to be able to view change history. Read-only users cannot see tracked changes.
History Limitations
Excel can only maintain a limited history of workbook changes. Here are some key limitations to be aware of:
- The number of changes that can be tracked at one time is 1,024. Once this limit is reached, Excel begins removing older edits from the history.
- By default, change history is not saved when a workbook is saved and closed. An option to preserve the information must be enabled.
- If multiple users are editing the same shared workbook simultaneously, change collisions can occur which limits tracking accuracy.
- Changes cannot be tracked for some types of edits like formatting modifications or the reordering of data.
Due to the above restrictions, change tracking in Excel should not be considered an absolute complete audit log. While very useful, there are limitations in relying on the change history alone for 100% accountability.
Turning On Change Tracking
Since change tracking is disabled by default in Excel, you will need to turn it on to start recording edits. Here is the process:
- Open the Excel workbook for which you want to track changes.
- Navigate to the Review tab and click on Track Changes.
- In the drop-down menu, select Highlight Changes.
- In the Highlight Changes dialog box, check the box for Track changes while editing.
- You can also choose the color to highlight edits and whether to list changes on a separate sheet.
- Click OK to save settings.
Now any changes made from this point forward will start being recorded in the document’s history. The change tracker will record details like when the edit was made and by whom.
Preserving History
By default, the change history is discarded when you close the Excel file. To retain the information, you must enable history preservation before closing:
- Go to File > Options > Advanced.
- Under “Editing options” check “Keep change history after saving workbook.”
- Click OK to enable.
Now when you save and close the workbook, the tracked changes will persist. The next time the file is opened, the change history will still be available.
Reviewing Tracked Changes
Once change tracking is enabled, you can review a workbook’s edit history in a few ways:
- Hover over changed cells – this displays a comment with summary change info
- Right click > Show Revision – see specific details of a change
- Review tab > Track Changes – navigate through edits
- History worksheet – lists change metadata like timestamps and users (optional)
The easiest way is often to simply scroll through the worksheet – all edited cells will be highlighted based on your settings. This allows you to quickly visually identify where changes occurred.
For more details on a specific change, right click on an altered cell and choose Show Revision. A pop-up will display the before and after values, who made the change, when, and more.
The Review tab also lets you jump between changes using the Previous and Next buttons. And the History worksheet shows a chronological list of all edits in the workbook.
Accepting or Rejecting Changes
When change tracking is turned on, edits made by others are considered pending changes by default. As the workbook owner, you have the option to accept or reject changes individually or all at once.
To accept or reject a specific change:
- Right click the altered cell and choose Show Revision.
- Click Accept to confirm the change, or Reject to undo it.
To accept or reject all changes at once:
- Go to the Review tab and click Track Changes.
- Choose Accept All Changes or Reject All Changes.
Accepting a change finalizes and locks it in place. Rejecting a change reverts the cell back to its previous state. Use these options carefully when changes are shared.
Collating Changes from Multiple Users
When multiple collaborators are editing the same Excel workbook, you may want to review changes by individual user. This allows you to accept/reject changes on a per-person basis.
To collate changes by user:
- Go to the Review tab and click on Track Changes.
- In the drop-down menu, select Track Changes Options.
- In the dialog box, check “List changes on a new sheet.”
- Click OK to enable.
This will create a new “History” sheet in the workbook listing all changes by user in chronological order. The sheet will show precisely what each person changed, when, and provide options to accept/reject per change.
Conclusion
Change tracking is a very useful Excel feature that allows workbook edits to be audited. Users with sufficient permissions can view the history to see what changes were made, when, and by whom. However, change tracking has limitations in its retention and scope.
Key takeaways include:
- Excel can track up to 1,024 changes, then begins overwriting oldest edits first.
- History is not saved by default when closing workbooks.
- Only insertions, deletions and cell alterations are tracked – not formatting, row heights, etc.
- To use change tracking, it must be manually enabled in each workbook.
- Make sure to review history before distributing shared workbooks.
Change tracking brings accountability and transparency to Excel editing by multiple users. But diligence is still required to review changes and ensure proper versions are used for reporting.
