Solid state drives (SSDs) have become the standard storage device for most computers, including Macs running macOS. SSDs offer faster read/write speeds, better reliability, and other advantages compared to traditional hard disk drives (HDDs). With the release of macOS 10.15 Catalina in 2019, Apple switched to using SSDs exclusively in their Mac lineup.
When installing a fresh copy of macOS, whether on a new Mac or when replacing an old HDD with an SSD, a question arises – do you need to format or erase the SSD first? In the early days of SSDs, the answer was often yes for technical reasons. But on modern macOS versions and SSDs, formatting is usually no longer necessary before installation.
This article provides a definitive guide on whether formatting is needed when installing macOS on an SSD, including the history behind it, reasons you may still want to format, and steps on how to do it.
Do You Need to Format an SSD Before Installing macOS?
The short answer is no, you typically do not need to format a new SSD before installing macOS. Modern macOS versions and SSD drives are designed to work seamlessly together without requiring any special formatting ahead of time.
In the past, with older operating systems and platter-based hard drives, it was often recommended to format a new drive before installation. But SSD technology and macOS has evolved to no longer require this step for most use cases.
That being said, there are some exceptions where you may still wish to format an SSD first. For example, if you want to optimize performance, erase existing data, or start fresh with a clean drive. We’ll explore those situations more below.
But in general, for simply installing macOS on a new SSD, formatting beforehand is not necessary. The macOS installer is designed to automatically recognize, format if needed, and prepare the SSD correctly during the installation process.
When Formatting Was Necessary
In the past, with older versions of macOS and SSDs, formatting helped optimize performance. When SSDs were first introduced, macOS was not designed and optimized specifically for these new types of drives. As a result, formatting the drive before installation helped align the data properly and enabled features like TRIM to work correctly (source). This helped maximize the speed and performance of the SSD.
Additionally, earlier versions of macOS like Snow Leopard were designed primarily for hard disk drives. Formatting optimized the SSD by aligning data to 4k block sectors instead of 512 byte sectors used for HDDs (source). This alignment helped maximize read/write speeds.
So in summary, with older macOS versions and SSDs, formatting helped translate between interfaces designed for HDDs to the new SSD technology.
Modern SSDs and macOS
With current SSDs and recent macOS versions like Monterey and Big Sur, formatting is no longer required before installing the operating system. Apple has optimized macOS over the years to work seamlessly with modern SSDs right out of the box.
As explained on the Apple Support page, macOS includes the TRIM command that helps maintain SSD performance by cleaning up unused blocks (source). TRIM is enabled by default on Apple SSDs, so there is no need to manually format to activate it.
Additionally, modern SSDs have advanced controllers that efficiently manage performance through techniques like wear leveling and garbage collection. Formatting was more important with early SSDs that lacked these optimizations.
Overall, Apple has ensured the latest macOS versions work perfectly fine on new SSDs without requiring any special preparation like formatting ahead of time. Users can simply install macOS on the new drive and experience excellent performance right away.
Possible Reasons to Still Format
Though formatting is often no longer necessary, some users may still choose to format a new SSD before installing macOS for various reasons. One common reason is to start fresh with a completely clean drive. Formatting erases all existing data and partitions on the drive and allows you to create a new partition table from scratch [1]. This allows you to set up the SSD’s partitions as you want them for a new macOS installation without any leftovers from the factory formatting.
Formatting can also allow you to change the partition scheme from the default GUID partition table (GPT) to Apple Partition Map (APM) if preferred, though GPT is recommended for modern systems. Additionally, some users report formatting helps resolve installation issues or improves performance on some SSD models, though concrete evidence is lacking [2]. In the end, formatting is not strictly necessary but can provide more control over the low-level formatting of the drive.
How to Format an SSD
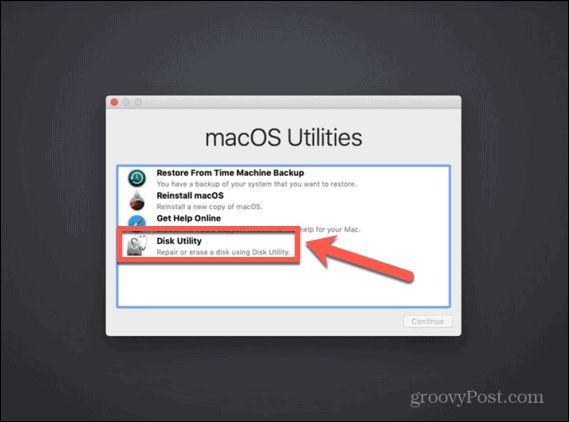
Formatting an SSD on a Mac is easy using the built-in Disk Utility application. Here is a step-by-step guide:
1. Connect the SSD to your Mac if it is an external drive. For internal SSDs, make sure it is properly installed.
2. Open Disk Utility, located in Applications > Utilities.
3. In the sidebar, select the SSD you want to format.
4. Click Erase at the top of the Disk Utility window.
5. Under Volume Format, select APFS or Mac OS Extended (Journaled). APFS is optimal for SSDs with macOS 10.13 or later.
6. Enter a name for the SSD.
7. Click Erase to begin formatting. This may take several minutes depending on the SSD size.
8. Once completed, the SSD will be formatted and ready for use.
For more details, refer to Apple’s guide on erasing and reformatting drives: https://support.apple.com/guide/disk-utility/erase-and-reformat-a-storage-device-dskutl14079/mac
What Gets Erased When Formatting
Formatting completely erases all data and files on an SSD drive. When you format a drive, the file system and any existing partition structures are wiped clean. This means that the operating system no longer has any way to locate files on the drive, making them inaccessible for practical purposes.
However, formatting does not physically overwrite or destroy the underlying data stored on the SSD cells. Until new data is written over the existing data, it remains intact at the lowest level. This allows for data recovery through specialized tools, though it becomes increasingly difficult the more the drive is reused after formatting.
So in essence, formatting removes all file system information and erases files for typical usage, but does not securely erase contents at the memory cell level. For most purposes though, formatting an SSD will wipe it clean of apps, data, and OS files (according to Crucial).
Backing Up Data Before Formatting
It is extremely important to back up all your files and data before formatting a drive. Formatting will completely erase everything on the drive, so if you don’t have backups, you risk permanently losing personal photos, documents, music, and other irreplaceable data.
According to EaseUS, “If you wish to format a hard drive without data loss, you should back up your hard drive first and then format it.” There are many backup options available, both free and paid. For example, you can use Time Machine on macOS to create backups.
On Windows, the built-in Backup and Restore tool allows you to create system image backups before reformatting, as explained in this uBackup article. There are also third party backup tools like Acronis Cyber Protect Home Office.
Backing up to external drives or cloud storage before formatting gives you the peace of mind that your data is safe. You can then reformat without worrying about permanent data loss. Be sure to verify the backups completed properly before erasing the drive.
Alternative Ways to Optimize a New SSD
While formatting is no longer required for most modern SSDs before installing macOS, there are some other optimization techniques that can help maximize performance and longevity of a new SSD:
Enable TRIM – Enabling the TRIM command allows the SSD to more efficiently handle garbage collection and maintains maximum write speeds over time. TRIM can be enabled on macOS by typing “sudo trimforce enable” in the Terminal app (Source).
Overprovisioning – SSDs work best when some spare capacity is left unused, usually around 7-20%. Overprovisioning allows the drive to better spread out writes and manage the flash cells. This can be done by leaving some space unformatted when setting up the SSD (Source).
Update Firmware – Check for and install any firmware updates for the SSD from the manufacturer. Firmware updates can fix bugs, improve performance and reliability. Some SSD tools like Samsung Magician have built-in firmware update features (Source).
Conclusion
In summary, formatting a new SSD before installing macOS is not required. Modern SSDs and macOS are optimized to work well out of the box without any special preparation. However, some users may still choose to format a new SSD in order to wipe it clean, start fresh, or optimize performance. Options for formatting include using Disk Utility and third party tools like DriveDx. Just remember to back up any important data first, as formatting will erase the contents of the drive. While formatting is not mandatory, it can provide peace of mind for some users or help maximize SSD performance.