SSD (solid state drive) drives are a type of computer storage that uses flash memory instead of a spinning hard disk. They offer several benefits over traditional HDD (hard disk drive) storage, including:
- Faster speeds – SSDs can load programs and files much quicker than HDDs due to faster read/write times (Source: https://www.eprovided.com/data-recovery-blog/pc-bootup-ssd-drives-put-old-hard-drive-shame/)
- Better reliability – No moving parts means SSDs are less prone to mechanical failure compared to HDDs (Source: https://www.accuwebhosting.com/blog/15-reasons-to-choose-ssd-drives-over-hdd-drives/)
- Lower power usage – SSDs consume less power than HDDs, improving battery life in laptops (Source: https://blog.resellerclub.com/how-do-ssd-drives-affect-your-dedicated-servers/)
Before using a new SSD drive with a Mac computer, it often needs to be formatted first. This prepares the drive for usage by creating the correct file system format. However, in some cases formatting may not be required for a new SSD drive. This article examines when formatting is necessary for SSD drives on Mac, and provides steps on how to format a drive correctly.
When Formatting is Required
Formatting is typically required when switching from an HDD drive to an SSD drive on your Mac. This allows the SSD to be optimized for the faster read and write speeds it is capable of. According to Apple support, SSDs work best when formatted specifically for macOS using APFS (Apple File System) [1].
Formatting is also required if you are using a used SSD that was previously formatted for Windows. Windows uses NTFS formatting by default which is incompatible with macOS. To use a Windows SSD on a Mac, it will need to be reformatted using APFS or Mac OS Extended [2].
Finally, formatting may help resolve performance issues if your SSD is acting sluggish or having problems. Reformatting the drive resets it completely and clears out any errors that may be slowing things down. Just be sure to fully backup your data first before reformatting a drive currently in use.
When Formatting is Not Required
Most brand new SSDs do not require formatting before use. SSD manufacturers typically pre-format drives to be compatible with Windows and Mac operating systems right out of the box. As Kingston explains, “If the SSD is brand new and has never been used, it does not need to be formatted,” though you may need to partition or initialize the drive so that it is recognized by your OS (Kingston).
Specifically for Mac users, new SSDs formatted for Mac can be used immediately without reformatting. The APFS file system used by modern Macs is optimized for SSD storage, so pre-formatted SSDs will provide the best performance. As Crucial notes, “If you have purchased a drive that’s preformatted for Mac, you can use it right away” (Crucial).
In most cases, pre-formatted SSDs from the manufacturer can be installed and used right away without formatting, partitioning, or initializing. However formatting may still be required if you want to change the file system, erase data, or troubleshoot drive issues.
How to Format a SSD
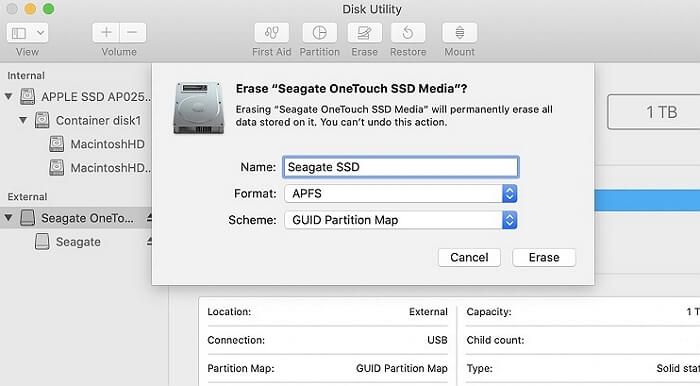
The easiest way to format a SSD on a Mac is to use the built-in Disk Utility application. Here are the steps:
1. Open Disk Utility, located in the Utilities folder in Applications.
2. In the sidebar, select the SSD drive you want to format.
3. Click the “Erase” button at the top.
4. Choose “APFS” as the format. APFS is optimized for SSDs and is recommended for most users.
5. Name the SSD.
6. Click “Erase” to begin the formatting process. This may take several minutes depending on the drive size.
Disk Utility will format the entire SSD, erasing all existing data. Make sure to backup your data before formatting. The APFS format is optimized for SSD performance on Macs (source: Apple Support).
Choosing a Format
When formatting a new SSD drive on a Mac, the two main file system options are APFS (Apple File System) and HFS+ (Hierarchical File System Plus). APFS is optimized specifically for solid state drives like SSDs and flash storage. It offers strong encryption, space sharing, snapshots, fast directory sizing, and improved file system fundamentals compared to HFS+ (source).
APFS is the default file system for SSDs formatted on modern Macs running macOS 10.13 High Sierra and later. It is the best choice for SSDs used as startup drives on these newer Macs. However, HFS+ may be preferable for older Macs running OS versions prior to macOS 10.13. HFS+ has wider compatibility with older versions of macOS and Mac hardware (source).
If you need to use an external SSD with both a newer Mac and an older Mac, formatting with HFS+ offers the greatest compatibility. However, APFS is optimal for SSD performance and features if the drive will solely be used with a Mac running macOS 10.13 or later.
Effects of Formatting
Formatting a drive erases all data stored on it. Before formatting, it’s critical to back up any files or data you want to keep. The backup ensures you don’t lose important information after wiping the drive (1).
While formatting a traditional hard disk drive (HDD) does not negatively impact its lifespan, formatting a solid state drive (SSD) causes additional wear. SSDs can only withstand a limited number of writes before cells wear out. Each format requires writing to all cells, incrementing the write count. Frequent full formatting shortens an SSD’s lifespan (2).
However, formatting an empty new SSD enables full performance. It erases any existing partitioning and writes fresh filesystem data across all cells. This “prepares” the SSD for first use, allowing it to operate at optimal speeds (3).
Overall, formatting is crucial when first setting up a new SSD. But once in use, avoid fully formatting an SSD unless absolutely necessary. Backups and targeted cleaning of corrupted areas are better than a full format for maintenance.
(1) https://superuser.com/questions/2544/side-effects-of-formatting-hard-drive
(2) https://www.quora.com/Does-formatting-SSD-damage
(3) https://www.partitionwizard.com/news/how-many-times-can-i-format-an-ssd.html
When Not to Format
There are a few key situations where you may not want to format your SSD drive on a Mac:
If switching hard drives in the same Mac – When simply swapping out one SSD for another in the same Mac computer, formatting is often not necessary. The new drive will automatically be formatted to work with the Mac OS on boot up. Formatting would wipe the drive clean and require reinstalling the operating system from scratch. This can be avoided by just swapping the SSDs and allowing the Mac to handle the formatting automatically.
When using SSD for Time Machine backups – Mac’s built-in Time Machine backup utility requires an external drive that it can continuously write new backup data to. If you format the Time Machine destination drive, it will wipe all the existing backups. Unless you no longer need those backups, formatting would be counterproductive.
If data needs to be preserved – Formatting erases all data on a drive. If you need to retain data or files stored on the SSD, do not format it. Instead, migrate that important data to another location before performing a format if possible.
Optimizing SSD Performance
There are several steps you can take to optimize the performance of an SSD on a Mac:
1. Enable TRIM support – The TRIM command allows the SSD to efficiently handle garbage collection. To enable TRIM on macOS, open the Terminal app and enter the command sudo trimforce enable (https://mac-optimization.bestreviews.net/enable-trim-mac-ssd/).
2. Overprovisioning – This involves leaving extra unused space on the SSD, allowing more efficient garbage collection and improving write speeds. Typically 7-20% overprovisioning is recommended for Mac SSDs (https://discussions.apple.com/thread/7389410).
3. Update firmware – Check for and install any SSD firmware updates from the manufacturer, as these can improve performance and fix bugs. Follow the manufacturer’s instructions to update the firmware.
Following best practices for enabling TRIM, overprovisioning, and installing firmware updates will help ensure optimal performance from a Mac SSD.
SSD Maintenance
Proper maintenance is important for maintaining the health and longevity of SSD drives. Here are some tips for keeping your SSD in optimum condition:
Run First Aid with Disk Utility periodically to check for and repair errors. Disk Utility’s First Aid feature will verify the formatting, permissions, directory structure, and other elements of your SSD. Running First Aid every few months can help catch minor issues before they become major problems (Source).
Monitor your SSD’s health using tools like Smart Utility or the S.M.A.R.T. data in Disk Utility. These will show metrics like total data written, spare blocks remaining, and temperature. Keep an eye out for warning signs like high operating temperature or an increased number of read/write errors, which can indicate potential SSD failure (Source).
Optimizations like TRIM should be run periodically, at least once a month, to maintain SSD performance. TRIM frees up blocks on your SSD that are no longer being used and allows future write operations to be more efficient. Regularly optimizing your SSD helps maintain speed and lifespan (Source).
Conclusion
In summary, formatting is only required for a brand new SSD or when switching from a Windows PC to Mac. If you are simply upgrading or replacing an existing SSD in your Mac, formatting is not necessary. When formatting, the most compatible format for general use is APFS, while for older Macs HFS+ is recommended.
Properly maintaining your SSD is key for optimal performance. Follow best practices like avoiding completely filling up the drive, enabling TRIM if your OS supports it, and running utilities that can fix errors. Periodically cleaning up unused files helps the SSD work efficiently. With proper care, an SSD can last for many years of reliable use.