The short answer is yes, Mac computers do have built-in software for setting up and managing RAID arrays. Apple refers to this as “RAID sets” in macOS. The RAID functionality is provided by Disk Utility, which is included with every version of macOS.
What is RAID?
RAID stands for “Redundant Array of Independent Disks”. It is a data storage technology that combines multiple disk drives into one logical unit. RAID provides increased storage performance and reliability through redundancy.
Some key advantages of RAID include:
- Increased read and write speeds – spreading data across multiple disks can improve performance.
- Fault tolerance – if one disk fails, data integrity is maintained due to redundancy mechanisms.
- Higher storage capacity – RAID allows multiple disks to be combined into larger storage pools.
There are several different RAID “levels” (RAID 0, RAID 1, RAID 5, etc) that provide various combinations of performance, redundancy, and storage efficiency. RAID can be implemented via hardware RAID controllers or in software.
Does Mac have built-in software RAID?
Yes, all modern versions of macOS have built-in software RAID functionality through Disk Utility. This allows you to create RAID arrays without any additional third-party software or hardware.
Specifically, macOS supports the following RAID levels:
- RAID 0 – Disk striping, no redundancy
- RAID 1 – Disk mirroring for redundancy
- Concatenation – Combining disks sequentially
To access the RAID management features in Disk Utility, you need to select multiple disks/volumes at once. The RAID options will then appear in the toolbar.
Steps to create a RAID array on Mac
Here is a step-by-step overview of how to create a RAID set using Disk Utility on Mac:
- Open Disk Utility (located in Applications > Utilities)
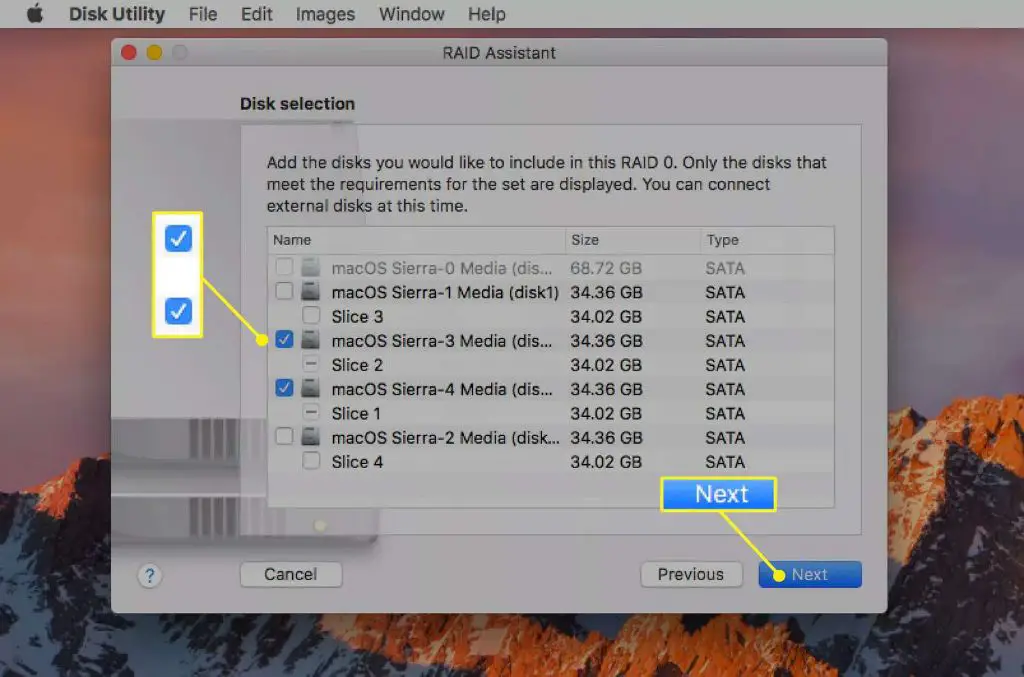
- Select all the disks/volumes you want to include in the RAID set
- Click the RAID button in the toolbar
- Select your desired RAID type – RAID 0, RAID 1, or Concatenation
- Give the RAID volume a name
- Click Create
- Allow time for the RAID set to be created
- The new RAID drive will appear in the sidebar of Disk Utility
That’s all there is to it! macOS makes setting up RAID very simple through this graphical interface.
What types of disks can be used in a RAID set?
Disk Utility supports using the following types of disks or volumes in a RAID set on Mac:
- Internal hard drives
- Solid state drives (SSDs)
- External hard drives
- Thunderbolt drives
- USB drives
- Partitions on any of the above drive types
So you have a lot of flexibility in terms of the disks you can combine. Using external disks can provide portability to the RAID set. Or you can use Thunderbolt for high speed connectivity if supported by your Mac.
Should I use hardware or software RAID on Mac?
For most home and small business users, the built-in software RAID in Disk Utility will be sufficient. However, there are some cases where a hardware RAID setup could be preferable:
- If you need support for more advanced RAID levels like RAID 5/6/10
- If you require the highest disk performance
- For setting up large scale or enterprise-level RAID
- If you need to connect many more than 2-4 disks
In those situations, you may want to consider investing in a dedicated hardware RAID controller. This typically takes the form of an expansion card or external enclosure with the RAID capabilities built-in.
What are the pros and cons of software vs. hardware RAID?
| Software RAID | Hardware RAID | |
|---|---|---|
| Pros |
|
|
| Cons |
|
|
So in summary, software RAID like Disk Utility offers a cheaper, easier option that works well for home users. But hardware RAID is better for large or performance-critical systems.
Performance differences: Hardware vs. software RAID on Mac
In terms of performance, hardware RAID generally has the advantage over a software solution. Here are some of the key differences:
- Hardware RAID dedicates its own processor and memory resources to RAID tasks. Software RAID relies on the computer’s main CPU.
- Hardware RAID uses a dedicated storage bus like PCIe. Software RAID uses the computer’s main data bus.
- Hardware RAID has custom hardware acceleration like ASICs for parity calculations and caching. Software RAID uses the CPU.
- Hardware RAID controllers have large caches to optimize disk writes. Software RAID has no special caching abilities.
As a result, benchmark tests typically show anywhere from 10-50% faster speeds with hardware vs. software RAID in operations like rebuilding arrays or large file transfers. For normal workload the differences are smaller. But hardware RAID theoretically has higher performance potential.
Real-world Mac RAID performance tests
To quantify the performance differences on Mac specifically, some real-world tests were conducted using Disk Utility software RAID vs. a hardware RAID card.
A 2016 test by Macworld compared Disk Utility software RAID 0 to a hardware Sonnet Tempo card on a RAID 0 array. The hardware RAID read about 20% faster and wrote about 8% faster overall.
Another test in 2020 by BareFeats compared a SoftRAID software array vs. a Hammer More Space hardware card in RAID 0. In this test, the hardware array was about 11% faster for reads and 5% faster for writes.
So in these examples, the hardware RAID performance advantage was measurable but not enormous. For many users, Disk Utility software RAID speeds are still very adequate.
What are the disk format requirements for RAID on Mac?
An important requirement when creating a RAID set in Disk Utility is that all disks or volumes must use the APFS or Mac OS Extended format. This is necessary for the RAID functionality to work properly.
If you have disks with other formats like FAT32 or exFAT, you will need to erase and reformat them to APFS or Mac OS Extended before adding them to the array.
The RAID volume itself can use either APFS or Mac OS Extended. Generally, it’s best to use APFS if supported by your MacOS version, or Mac OS Extended otherwise.
Converting existing disks to APFS/Mac OS Extended
To quickly format disks to APFS/Mac OS Extended for use in RAID:
- Open Disk Utility
- Select the disk you want to format
- Click Erase in the toolbar
- Name the disk
- Select APFS or Mac OS Extended format
- Click Erase to confirm
This will reformat the drive, erasing all data in the process.
Can I resize an existing Disk Utility RAID volume?
Unfortunately, Disk Utility does not provide a way to easily resize volumes in an existing RAID set. Your options are:
- Back up your data and recreate the RAID set from scratch
- Use a third party tool like SoftRAID to modify the RAID
- Add another RAID chunk and concatentate it to the existing volume (messy)
This is one advantage hardware RAID controllers often have – the ability to dynamically resize arrays. With Disk Utility you need to plan the RAID sizes up-front or be prepared to recreate arrays as needed.
What types of RAID arrays can I create in Disk Utility?
As mentioned previously, Disk Utility supports the following RAID levels:
- RAID 0 – Disk striping without parity or redundancy. Optimizes speed but provides no fault tolerance. Requires at least 2 disks.
- RAID 1 – Disk mirroring to an identical second drive. Provides redundancy if one disk fails. Requires 2 disks.
- Concatentation – Combining disks sequentially. Simple grouping without performance benefits or redundancy. Can use 2+ disks.
Advanced RAID levels like 5, 6, 10 etc. are not supported in Disk Utility. For those options, third-party software or hardware RAID would be required.
Can I do RAID 5, RAID 6 or other advanced levels?
Unfortunately, Disk Utility does not support any advanced RAID levels like RAID 5, RAID 6, RAID 10, etc. Only RAID 0, 1 and Concatenation are available.
To use the more advanced RAID options, you would need third-party software like SoftRAID, or a dedicated hardware RAID controller.
SoftRAID is a popular option that provides RAID 5 and other advanced levels. It does cost $129, but there is a free 30-day trial available.
Key differences in advanced RAID levels
- RAID 5 – Block-level striping with distributed parity for redundancy. Requires at least 3 disks.
- RAID 6 – Like RAID 5 but with double distributed parity. Can sustain up to two disk failures. Requires at least 4 disks.
- RAID 10 – Striped set of mirrored disks. Provides performance and redundancy. Requires 4+ disks.
So in summary, Disk Utility RAID options are quite limited. For advanced RAID functionality on Mac, third-party solutions are generally the way to go.
Can I use NAS or Thunderbolt drives with RAID on Mac?
External drives – including network-attached storage (NAS) and Thunderbolt drives – can definitely be used as part of a RAID array in Disk Utility on Mac.
As long as the drives are formatted properly (APFS or Mac OS Extended), they can be combined into a RAID set right alongside internal drives.
This provides a lot of flexibility for creating portable or highly connected RAID arrays using Mac’s built-in tools.
Benefits of using external disks in RAID:
- Portability – external drives allow the array to be moved around or migrated between machines.
- Capacity – external enclosures often support more and larger drives.
- Speed – Thunderbolt/USB 3.0 offer much better performance than internal SATA.
- Accessibility – easily add/remove drives from the array as needed.
One downside is that external disks can be disconnected/unmounted unexpectedly, which can disrupt a software RAID array. But overall they work very well.
Should I encrypt my RAID array for additional security?
macOS makes it easy to encrypt RAID arrays for extra security through Disk Utility. This may be desirable to protect sensitive data stored on the array.
To encrypt a RAID volume, simply check the “Encrypt backups” box when creating the RAID set in Disk Utility. You can choose between AES-128 or AES-256 encryption algorithms.
This will encrypt the RAID array in a format that can only be accessed through your password. The encryption applies to the whole RAID set – individual disks remain unencrypted.
One downside is diminished performance due to the encryption overhead. Benchmark tests show around a 15-30% drop in speeds for reading/writing encrypted RAID arrays versus unencrypted ones.
But for the security conscious, this performance hit may be worth taking. Just make sure you don’t lose the password or the data will be inaccessible!
Other RAID data protection options
Beyond encryption, there are also some RAID types (like RAID 1, 5, 6) that provide redundancy and fault tolerance against disk failures. This protects against data loss due to drive crashes.
No matter what RAID type you use, it’s recommended to supplement your array with backups to off-site external storage, cloud storage, tape, etc. Backups should be versioned in case files need to be recovered from an earlier date.
Following the “3-2-1” backup rule – 3 copies, 2 local and 1 off-site – is a good way to robustly protect valuable data stored on a RAID array.
Conclusion
In conclusion, Mac computers do have very capable built-in RAID functionality via Disk Utility. It handles the most common RAID levels like RAID 0 and 1 with ease.
Software RAID is lower cost and easier to configure than hardware RAID, but has some limitations in performance and features. For more advanced setups, third party software or hardware RAID controllers may be preferable.
Internal and external disks can be combined into fast, flexible arrays. And macOS makes it easy to encrypt RAID sets for extra security.
So for a wide range of home and small business use cases, the integrated RAID capabilities on Mac remove the need for any additional purchases. But be sure to still implement regular backups to fully protect your data!
