Yes, Windows 11 does have a built-in disk management utility called Disk Management that allows you to manage your hard disk drives and the volumes or partitions on them. Disk Management has been a part of Windows for many versions and continues to be included in Windows 11.
What is Disk Management in Windows 11?
Disk Management is a system utility in Windows 11 and previous Windows versions that enables you to perform a number of disk and volume management tasks, such as:
- View information about the hard disk drives installed on your computer, including the size, status, and volumes on each disk.
- Create, delete, format, extend, and shrink volumes (partitions) on your hard disk drives.
- Change drive letters and volume labels.
- Convert basic disks to dynamic disks and create volumes on dynamic disks.
- Initialize and convert disks from MBR to GPT partitioning style.
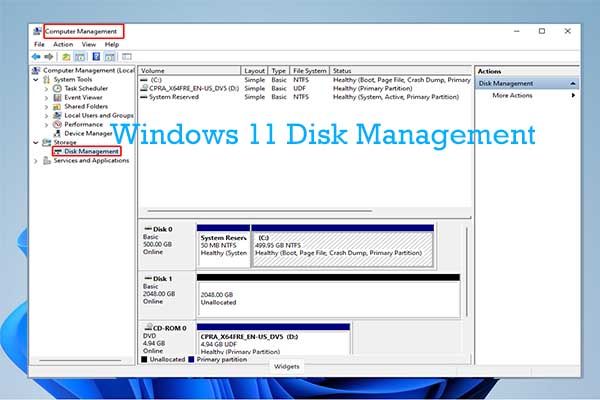
Disk Management provides a graphical view of your disks and volumes, allowing you to easily visualize the layout and structure of your drives. It shows you which volumes are healthy or corrupt, the amount of free space, and gives you access to formatting and other maintenance tools.
Where to Find Disk Management in Windows 11
There are a few ways to launch Disk Management in Windows 11:
- Open the Start menu and search for “Create and format hard disk partitions” and select it from the result.
- Right-click the Start button or press Win + X and select “Disk Management” from the menu.
- Open the Control Panel, go to System and Security > Administrative Tools, and double-click Computer Management. Then select Disk Management under Storage in the left pane.
- Type “diskmgmt.msc” in the Run dialog box (Win + R) and press Enter.
This will open the Disk Management utility, which displays all connected disk drives and their volumes graphically in the main pane. You can then right-click on volumes or disk sections to access the available management options.
Key Features and Functions of Disk Management
Here are some of the main features and functions you can use in the Windows 11 Disk Management utility:
- View disk information – See the total size, used space, free space, file system, and status of your connected drives. Identify issues with disks using color coding and notifications.
- Create and delete volumes – Add new partitions and volumes to available disk space or delete existing volumes you no longer need.
- Change drive letters and labels – Assign different drive letters or rename the volume labels of your drives.
- Format volumes – Format new or existing volumes by selecting options like the file system (NTFS, FAT32, etc.) and allocation unit size.
- Extend or shrink volumes – Increase or decrease the size of existing volumes by taking free space from adjacent volumes.
- Convert disk partitioning style – Change the partition style of a drive from MBR to GPT or vice versa.
- Initialize disks – Initialize a brand new disk drive before it can be used by Windows.
- Mark partitions as active – Set a partition as active so that it can host the operating system.
- Change drive status – Mark a drive as online or offline.
- Import foreign disks – Bring disk volumes from another computer online on your system.
These capabilities allow you full control over how your drives and volumes are managed in Windows 11. Whether you need to create space for a new volume, extend your C drive, remove an old recovery partition, or troubleshoot drive errors, Disk Management provides the tools to handle most disk and volume management tasks.
Managing Basic and Dynamic Disks
Disk Management works with two types of disks – basic and dynamic. Basic disks use the standard partitioning schemes like MBR and GPT and can contain primary partitions and extended partitions with logical drives. Dynamic disks use a proprietary partitioning scheme and support volumes that span across multiple disks.
When you first install Windows, your hard drive is configured as a basic disk. You can convert it to dynamic if you want to use features like striped, mirrored, spanned, or RAID-5 volumes.
The main advantages of dynamic disks are:
- Ability to create volumes spanning multiple disks
- Supports disk mirroring and RAID configurations
- Can extend volumes into adjacent unallocated spaces
However, dynamic disks also have downsides to consider:
- More complex – requires understanding of volumes vs. partitions
- Volumes can’t be read by other operating systems
- Requires converting the entire drive and deleting existing partitions
- No support for boot or system volumes
For most home users, basic disks are simpler to manage and sufficient for typical use cases. But dynamic disks provide added flexibility for those with more advanced storage needs.
Step-by-Step Guide to Using Disk Management
Here is a step-by-step walkthrough of using Disk Management to view disk info, create a new volume, extend a volume, and more:
View Disk and Volume Information
- Open Disk Management (right-click Start > Disk Management).
- View the graphical layout of volumes and free space on your drives. Disks and volumes are color coded:
- Yellow – Healthy primary partition
- Green – Healthy logical drive
- Red – Unusable space
- Black – Unallocated space
- See volume info like file system, capacity, free space, and status.
- Check for notifications of disk errors or corrupt volumes.
Create a New Volume
- Right-click any unallocated space and select New Simple Volume.
- Follow the wizard prompts to specify size, drive letter, file system, etc.
- Click Next between steps and Finish to create the volume.
- The new volume should appear after a quick format, ready to use.
Extend a Volume
- Right-click the volume you want to extend and choose Extend Volume.
- Select the amount of adjacent, unallocated space to add to the volume.
- Click Next and then Finish to extend the volume.
Shrink a Volume
- Right-click the volume you want to shrink and choose Shrink Volume.
- Enter the amount by which you want to decrease the volume size.
- Click Shrink to reduce the volume as specified.
Change a Drive Letter
- Right-click the selected volume and choose Change Drive Letter and Paths.
- Click Change to choose a new drive letter.
- Click OK to assign the drive letter.
These steps provide an overview of how to use Disk Management for some common volume operations. You can also format volumes, bring disks online, convert disk types, and perform many other disk management tasks using similar steps.
Alternatives to Disk Management
While Disk Management is the built-in Windows disk utility, there are several third-party disk management tools as well. Some alternatives to consider include:
- Partition Wizard – Feature-rich partitioning manager for Windows.
- AOMEI Partition Assistant – Allows merging, splitting, formatting, and converting partitions.
- MiniTool Partition Wizard – Provides advanced partition management features.
- EaseUS Partition Master – Allows non-destructive disk and partition resizing.
These third-party options provide added features beyond what Disk Management offers, such as non-destructive partitioning, converting disks without data loss, and increased compatibility with other file systems.
However, Disk Management remains a capable and convenient option for most volume management tasks on Windows 11. And being built-in means there is no additional software to install or learn how to use.
Should You Use Disk Management in Windows 11?
For most everyday disk management needs, Disk Management remains a reliable choice on Windows 11. Reasons you may want to use Disk Management include:
- It’s built-in – no extra software required.
- Intuitive graphical interface.
- Handles essential tasks like creating, extending, and shrinking volumes.
- Lets you format, initialize, and assign drive letters to disks.
- Good option for Windows-only environments.
- Easy to access through File Explorer and System settings.
Reasons you may want to consider a third party tool:
- More robust features like non-destructive resizing.
- Ability to convert disks without losing data.
- Better compatibility with non-Windows file systems.
- Adds support for advanced storage configurations.
- Better options for data recovery and secure erasure.
For typical home users, Disk Management has all they need for managing disks and volumes. But power users and IT professionals may benefit from expanded capabilities of third-party partition managers.
Conclusion
In summary, Windows 11 retains the standard Disk Management utility for handling everyday storage management tasks. Disk Management allows you to create, format, extend, and shrink volumes, assign drive letters, check disk health, and convert disks between basic and dynamic. While third-party tools provide added features, Disk Management remains a convenient built-in option for most users’ partitioning needs.