A system image backup is a full copy of everything on your Windows 10 hard drive, including the operating system, installed programs, system settings, and files. Having a system image backup provides a way to restore your entire PC to the exact state it was in when you created the backup, which can be extremely useful in case of hard drive failure, OS corruption, or other system issues.
Creating a system image backup requires having enough external storage space available to store all the data from your PC’s hard drive. For a typical Windows 10 system, this usually means having an external hard drive or flash drive with at least 16GB of storage, but could require larger drives for systems with more data and installed programs.
This article will cover what factors determine how much space is required for a system image backup, provide estimates for typical Windows 10 backup sizes, give recommendations for choosing an appropriate flash drive, outline the process of creating and storing the backup, and explain how to restore your system from the backup image if needed.
Windows 10 System Image Backups
A Windows 10 system image backup is a complete copy of everything on your hard drive (C: drive), including the Windows operating system, installed programs, system settings, and all personal files (Cite https://www.windowscentral.com/how-make-full-backup-windows-10). It allows you to restore your entire PC back to the exact state it was in when you created the backup image.
System image backups include the drives required for Windows 10 to run properly. This includes the Windows 10 operating system itself, boot information, system settings, installed programs, and drivers (Cite https://answers.microsoft.com/en-us/windows/forum/all/differences-between-backup-and-system-image/33a83cdc-e70a-495f-954a-d9affdf7de96).
Having a system image backup allows you to restore your entire PC back to the exact state it was in when you created the backup. This is useful if your system becomes unstable or unusable and you want to revert back to a working state. The system image contains everything needed to get your PC up and running again.
Factors That Determine Backup Size
There are several key factors that determine the size of a Windows 10 backup:
The version of Windows 10 being backed up is one major factor. Windows 10 Home takes up less space than Windows 10 Pro since Pro includes additional features for business and enterprise use. According to Microsoft, Windows 10 Home requires a minimum of 16GB of storage while Windows 10 Pro requires 20GB [1].
The size of the hard drive being backed up also affects the backup size. The more storage capacity on the drive, the larger the potential backup. Drives with minimal apps and data will have smaller backups than drives filled close to capacity.
The amount and type of applications and data stored on the drive influences backup size as well. Game installations, media files, and productivity suites take up substantial space compared to leaner software. The more apps and files on the drive, the bigger the backup.
Typical Backup Sizes
The size of your Windows 10 system image backup can vary greatly depending on the amount of data stored on your hard drive. Here are some typical backup sizes for common hard drive capacities:
128GB hard drive: 25-35GB backup file
256GB hard drive: 50-70GB backup file
500GB hard drive: 90-120GB backup file
1TB hard drive: 180-250GB backup file
As you can see, the system image backup is usually 20-30% the size of the drive being backed up. This is because the backup contains the Windows operating system files, preinstalled applications, drivers, and the system state. It does not include your personal files and data.
According to this forum post, a Windows 10 system image backup of a 128GB drive was around 28GB in size. So you can use these rough estimates to determine how large of a flash drive you’ll need for your system image backup.
Estimating Your Backup Size
To estimate the size of your Windows 10 system image backup, start by looking at how much disk space is currently being used on your C: drive. You can check this by going to File Explorer, right-clicking on your C: drive, and selecting “Properties.” This will show you the total used space on that drive.
As a general rule, your Windows 10 backup will be around the same size as the used space on your C: drive. However, it’s a good idea to add 10-20% as a buffer, since the backup may be slightly larger than the used space alone. This buffer allows for any additional files that get added between the time you estimate the size and when you actually create the backup.
For example, if your C: drive shows 100 GB of used space, your Windows 10 backup should be between 110-120 GB in size. This gives you a nice buffer so the backup is sure to fit. You can then select a flash drive that is at least that size (or larger) to store the system image backup.
According to EaseUS, when estimating backup size you should “double the combined size of your current files by at least two to determine the storage you require.” This helps account for any fluctuations in used space over time [1].
Choosing a Flash Drive
When selecting a flash drive to use for a Windows 10 backup, it is recommended to get a drive that is at least 20% larger than your estimated backup size. Getting a drive with extra room is useful for a few reasons:
Having a buffer of extra space allows your backups to grow over time as you install updates, software, and store more data. Windows 10 backups can range from 5GB for a fresh install up to 30GB or more for a system with lots of applications and user data. With automatic updates and new features added semi-annually, your backup will gradually get larger.
The extra room also gives you flexibility if you need to create multiple backup images over time. For example, you may want to create a backup image before and after a major Windows update or hardware change. Having the extra space makes this easy to do without having to delete old backups right away.
Finally, drives advertised as 16GB or 32GB rarely offer the full formatted capacity. Getting a drive 20% larger than needed ensures you’ll have sufficient actual space for the backup even after formatting.
So when estimating your Windows 10 backup size, add 20% or more and choose a flash drive accordingly for the best experience.
Flash Drive Considerations
When choosing a flash drive for backing up Windows 10, reliability and read/write speeds are important factors to consider. Avoid cheap, low quality flash drives, as these can fail or corrupt data more easily. Look for a drive from a reputable brand that offers robust construction and stable components.
For faster backup and restore times, choose a flash drive that supports USB 3.0 or later, as these provide much better transfer speeds compared to USB 2.0 drives. Some of the fastest options include drives like the SanDisk Extreme Pro USB 3.2 (The Best USB Flash Drives), which can reach speeds up to 420MB/s.
Higher quality drives from reliable brands like Samsung, SanDisk and Kingston are less prone to failure or data corruption. Avoid no-name brands selling cheap drives in bulk. Paying a little more for a durable and fast flash drive from a trusted brand is worth it for safe Windows backups.
Creating the Backup
Creating a system image backup in Windows 10 is a straightforward process that can be done in just a few steps:
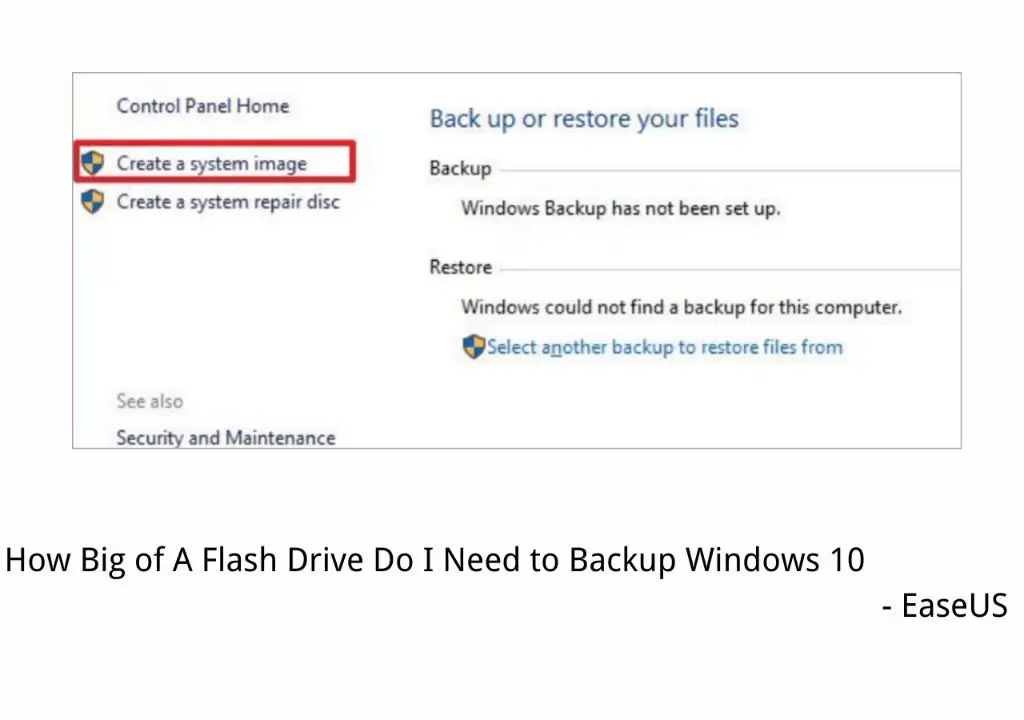
1. Open the Start menu and search for “Backup and Restore”. Select it from the results.
2. In the Backup and Restore window, select “Create a system image” on the left side.
3. Choose the destination drive for your backup image. An external hard drive or USB flash drive are good options since they can be stored offline after the backup is complete. The drive must have enough storage space for the system image.
4. Select which drives you want to include in the system image. Typically you’ll want to include your Windows drive (usually C:) and any other drives that store programs or data.
5. Click “Start backup” to begin the process. Creating the initial full backup can take some time depending on the size of your system drive and the speed of your storage device.
It’s a good idea to create regular incremental backups after your initial full backup. This will save time compared to creating full backups each time. You can schedule incremental backups to run automatically on a regular basis using the “Schedule” option in the Backup and Restore tool.
Storing the Backup
Once you have created the Windows 10 system image backup on your flash drive, it is important to store the drive safely. Since the backup contains critical data for restoring your system, you will want to keep it in a secure location away from your computer.
According to Microsoft’s support article, it is recommended to store backup media “in a secured location that is separate from your PC” [1]. This way if something happens to your computer like theft, fire, or mechanical failure, you will still have access to your backup data.
Some options for safe backup storage locations include a fireproof safe, safety deposit box, or another secure off-site location. Just make sure you keep track of the location so you can retrieve the backup when needed.
For sensitive personal data, you may also want to consider encrypting the backup. Microsoft notes that Windows 10’s system image backup functionality supports encrypting the backup with BitLocker drive encryption [2]. This will add an extra layer of security to protect your data.
Properly storing your Windows 10 backup flash drive is a key step to ensure you have a backup available in case of emergency. Keep the drive safe and secure in an off-site location for optimal protection.
Restoring from a Backup
If your Windows 10 system becomes corrupted or unusable, restoring from a system image backup can get you back up and running quickly. The system image contains a snapshot of your Windows partition along with installed programs and settings. Restoring this image helps you avoid the hassle of having to completely reinstall Windows and all your applications.
To restore from a system image backup in Windows 10, follow these steps:
- Boot your PC from the Windows recovery environment. You can do this by booting from the recovery partition on your hard drive, a recovery USB drive, or the Windows install media.
- On the Choose an option screen, select Troubleshoot > Advanced options > System Image Recovery.
- Choose the system image you want to restore from. This will be on your external flash drive.
- Confirm that you want to restore from the chosen system image. The restoration process will overwrite your existing Windows installation.
- Wait while your drive is formatted and the system image is restored. The computer will restart a few times during this process.
After the restoration completes, you should boot back into your original Windows 10 installation, now restored to the state captured in the system image. Restoring from a recent backup can save you hours or even days compared to reinstalling Windows and applications.
