The BIOS (Basic Input/Output System) is firmware stored on a small memory chip on a computer’s motherboard. It is the first program that runs when a computer starts up, and it initializes the computer’s hardware components as well as loads the operating system. The BIOS provides a small library of basic input/output functions used to operate and control the peripherals such as the keyboard, display, and disk drives. It also manages settings for booting devices and the boot order priority. The boot order determines the order in which the BIOS will check storage devices to find and load an operating system. Being able to add, remove or reorder boot devices in the BIOS is important for selecting the device you want the system to boot from.
Sources:
https://www.techtarget.com/whatis/definition/BIOS-basic-input-output-system
https://www.simplilearn.com/what-is-bios-article
Prerequisites
Before adding a new boot device to the Dell BIOS, there are a couple prerequisites:
First, you’ll need administrator access to the computer in order to make changes to the BIOS settings. Without admin privileges, you won’t be able to save any changes you make (Lenovo).
Second, you’ll need a boot device prepared, like an internal hard drive, external USB hard drive, or bootable USB flash drive. The BIOS allows you to select the boot order from available boot devices, so having one ready is necessary (Computer Hope). The most common options are an internal hard drive or external USB drive formatted with a bootable operating system.
Accessing the Dell BIOS
To enter the BIOS setup on a Dell computer, you need to press a specific key as the computer boots up. The exact key depends on your specific Dell model, but common options include F2, F10, F12, and Delete.
As soon as you power on the Dell computer, you’ll see the Dell logo appear on the screen. At this point, start tapping the appropriate BIOS access key continuously until the BIOS interface loads. On some Dell models, you may need to press F12 to bring up a one-time boot menu and select BIOS setup from there.
Once in the BIOS, you’ll be presented with the system setup interface. This allows you to view system information and configure BIOS settings. The interface uses blue text on a white background and can be navigated with the keyboard. Pressing F1 will bring up a help file with information about the various BIOS parameters.
Navigating to Boot Options
The boot order determines the order in which devices are checked for a bootable operating system. Devices that are higher in the boot order are checked first. The boot menu allows you to temporarily override the boot order and boot directly from a specific device.
To get to the boot options in the Dell BIOS:
- Restart your computer and press F2 when the Dell logo appears to enter the BIOS setup screen.
- Go to the “Boot” tab in the BIOS.
- The boot order will be displayed, showing the priority order of bootable devices.
- To temporarily boot from a different device, use the boot menu. Select “Boot Menu” and you will be presented with a list of bootable devices.1
- To change the default boot order, select “Boot Option Priorities”. Use the arrow keys to move devices up or down in the order.
- Press F10 to save changes and exit the BIOS.
From the boot options, you can set the boot order priority or use the boot menu to temporarily override the boot order.
Adding a New Boot Device
To add a new hard drive or USB device to the boot list in the Dell BIOS, follow these steps:
- Turn on or restart your Dell computer and press F2 when the Dell logo appears to access the BIOS setup screen.
- Navigate to the “Boot” tab using the arrow keys.
- Select “Boot List Option” and press Enter.
- Click “Add Boot Option” and press Enter.
- Select the new hard drive or USB device you want to add from the list and press Enter.
- The new boot device will now appear in the boot list. Use the arrow keys to move it to the top of the list if you want it to have boot priority.
- Press F10 to save changes and exit the BIOS.
The newly added hard drive or USB device should now appear in the boot menu when you restart the Dell computer again. You can select it to boot directly into that device (source).
Reordering Boot Priority
Now that the new boot device has been added, the next step is to prioritize it in the boot order so that the system boots from it first. Here are the steps to reorder boot priority in the Dell BIOS:
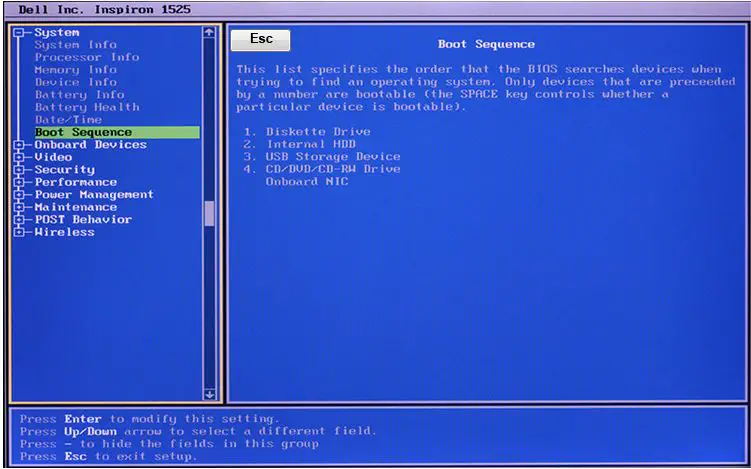
1. From the System Setup Main Menu, navigate to Boot Settings > Boot Option Settings > Boot Sequence (Source).
2. Use the arrow keys to highlight the newly added boot device and move it to the top of the boot sequence.
3. Press F5 to move the device up in priority.
4. Repeat steps 2 and 3 until the new boot device is the first option in the sequence.
5. Press Esc to exit the Boot Sequence menu.
This will ensure that the system tries to boot from the newly added device before other boot options. The new boot device should now be prioritized to boot first in the Dell system.
Saving Changes and Exiting
After making all of your desired BIOS changes, it’s important to properly save your settings before exiting the BIOS. Unlike software programs, BIOS settings are not automatically saved. If you don’t manually save before exiting, any changes you made will be lost.
To save changes in a Dell BIOS:
- Navigate to the ‘Exit’ tab using the arrow keys.
- Select the ‘Save Changes and Exit’ option.
- Press ‘Enter’ when prompted to confirm exiting the BIOS.
The computer will reboot and the new BIOS settings will take effect. If you don’t properly save before exiting the BIOS, the computer will revert back to the previous BIOS state on reboot.
To be safe, after rebooting you may want to re-enter the BIOS to verify that your changes were properly saved. If not, simply redo the steps to modify the desired settings again and save before exiting.
Verifying Boot Order
After making changes to the boot order in the Dell BIOS, it’s important to verify that the changes were saved correctly before attempting to boot from the new device. Here are the steps to check the boot order in the Dell BIOS:
- Restart the computer and enter the BIOS setup utility by pressing F2 during the Dell splash screen.
- Navigate to the “Boot” tab in the BIOS.
- The boot devices will be listed in priority order under “Boot Option Priorities”. Verify that the newly added boot device is in the correct position in the boot order list.
- If the boot order is incorrect, you will need to edit it again to put the desired boot device in the first priority position.
- Once the boot order is verified, select “Exit” and then “Save Changes” before exiting the BIOS.
Checking the boot order in the BIOS is crucial to avoid booting from the wrong device by accident. Always verify changes before attempting to boot from a new boot device.
Booting from New Device
After setting the new boot device as the first priority in the boot order, the computer should now automatically boot from that device when turned on instead of the normal hard drive.
When powered on, the computer will check the boot devices in priority order, starting with the one set as first. Since the new external drive or USB drive was set to boot first, the computer will load and boot from that device into the operating system installer instead of booting into Windows.
To verify it is booting from the new USB or external drive, you should see the device name or boot menu prompt briefly display when first powered on. The operating system installer splash screen from the bootable USB or external drive will then appear shortly after.
If the computer still boots from the normal hard drive into Windows, double check the boot order was properly set in BIOS with the new device first. If the boot order is correct, try restarting and entering BIOS again to save changes.
Troubleshooting
If you are unable to boot from the new device after adding it in the BIOS, here are some troubleshooting steps to try:
First, double check that the boot order was properly changed and saved in the BIOS. Go back into the BIOS and verify that the new boot device is listed first in the boot order priority list. If not, reorder it again and retry booting.
If the boot order is correct but it still does not boot from the new device, try resetting the BIOS to factory default settings. Sometimes a corrupted BIOS can prevent proper booting. Resetting will clear out any issues.
Check for loose connections on the new boot device and motherboard. Disconnect and reseat any lose cables or connections. Try different SATA ports on the motherboard if using a hard drive or SSD.
Update the BIOS and firmware on the boot device to the latest available versions from the manufacturer website. Old firmware can sometimes cause issues.
If you continue experiencing boot issues, the new device itself may be defective. Try replacing it with a known working device to rule out hardware failures.
As a last resort, you may need to reinstall the operating system from recovery media or the cloud. This will erase any OS issues preventing booting.
For additional troubleshooting assistance, refer to Dell’s support article on recovering from boot issues: https://www.dell.com/support/contents/en-us/article/product-support/self-support-knowledgebase/fix-common-issues/no-boot