What is RAID 5?
RAID 5 is a popular RAID (Redundant Array of Independent Disks) level that combines distributed parity with striping. According to TechTarget, RAID 5 stripes data and parity information evenly across multiple drives. The parity information allows for fault tolerance; if one drive fails, the missing data can be recreated from the remaining data and parity.
Some key advantages of RAID 5 include:
– Improved read performance compared to a single drive due to spreading reads across multiple disks.
– Ability to withstand a single disk failure without losing data.
However, RAID 5 does come with some downsides:
– Slower write speeds due to the parity calculation overhead, known as the RAID 5 write penalty.
– Long rebuild times if a replacement drive needs to be rebuilt after a disk failure, according to Wikipedia.
Overall, RAID 5 provides a balance of performance, redundancy, and storage efficiency for many applications.
When to Expand a RAID 5 Array
There are two common reasons you may want to expand a RAID 5 array:
1. When you need more storage capacity
As your data storage needs grow over time, the existing capacity of your RAID 5 array may no longer be sufficient. Adding more drives is an efficient way to increase capacity without having to setup an entirely new array. According to this ServerFault discussion, expanding capacity is one of the main reasons to add disks to an existing RAID 5 array: https://serverfault.com/questions/274743/setting-up-a-raid-5-with-expansion-in-the-future-in-mind
2. When rebuild times are becoming too long
RAID 5 arrays have to rebuild data when a disk fails. As the number of disks and capacity increases, rebuild times also increase. At some point, the long rebuild times introduce an unacceptable risk of a second disk failing during rebuild. Adding disks can help by spreading the data and parity information across more drives. According to EaseUS, reducing rebuild times is a key reason to expand a RAID 5 array: https://www.easeus.com/partition-master/expand-raid-5-array.html
How Many Disks Can You Add?
The maximum number of disks that can be added to a RAID 5 array is limited by the RAID controller. Most RAID controllers support adding 8-16 drives to a RAID 5 array before performance becomes an issue.
When expanding a RAID 5 array, you can add disks one at a time. There is no need to add multiple disks at once. This provides flexibility to expand storage as needed.
According to ServerFault, a good rule of thumb is to limit RAID 5 arrays to 7-8 drives. Beyond this, performance will suffer and rebuild times will become excessive if a drive fails.
Overall, start small when first creating a RAID 5 array. Then add additional drives over time as your storage needs grow. Just be aware of the physical disk limits of your RAID controller.
Choosing New Drives
When expanding a RAID 5 array, it’s important to choose new drives that match the interface and capacity of the existing drives in the array. This ensures proper compatibility and maximum usable capacity.
For example, if your current RAID 5 array uses 4TB SATA hard drives, the new drives should also be 4TB SATA drives. Mixing drive capacities can result in unused space on larger drives.
You’ll also want to consider performance needs when selecting new drives. For example, upgrading to faster solid state drives (SSDs) can boost performance for disk-intensive workloads. However, SSDs are more expensive than traditional hard disk drives (HDDs).
In most cases, matching the existing drive type (HDD vs. SSD) and interface is recommended when expanding a RAID 5 array. Just make sure the new drives are from the same manufacturer and product line to minimize compatibility issues.
Sources:
https://www.seagate.com/products/nas-drives/raid-calculator/
Preparing New Drives
Before adding new drives to expand your RAID 5 array, you’ll need to make sure they are properly prepared and compatible. The main steps for preparing new drives are:
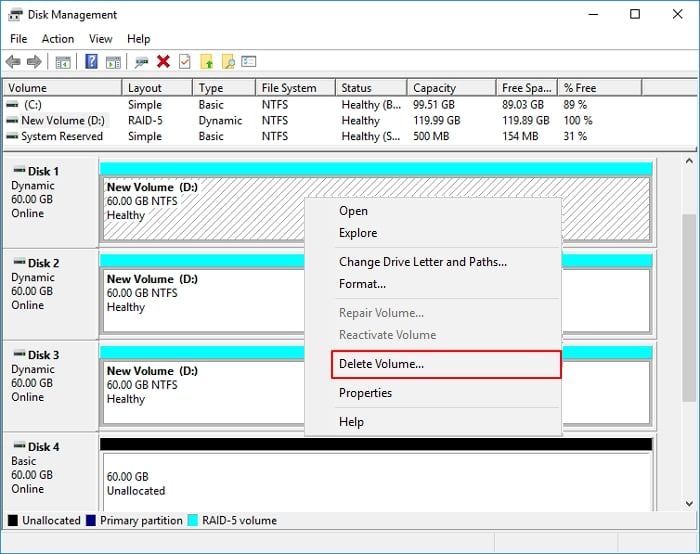
Confirm the drives are empty/unpartitioned – New drives being added to the array cannot have any existing partitions or data on them. Use a tool like Disk Management on Windows or fdisk on Linux to verify the drive does not contain any partitions. Wipe any partitions or data before proceeding.
Update drive firmware if needed – Check with your drive manufacturer for the latest firmware available for the drives and update if necessary. Firmware updates can improve drive performance and compatibility.
Format drives – Once the drives are confirmed empty, format them to remove any residual data and prepare them. On Windows, use Disk Management to format and on Linux use a tool like mkfs.xfs. This source provides more details on formatting empty drives for Linux software RAID.
Following these steps ensures your new drives are ready to be added into the expanded RAID 5 array.
Adding Drives to the Array
The specific steps for adding drives to an existing RAID 5 array will vary depending on the RAID controller used. However, the general process involves:
1. Designating the new drives as “hot spares” in the RAID controller configuration. This indicates they are standby drives ready to be added to the array.
2. Initiating a “rebuilding” or “resynchronization” operation in the RAID software. This will add the hot spare drives into the array one at a time and rebuild the redundant parity information.
3. The RAID controller will automatically add the spare drives and redistribute data across the new total number of drives. This rebuild process can take hours or days to complete depending on the size of the drives.
4. Once finished rebuilding, the array will show the expanded total capacity and the new drives will be fully integrated (source: https://www.diskinternals.com/raid-recovery/add-drive-to-raid-5/).
The specific RAID controller in use will determine the precise steps and interface for designating hot spares and initiating the rebuild. But the overall process remains similar across different RAID implementations.
Initiating RAID Resync
Once the new disks have been added to the RAID 5 array, a process called “resyncing” needs to take place. Resyncing re-stripes the existing data across all the disks in the array, including the newly added ones. This allows the array to regain full redundancy and protection against disk failures. Depending on the size of the array, resyncing can take a significant amount of time to complete.
The resync process is automatically initiated when the new disks are added to the array. The RAID controller detects the new disks and starts the re-striping process in the background. No manual intervention is required to start resyncing. The process continues automatically until all data has been re-distributed across the new and existing disks (Source).
The resync process puts additional load on the disks as data is read and moved around. It’s generally recommended to avoid heavy write activity during resyncing, but reads can continue as normal. The array remains protected during the resync as long as there are no additional disk failures (Source).
Monitoring Resync Status
The most accurate way to monitor the progress of a RAID 5 array rebuild is to check the status through the RAID controller interface. Most RAID controllers like Dell PERC or LSI MegaRAID have a utility that shows the progress of any ongoing rebuilds. You can check the percentage completed and time remaining.
For example, on a Dell server you can open the PERC interface and go to the Operations tab to see all the disks in the array. It will indicate which disks are rebuilding and the percent completed. The LSI MegaRAID Storage Manager is similar with a Progress tab showing current operations.
While the rebuild is in progress, you may notice decreased performance on the RAID as the controller rebuilds parity. The rebuild consumes controller resources and disk I/O so response times may lag during heavy use. Plan rebuilds during off hours if possible. The impact depends on the size of the array and number of drives added.1
Monitor the progress until it shows the rebuild completed successfully. If the progress stalls, there may be an issue with one of the new drives.
Verifying Expanded Capacity
Once the resync process finishes, you’ll want to verify that the RAID array has the new expanded capacity. The easiest way is to check Disk Management in Windows. Open the Disk Management utility and look at the total size listed for the full RAID 5 volume. It should now show the larger size with the added disks (for example, if you added two 2 TB disks to a 2 TB RAID 5 array, it should now show around 4 TB of total capacity).
You can also run disk benchmarking tools like CrystalDiskMark to test the performance of the expanded array and compare it to before expanding. Since you maintained the same RAID level, performance should be similar or slightly improved thanks to the increased parallelization. Running benchmarks can help validate that everything is working as expected after expanding the array.
Overall the process is straightforward, but verifying the new capacity and performance helps give you peace of mind that the expansion succeeded. Checking Disk Management and running benchmarks are simple ways to confirm the RAID 5 array has indeed expanded (cite: http://www.raid-calculator.com/).
Maintaining the Expanded Array
Once a RAID 5 array has been expanded, it’s important to take steps to maintain it properly. Two key aspects of maintaining an expanded RAID 5 array are:
Schedule Regular Integrity Checks
It’s recommended to schedule periodic integrity checks on the RAID 5 array to verify all data can be read and accessed correctly. Many RAID controllers or software tools allow automating scrubbing or consistency checks on a daily, weekly, or monthly basis [1]. Running scrubbing routinely helps identify any potential disk errors or corruption issues early.
Monitor Disk Health
Closely monitoring the S.M.A.R.T. stats and overall health of the physical disks in the RAID 5 array is also important. Since RAID 5 can only tolerate a single disk failure, it’s critical to replace any degraded or failed drives promptly. Most RAID management utilities will proactively send alerts about disk health and predictive failures.
Periodically verifying disk performance and workload can help identify any potential issues like bottlenecks or uneven load distribution before they turn into bigger problems. This helps optimize reliability and performance.