An SD card, or Secure Digital card, is a small removable storage device often used to expand storage capacity on Android devices. SD cards allow Android users to store more photos, videos, music, and app data by providing additional storage space beyond what is available internally on their phone.
With many Android phones limited to 16GB or 32GB of internal storage, using an SD card can be necessary for people who download a lot of apps, take high resolution photos and videos, or have large music libraries they want to carry with them. SD cards are also useful as a way to back up important files and transfer data between devices.
By enabling and properly setting up SD card access on an Android phone, users can take full advantage of this external storage option to gain more capacity for the growing amount of data and media people keep on their mobile devices.
Check if Your Phone Supports SD Cards
Before inserting an SD card, you’ll want to confirm that your Android device actually has a slot for SD card expansion. Here’s how to check:
- Go to Settings > About Phone on your Android device.
- Look for model number or name and search it online along with “SD card slot.”
- You can also look under the phone’s specifications directly on the manufacturer’s website to verify SD card support.
- Alternatively, consult your phone’s manual or packaging to see if SD card support is mentioned.
- Do a visual inspection of the phone body for a slot with the SD card symbol.
Many newer Android models, especially from brands like Samsung, LG, Motorola, and Sony, still retain microSD slots. However, some phones like Google Pixels do not have SD card support. Checking your particular device model will clarify if a memory card can be used.
Insert the SD Card
To insert the SD card properly into your Android device, first locate the SD card slot. This is usually on the side or bottom edge of the phone. SD cards are very small, so the slot will be a very narrow opening.
Before inserting the SD card, make sure the metal contacts are facing down and the angled corner of the card matches the angled corner of the slot. Gently slide the card into the slot until it clicks into place and do not force it. The card should fit smoothly and sit flush with the edge of the phone once inserted properly.
If your SD card does not slide in easily or seems to stick out, do not continue forcing it into the slot. Remove it and double check you are inserting it in the correct orientation. Forcing an SD card into the wrong slot or upside down can damage both the card and your phone.
According to Salvagedata.com, one of the most common errors is improperly seating the SD card so that the contacts don’t align with the hardware inside the phone slot. This prevents the SD card from being detected and read properly.
Mount the SD Card
Mounting an SD card refers to the process of making the SD card’s storage accessible to the operating system of your Android device. When you insert an SD card, it needs to be mounted before the phone can read and write files to it.
Mounting is required because when you first insert an SD card, the Android operating system does not have access to it. The SD card acts as external removable storage, so the OS needs to mount it to be able to use the space for storage. This is similar to how you need to mount external drives on a computer.
According to this Quora post, “Mounting an SD card refers to the process of making the SD card’s storage accessible to the operating system of a device. When you insert an SD card, it needs to be mounted before the device can read and write files to it.”
Once the SD card is mounted, the Android OS can access the files and folders on the card similar to internal storage. It enables full integration and usage of expanded storage space on your device.
Enable SD Card Access
In order to move apps or store media on your SD card, you first need to enable SD card access in your phone’s settings. Here are the steps to allow app data and media files to be stored on your SD card:
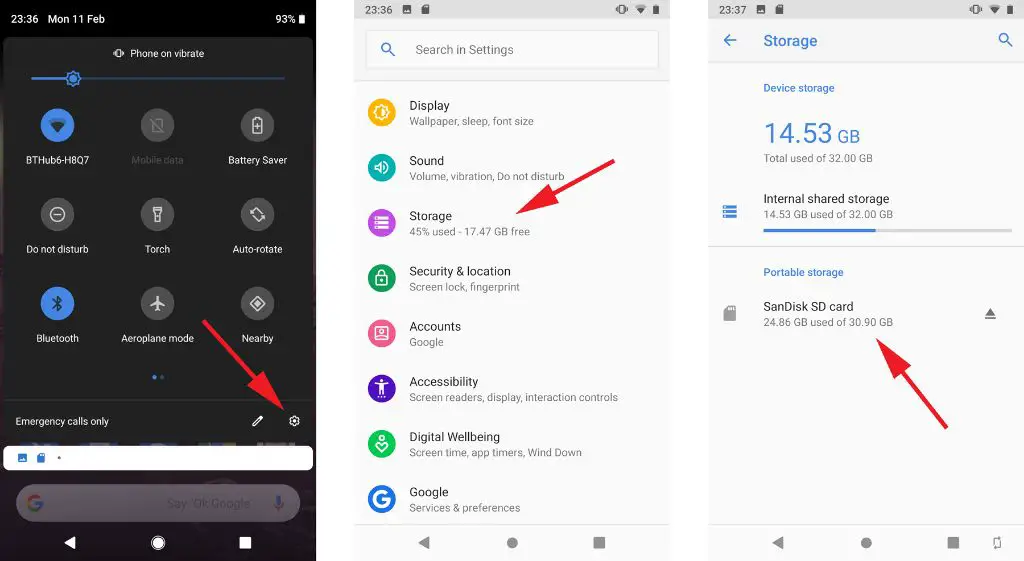
Open the Settings app on your Android phone. Scroll down and tap on “Storage”.
Look for the option that says “Allow apps and media data to be stored on external storage”. Enable this option by tapping on it. Some phones may word this setting differently, but look for the option to allow apps and media to access the SD card storage.
You may see popups asking you to confirm allowing apps or media to be moved. Tap “Move” or “Allow” to confirm. Your phone may prompt you to reboot to apply the setting change.
Once enabled, your phone will now allow apps and media like photos, videos, and music to be stored on your SD card when space is needed. Keep in mind some apps do not support running or storing data on external storage.
Move Apps to the SD Card
Once the SD card is properly mounted, you can move apps over to it to free up space on your phone’s internal storage. Here is the process for moving apps to the SD card on Android:
1. Go to Settings and tap on Apps & notifications.
2. Tap on App info or App management.
3. Tap on the app you want to move.
4. Tap Storage/Memory.
5. Tap the Change button to change the storage location.
6. Select your SD card from the list of storage locations.
7. Confirm that you want to change the app’s storage location.
The app and its data will now be moved over to your SD card. Keep in mind that some apps do not allow you to change their storage location. Also, moving large apps over can take some time to complete.
You can follow this process to move multiple apps to your SD card. Just be careful not to fill up the card completely as it needs some free space to function properly. Periodically check your storage usage under Settings to see how much free space you have left on both your phone’s internal storage and your SD card.
Store Photos/Videos on SD Card
You can set your Android device’s camera to automatically save photos and videos to the SD card by default. This prevents your phone’s internal storage from filling up quickly.
Go to your Camera app settings and look for the storage or memory option. On many Samsung devices, tap the Settings icon (shaped like a gear) in the top left corner of the camera app. Then go to “Storage location” and select “SD card”.
For other Android devices like Motorola, go to the Camera app settings and tap “Storage” or “Data storage”. Choose “SD card” or your external storage as the default save location.
Once you set the SD card as the default location, all new photos and videos shot from the camera will be stored on your expandable storage. You may need to grant the Camera app permission to access and modify contents on the SD card when first enabling this.
If you ever want to save media internally again, simply revisit the Camera app settings and change the storage location back to “Phone” or internal storage. Moving the save location does not affect your existing photos and videos.
Transfer Files Between Phone and SD Card
You can easily transfer files between your phone’s internal storage and the SD card using a file manager app. Here are the steps:
1. Open the file manager app on your Android device. The Files app by Google or My Files work well.
2. Tap on Internal Storage to view the files stored on your phone.
3. Long press on the file you want to move to the SD card. Select “Copy” from the menu.
4. Now go back and tap on the SD card folder. This will show you the contents of the external SD card.
5. Long press on an empty space and select “Paste”. This will copy the file from your phone’s internal storage to the SD card.
6. To transfer a file back to internal storage, long press the file on the SD card and select Copy. Then paste it into the Internal Storage folder.
That’s it! With a file manager app, you can quickly copy photos, videos, music, documents and other files between your phone’s internal storage and external SD card.
Safely Remove the SD Card
Before removing the SD card from your Android device, it’s important to properly unmount it first. This prevents corruption or data loss. Here’s how to safely remove an SD card:
Open the Settings app and tap Storage. Locate your SD card and tap the name. This will open the storage settings specifically for the SD card.
Tap the “Unmount” button. You’ll see a confirmation asking if you want to unmount the card. Tap OK.
This will unmount the SD card from the system and allow you to safely remove it without errors. Once unmounted, you can physically remove the SD card from the device.
According to an Android Central forum discussion, some devices may not have an obvious “Unmount” option. Instead, tap the three-dot menu in the top corner of the Storage screen and select “Storage settings.” In here, find the option to unmount the SD card before removing it.
As recommended by GroovyPost, always unmount the SD card properly before taking it out. This prevents any potential corruption, data loss, or errors when removing external storage from an Android device.
Troubleshooting SD Card Issues
Here are some common SD card issues you may encounter on Android devices and potential solutions to try:
SD Card Not Detected or Reading
If your Android device is not detecting or reading your SD card, try these steps:
- Remove and reinsert the SD card to ensure it is seated properly (make sure to unmount it first).
- Inspect the SD card for any physical damage or dirt/debris.
- Reboot your Android device.
- Check if your device supports your SD card’s capacity and type.
- Try your SD card in another device to see if it works.
- Clean the metal contacts on the SD card gently with a clean cloth.
If the SD card still won’t mount, it’s possible the SD card is corrupted. You can try formatting the SD card on your computer or with an SD card formatter app. Just know this will erase all data on the card.[1]
SD Card Suddenly Became Read-Only
If your SD card is suddenly read-only on your Android device, potential solutions include:
- Check if the physical lock switch on your SD card is in the locked position.
- Remount the SD card after unmounting it.
- Reboot your device.
- Try a different SD card reader or USB adapter if connecting to a computer.
The SD card itself may have suffered some kind of file system corruption. You can try reformatting it to see if that resolves the read-only issue.
Files Missing from SD Card
If you are suddenly missing files from your Android device’s SD card, try these steps:
- Use a file recovery app to scan the SD card and recover deleted files if needed.
- Remount the SD card after unmounting it.
- Re-insert the SD card to check if files reappear.
- Check if you have hidden dot files enabled, which may be hiding some files.
As a last resort, you can reformat the SD card after backing up any retrievable files. But this will erase all data on the card.
[1] https://recoverit.wondershare.com/memorycard-recovery/phone-not-reading-sd-card.html