Booting a non-RAID drive simply means starting up a computer using a drive that is not configured as part of a RAID (Redundant Array of Independent Disks) array. RAID allows multiple drives to be linked together for redundancy or performance, but a non-RAID drive operates independently. With the right BIOS settings and OS installation, booting from a non-RAID drive is straightforward.
What is a Non-RAID Drive?
A non-RAID drive is a standalone storage drive that is not configured as part of a RAID array. This could be a hard disk drive (HDD), solid state drive (SSD), or other storage device connected directly to the motherboard via SATA, SAS, NVMe, or another interface. The key distinguishing factor is that the drive is operating independently and not grouped with other drives in a RAID configuration.
Some key characteristics of non-RAID drives:
- Not dependent on RAID controller or drivers to function
- Does not require RAID configuration utilities to set up
- Typically contains a single partition spanning whole disk space
- Performs at the speed of an individual drive, with no RAID performance improvements
Both RAID and non-RAID drives can be used as boot drives, though non-RAID configuration is simpler. The rest of this guide will focus on booting from a non-RAID drive.
Why Boot from a Non-RAID Drive?
There are a few reasons why someone may want to boot their computer from a non-RAID drive:
- Simplicity – No need to configure/manage RAID arrays
- Cost – Avoid cost of RAID controller and extra drives
- Compatibility – Support older systems without RAID capabilities
- Performance – Single SSD often faster than HDD RAID 0
- Portability – Easily move drive between different computers
Booting from a standalone, non-RAID drive can make a lot of sense for basic home and office PCs that don’t require the more advanced capabilities of RAID. It is a simple and affordable solution.
Selecting a Non-RAID Drive
Any storage drive can operate as non-RAID, but you’ll want to pick one suitable for use as a boot drive:
- HDD vs SSD – An SSD will provide much better performance as a boot drive over a traditional hard disk drive (HDD). Use an SSD if possible.
- Capacity – Aim for at least 256GB to 512GB for adequate storage as a boot drive.
- Interface – SATA III and NVMe are the most common modern interfaces. Select the fastest your system supports.
- Physical size – Choose a 2.5″ drive if booting in a laptop, or 2.5″/3.5″ for desktop.
- Reliability – Pick a drive from a reputable vendor with a good warranty and endurance rating.
Once you have a suitable non-RAID drive, you can install it in your computer and configure your BIOS to boot from it.
BIOS Configuration for Booting from a Non-RAID Drive
In order for your computer to successfully boot from the non-RAID drive, you’ll need to enable the appropriate BIOS settings:
- Enter BIOS setup utility on boot – Typically by pressing F2, F10, Del, or another function key
- Navigate to Boot Order/Priority settings
- Enable the drive’s interface type as bootable – For SATA, enable SATA or AHCI mode vs IDE/Legacy
- Prioritize the drive’s interface over others – Place drive’s SATA or NVMe controller first
- Select proper hard drive boot priority – Move non-RAID drive to top of HDD boot order
- Save changes and exit BIOS setup
This ensures the BIOS will attempt booting from the non-RAID drive before other interfaces or devices. Refer to your motherboard manual for exact steps for your BIOS.
Installing an OS on the Non-RAID Drive
With BIOS settings configured, you can proceed to install an operating system on the non-RAID drive:
- Insert OS installation media – Typically a DVD or USB flash drive
- Boot computer from media to access OS installer
- When prompted, select the non-RAID drive for OS installation
- Delete any existing partitions on drive to create needed OS partition
- Follow on-screen steps to complete OS installation to drive
- Reboot computer – OS should boot from the non-RAID drive
Many popular OS choices like Windows, Linux, and macOS can be installed to and booted from a non-RAID drive using this straightforward process.
Verifying Successful Non-RAID Boot
Once installation is complete and computer has rebooted, verify the OS has successfully booted from the non-RAID drive:
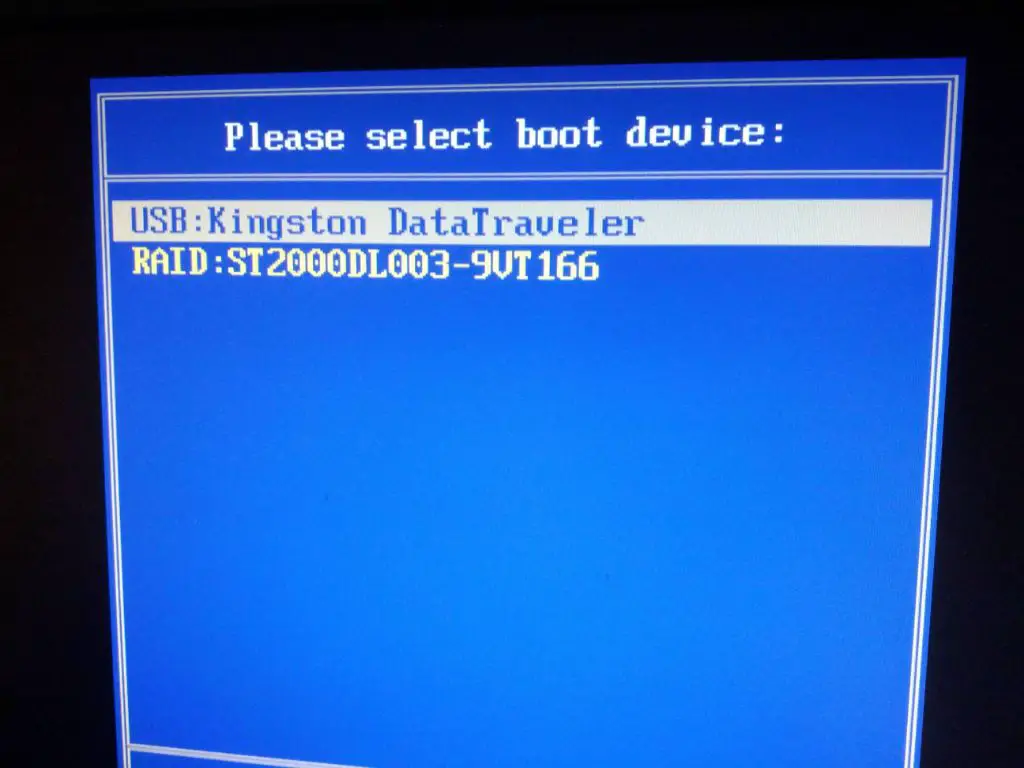
- Check boot messages for drive model/serial – Confirm drive is initializing during boot
- Go into Disk Management (Windows) or fdisk (Linux) – Non-RAID drive should show as only disk, no arrays visible
- Check Disk Utility/System Profiler on macOS – Disk should show as directly connected, not part of RAID
- Reboot and enter BIOS – Confirm boot order still correct, booting from drive first
If everything checks out, congrats! Your computer is now booting from a simple, standalone non-RAID drive.
Advantages of Booting from a Non-RAID Drive
Compared to configuring a RAID array, booting from a non-RAID drive has some nice advantages:
- Simple setup – No RAID configuration needed, just install OS on drive
- Cost effective – Only need one drive, no RAID controller required
- Faster performance – Single SSD faster than HDD RAID, and no overhead
- Easy drive migration – Can directly move drive to new system
- Wider compatibility – Works on systems without RAID support
For general home and business use, a single non-RAID drive can deliver great reliability and performance at low cost and complexity.
Disadvantages vs. RAID
There are a few tradeoffs vs. configuring a RAID array as your boot drive:
- No redundancy – Single drive failure can cause total data loss
- Limited capacity – Single drive may not offer enough storage space
- Slower large transfer speeds – RAID 0 can provide faster speed for large files
- No performance aggregation – A RAID of SSDs can multiply performance
For mission critical servers or high demand workloads, the benefits of RAID may outweigh the simplicity of a standalone drive.
Non-RAID Booting Tips
Here are some additional tips for getting the most from booting your computer from a non-RAID drive:
- Use the fastest drive interface available – NVMe > SATA III > SATA II
- Keep drive firmware and OS fully updated
- Enable TRIM on SSDs in OS for optimal performance
- Monitor drive health metrics using OS tools
- Backup critical data regularly in case of failure
- Consider external drive enclosures for creating backups
Following best practices for your single drive will help ensure reliable booting and long drive lifespan.
Migrating to a New Non-RAID Boot Drive
When it comes time to replace your boot drive, it’s straightforward to migrate to a new non-RAID drive:
- Backup data and OS partition from old drive
- Replace old drive with new non-RAID drive
- Clean install OS on new drive
- Restore data onto OS partition
- Swap boot order in BIOS to new drive
- Done! Enjoy your new non-RAID OS drive
Taking occasional backups makes recovering from failure or migrating to a new drive much simpler.
Conclusion
Booting from a non-RAID drive is a cost-effective, high performance solution for many home and business PCs. With the right drive selection and OS installation, setup is quick and simple. Non-RAID drives offer great versatility and compatibility while avoiding the cost and complexity of RAID.
By following the steps outlined in this guide, you can easily achieve a fast and reliable boot experience using a standalone, non-RAID drive. Just be sure to back up important data in case of failure. With the advantages in speed, affordability, and simplicity, booting from a non-RAID drive is a great choice for most basic computing needs.