The recovery partition is a section of the hard drive on a Toshiba Satellite laptop that contains software to recover the system to its original factory state. You may need to boot from the recovery partition if your system becomes unstable or corrupted, in order to reset it to factory settings and restore full functionality.
Booting from the recovery partition involves entering the boot menu on startup, selecting the recovery partition as the boot device, and then following the on-screen instructions to restore your system. The steps include using the Recovery Wizard to reformat the hard drive and reinstall the original operating system, drivers, and Toshiba software.
Pre-requisites
Before you can boot from the recovery partition on a Toshiba Satellite laptop, there are a few requirements that must be met:
The laptop must have the original Toshiba recovery partition intact. This is typically a hidden partition created by Toshiba when the computer is manufactured. If this partition has been deleted or corrupted, you will not be able to access the recovery options (Source).
The recovery partition itself cannot be corrupted or damaged. If the recovery partition is not readable, booting into it will fail and recovery options will be unavailable (Source).
You need physical access to the Toshiba Satellite laptop in order to boot into the recovery partition. The recovery options are only accessible by pressing certain key combinations at startup, before the operating system loads.
Enter the Boot Menu
To enter the boot menu on a Toshiba Satellite laptop, you’ll need to repeatedly press a specific function key as the computer powers on:[1]
When powering on your Toshiba Satellite, tap the F12 key continuously. This will bring up the One Time Boot Menu. If F12 does not work, try tapping F2 or F8 instead as the boot menu key can vary on some models.
Once in the boot menu, use the arrow keys to select the “Boot Manager” or similar option. This will display a list of available bootable devices and partitions.
Select the recovery partition from this menu to boot your Toshiba Satellite into the recovery environment.
Select Recovery Partition
Once you are in the Boot Menu, look for an option named ‘HDD Recovery’ or something similar. This option boots from the recovery partition on your Toshiba Satellite laptop (Source). The exact name may vary between models, but it should be clearly labeled as the recovery option.
Use the arrow keys to highlight the recovery partition boot option and press Enter. This will boot your Toshiba Satellite from the recovery partition rather than the main Windows partition (Source).
Once selected, the laptop will restart and load files from the recovery partition on the hard drive. This contains the factory reset files and tools to restore your Toshiba to its out-of-the-box state (Source).
Follow On-Screen Instructions
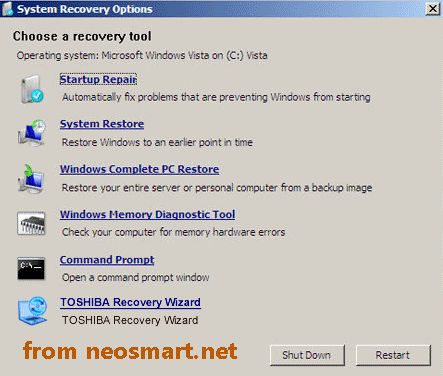
Once you have selected the recovery partition option in the boot menu, you will see the Toshiba recovery environment interface. This interface allows you to access various recovery options for your Toshiba Satellite laptop.
The next step is to follow the on-screen prompts to choose a recovery option. The main options typically include:
- Full system restore – This completely reinstalls the operating system and restores the laptop to factory settings.
- Refresh Windows – This keeps your personal files but reinstalls Windows and apps.
- Advanced recovery – Provides additional options like system diagnostics.
Make sure to read through the descriptions for each option carefully before selecting. The prompts will guide you through confirming your choice and initiating the recovery process.
Overall, just take your time and follow all the on-screen instructions. The Toshiba recovery interface is designed to walk users through restoring their laptop in a simple step-by-step manner. If you encounter any issues or have questions during the process, refer to Toshiba’s support documentation (https://support.dynabook.com/support/viewContentDetail?contentId=2753749).
Restore the System
Choosing system restore will revert the operating system and programs back to factory settings while keeping data files intact by default (Source 1). This option essentially reinstalls the OS and software that came pre-installed on the Toshiba laptop, fixing many software issues caused by corruption or problematic updates. However, any additional programs installed by the user will be removed in the process. Users can choose to also erase all data files during the restore, but keeping data is recommended if no backup exists.
System restore via the recovery partition is therefore an effective way to reset your Toshiba Satellite to a clean, working state as it was when new. It eliminates software problems while preserving your personal files. Just be aware that user installed programs will be erased, so you’ll need to reinstall anything you added after purchase. Overall, system restore is a convenient built-in recovery option for restoring Toshiba laptops’ system software to factory settings.
Refresh the OS
The refresh option reinstalls Windows but keeps data and programs 1. This can fix system file errors while preserving user installed software 2. The refresh process will:
- Reinstall Windows while keeping personal files, settings, and apps
- Remove third-party software downloaded from the web
- Restore Windows to original factory condition
- Retain data folders like Documents, Music, Pictures
Refreshing is useful when the PC is experiencing system file corruption or software problems. It will reinstall a clean copy of Windows without deleting personal data. The process normally takes less than an hour.
Advanced Recovery Options
The Advanced recovery options menu contains tools for troubleshooting more complex problems. This menu can be accessed by pressing F8 or the appropriate function key during the boot process to open the Windows Recovery Environment before the operating system loads. The Advanced recovery options include:
- System Restore – Restores your PC’s system files and settings to an earlier point in time.
- System Image Recovery – Recovers your PC from a system image backup.
- Startup Repair – Automatically fixes problems that prevent Windows from starting.
- Command Prompt – Starts a Command Prompt window from the recovery environment.
- System diagnostics – Starts diagnostic and recovery tools from your PC manufacturer.
For simple system restore operations, the Advanced recovery options are not necessary. However, they provide useful troubleshooting tools for diagnosing and repairing more complex startup and system file problems. The Command Prompt tool can be especially helpful for advanced users to run diagnostics, edit system files, or uninstall problematic updates.
Exit Recovery Partition
Once the recovery process is complete, you will want to exit the recovery partition and reboot back into the main operating system. Here are the steps to properly exit the recovery partition:
1. When the recovery process finishes, you will be prompted to exit the recovery partition. Select “Exit” from the menu.
2. The laptop will reboot and exit the recovery environment. It will boot back into the main operating system.
3. Before exiting the recovery partition, verify that the recovery or restore process completed successfully. Check that your files, settings, and apps are present as expected.
4. If the recovery process did not fully complete or issues persist, you may need to run the recovery process again before exiting the partition.
Exiting the recovery partition will reboot the laptop and restore normal functioning. Be sure to validate the recovery was successful before exiting.
Summary
In summary, to boot from the recovery partition on a Toshiba Satellite computer, first enter the boot menu during startup. Then select the recovery partition from the boot options. Follow the on-screen instructions to restore the system files or refresh the operating system. The recovery partition is useful for fixing software issues and restoring your computer’s original settings.
It’s important not to delete the recovery partition, as this contains the files needed for system recovery. If you do delete the partition, you’ll need to create Toshiba recovery media using the Toshiba Recovery Media Creator to restore your computer.
Overall, the recovery partition provides a handy way to restore your Toshiba Satellite without external media. Use it to refresh your OS or reset to factory conditions. Just be sure not to remove the recovery partition itself.