The BIOS (Basic Input/Output System) is firmware used to perform hardware initialization during the booting process and to provide runtime services for operating systems and programs. The BIOS is the first code that runs when you turn on your computer before the operating system loads.
One important function of the BIOS is controlling the boot order – the sequence of storage devices that the computer checks for an operating system bootloader or bootable disk image. On a Gigabyte motherboard, the boot order can be configured through the BIOS setup utility.
You may want to change the BIOS boot order if you are dual-booting operating systems, troubleshooting boot issues, booting from external drives, or prioritizing certain drives over others. Setting the proper boot order ensures that the computer boots from the correct drive and loads the desired operating system.
Accessing the BIOS
To access the BIOS setup utility on a Gigabyte motherboard, you need to press the designated BIOS key during the boot process. This is usually the Delete key or the F2 key, but can vary between specific Gigabyte models.
Follow these steps to access the BIOS:
- Power on or reboot your computer.
- As soon as the computer starts booting, look for a prompt to press a key to enter setup. This is usually in the bottom left corner of the screen.
- Press the designated BIOS key repeatedly. This is often Delete or F2, but can also be F12, F10, or other function keys on some systems. Press the key continuously until the BIOS screen opens.
- If you miss the prompt, simply restart the computer and try again.
Once you see the BIOS start to open, you can stop pressing the key. This will bring you to the main BIOS setup screen and utility.
If the system does not respond or you experience issues accessing the BIOS, refer to the motherboard manual or Gigabyte’s website for the exact BIOS key for your model. For example, according to Gigabyte’s manual, pressing Delete after reboot will open the BIOS on many of their models.
Navigating the BIOS
Once you access the BIOS by pressing the designated key during bootup (usually Delete or F2), you will be presented with the main BIOS menu. This gives you an overview of basic system information and allows you to navigate to other menus using the arrow keys or mouse.
The main menus typically include options like:
- System Information – Displays details about the CPU, memory, drives, etc.
- M.I.T. – Advanced memory and clock settings
- BIOS Features – Boot order, security, virtualization settings
- Peripherals – Configures ports, integrated devices, etc.
- Chipset – Chipset and power management options
- Save & Exit – Save changes and exit BIOS
You can drill down into each menu for additional options and settings. The BIOS navigation is designed to be intuitive, with clear menu labels and organization. Take some time to explore each section to understand the full configuration available.
Key navigation tips:
- Use arrow keys to move between menus and options
- Press Enter to select an option or submenu
- Press Esc to go back to a previous menu
- F1 usually opens the integrated BIOS manual
With some practice navigating the various menus, you’ll be able to find any BIOS setting with ease.
Finding the Boot Menu
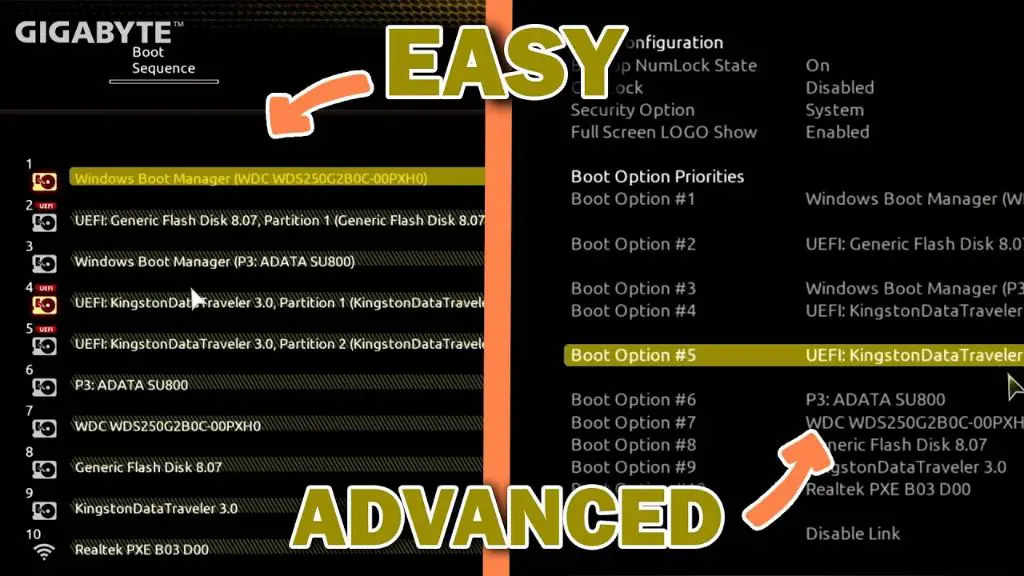
The Boot menu in Gigabyte’s BIOS is located under the Boot tab (https://www.partitionwizard.com/partitionmanager/gigabyte-bios-key.html). To access it, you first need to enter the BIOS setup by pressing the Delete key on your keyboard when your computer boots up. Once you are in the BIOS, navigate to the Boot tab along the top. The Boot Option Priorities section here allows you to view and edit the boot order.
Specifically, the Boot Option Priorities section lists all available bootable devices connected to your system, such as hard drives, USB drives, and optical drives. You can use the arrow keys to move a device up or down in the boot order. The device at the top of the list will be the first boot option.
So in summary, the Boot menu is found by going to the Boot tab > Boot Option Priorities in Gigabyte’s BIOS setup. This is where you can view and rearrange the boot order of devices.
Viewing Boot Order
To view the current boot order in Gigabyte’s BIOS, first enter the BIOS setup menu as described in the Accessing the BIOS section. Once in the BIOS, navigate to the Boot tab. This is usually located along the top of the BIOS menu.
Under the Boot tab, look for the “Boot Option Priorities” section. This will list the current boot order and boot priority for devices configured in the BIOS.
The device at the top of the list has the highest boot priority and will be attempted first on system boot. The device at the bottom of the list has the lowest priority and will only be attempted after all other boot options fail.
To see specific settings like hard drive order or boot sequence, expand the boot options using the “+” icons. For example, expanding “Hard Drive” may reveal separate entries for multiple drives installed in the system.
Review this list closely to understand the current boot order. If changes are needed, see the Changing Boot Order section below.
Changing Boot Order
To change the boot order in a Gigabyte BIOS, follow these steps:
- From the BIOS main menu, go to the Boot tab.
- Locate the “Boot Option Priorities” section. This lists the current boot order.
- Use the arrow keys to highlight the device you want to move in the boot order.
- Press + or – on your keyboard to move the highlighted device up or down in the boot order.
- Once the devices are in the desired boot order, press F10 to save changes and exit BIOS.
The motherboard will now boot following the new boot order. If the system does not boot as expected, double check the boot order and verify the settings.
For more details, refer to Gigabyte’s guide on setting the boot order: https://www.gigabyte.com/Support/Consumer/FAQ/1767
Save and Exit
After making changes to the boot order in the BIOS, you need to save the changes and exit properly for them to take effect.
To save changes and reboot the system, go to the Save & Exit tab in the BIOS. This tab provides options to save various BIOS settings.
Select Save Changes and Reset to save all changes made to the BIOS settings and restart the computer. According to the Gigabyte BIOS manual, this will save the changes to the CMOS and exit the BIOS, rebooting the system.
You can also press F4 on the keyboard to save and reset, if the option is available in your BIOS.
After rebooting, the computer will boot from the new boot order specified in the BIOS.
Verification
After making changes to the boot order in the BIOS, it is important to verify that the changes were properly applied and persisted after rebooting the computer. Here are the steps to confirm that the new boot order is in effect:
- Save changes and exit the BIOS setup utility, allowing the computer to reboot.
- As the computer is booting up, enter the BIOS setup again using the same key combination as before (e.g. Delete, F2).
- Navigate back to the Boot or Boot Order section of the BIOS.
- Confirm that the boot devices are listed in the new order you specified. According to Lifewire, changes made in the BIOS should persist after rebooting.
- If the previous boot order is still shown, the changes were not properly saved. Repeat the process to reorder the boot devices and save changes again before exiting.
Following these steps will validate that the boot order change was correctly applied and is in effect going forward across reboots. This prevents issues booting from the desired device.
Troubleshooting Issues Changing Boot Order
Here are some solutions for common issues that may occur when trying to change your boot order in the BIOS:
If your computer is not saving the boot order changes you make, try resetting the BIOS to default settings by removing the CMOS battery on the motherboard for a few minutes. After replacing the battery, enter the BIOS again and remake your boot order selections (source).
For boot order changes reverting on their own, this is likely caused by having legacy/UEFI boot configurations mixed for your drives. Try ensuring all drives use the same boot type, such as UEFI only (source).
If you cannot access or change the boot menu, your PC may have boot order locked in the BIOS. You can reset this by powering down, disconnecting all drives except your primary, booting into BIOS to change the order, shutting down again, then reconnecting your other drives (source).
Conclusion
Changing the boot order in your Gigabyte BIOS allows you to select which device the computer boots from first. The process involves accessing the BIOS menu on startup, navigating to the Boot tab, viewing and re-ordering boot devices, saving changes and exiting the BIOS, and verifying the changes took effect. Key steps include entering the BIOS by pressing the Delete key on boot, finding the Boot menu, using arrow keys to move devices up or down in priority, selecting Save & Exit, and confirming the boot order change was successful after rebooting.
Modifying boot order is useful when you want to select a different hard drive or external device to boot from. It gives you control over which device initializes the operating system. While the process varies slightly across manufacturers, the general steps are similar for accessing the BIOS and changing boot order on most PCs. With some careful navigation of the BIOS interface, you can easily alter system boot order.