By default, iTunes stores your music library and media files in a folder location on your computer’s local hard drive. For many users, this default location is inside your Music folder under C:\Users\[username]\Music\iTunes.
There are a few reasons why you may want to move your iTunes media folder to a new location. You may be running low on space on your primary hard drive and want to relocate the files to an external or secondary drive with more available storage. Or you may want to organize your media files better by moving them all into one main folder location. Changing the location can also help improve performance if your media files are on a faster external SSD drive versus a slower mechanical hard drive.
This article explains the steps to take in order to move your existing iTunes media folder to a new file path location on your Windows PC.
Find Your Current iTunes Media Folder Location
The iTunes media folder is where all your music, movies, apps, and other iTunes content is stored on your computer. To find where your iTunes media folder is currently located, follow these steps:
On Windows:
– Open File Explorer and navigate to C:\Users\ [your username] \Music\. Look for a folder called “iTunes”. This is the default location for the iTunes media folder on Windows.
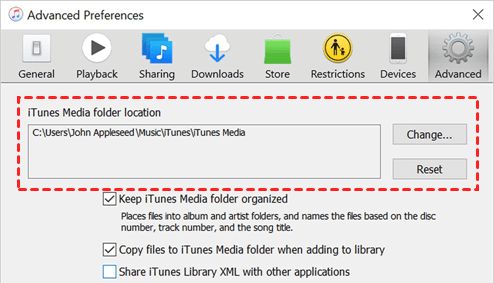
– You can also check within iTunes itself. Go to Edit > Preferences > Advanced and look at the current setting for “iTunes Media folder location”. This will show you the path to the folder where your iTunes content is stored.
On Mac:
– Go to Finder and open the Music folder in your Home directory. The default location is /Users/[your username]/Music/. Look for a folder called “iTunes”.
– You can also check in iTunes by going to iTunes > Preferences > Advanced and look at “iTunes Media folder location”.
If you ever relocated your iTunes media folder, it may be in a different location than the defaults above. But the steps above will show you the current path so you can find where your iTunes content is now stored.
Create a New Folder for Your iTunes Media
Before moving your existing iTunes media files, you’ll first want to create a new folder where you can move them to. It’s best practice to keep your iTunes media files organized in their own dedicated folder.
When naming the new folder, it can be helpful to include ‘iTunes’ in the name so it’s clear what the folder contains. For example, you could name it ‘My iTunes Media’ or ‘iTunes Files’.
In terms of location, you’ll want to create this new iTunes folder somewhere easy to access and with plenty of storage space, like on an external hard drive or a different location than your current iTunes folder. Avoid putting it somewhere like your Windows C drive where storage may be limited.
Once you’ve created the properly named new folder in your desired location, you’ll be ready to move your existing iTunes media over to consolidate everything in one organized spot.
Move Your Existing iTunes Media
Once you have created a new folder location for your iTunes media files, you will need to move your existing iTunes media from its current location to the new folder. Here are the steps for both Windows and Mac:
On Windows
Open iTunes and go to Edit > Preferences > Advanced. Click the ‘Change’ button next to ‘iTunes Media folder location’. Navigate to and select your new iTunes media folder location. Click ‘OK’.
Next, go to File > Library > Organize Library. Check the box for ‘Consolidate files’ and click ‘OK’. This will copy all of your existing iTunes media files over to the new folder location. [1]
On Mac
Hold down the Option key and click on the iTunes menu bar. Select ‘Preferences’. Go to the Advanced tab and change the ‘iTunes Media folder location’ to your new folder path. Click ‘OK’.
Next, go to File > Library > Organize Library and check ‘Consolidate files’. Click ‘OK’ to copy the existing iTunes media files to the new location.
This process may take some time depending on how large your iTunes library is. The existing files will remain in their original locations as copies. Once the process is complete, you can delete the iTunes media files from the old location if desired.
Point iTunes to the New Media Folder Location
Once you have created your new iTunes media folder location, you need to point iTunes to this new folder so it knows where to find your music files. Here are the steps to update the iTunes media folder location setting on both Windows and Mac:
On Windows:
- Open iTunes and go to Edit > Preferences > Advanced
- Click the ‘Change’ button next to ‘iTunes Media folder location’
- Navigate to and select your new iTunes media folder
- Click ‘Open’ to set this as the new iTunes media folder location
On Mac:
- Hold down the Option key while launching iTunes
- In the pop-up, click ‘Choose Library’
- Navigate to and select your new iTunes media folder
- Click ‘Open’ to set this as the new iTunes media folder location
Now when you add new music or other media to your iTunes library, it will be saved to the new folder location instead of the default one. iTunes will look in the new media folder for your existing music as well.
Consolidate Your iTunes Media
Consolidating your iTunes media is an important step after changing the location of your iTunes media folder. Consolidating copies any media files that are referenced in your iTunes library but located elsewhere on your computer into the new iTunes media folder location.
This ensures that your iTunes library has the proper file paths to all of your media files in the new location. Without consolidating, iTunes may still be referencing the old file paths from the previous media folder location. This can cause issues with missing files when you play music and videos.
To consolidate your iTunes media:
1. Open iTunes and go to File > Library > Organize Library.
2. Tick the box for “Consolidate files”.
3. Click OK. [1]
iTunes will copy all files that are referenced in your library into the new media folder location. This process may take some time depending on how large your iTunes library is. When complete, you can be confident that iTunes now has the correct file paths to find all media files in their new location.
Update iTunes Music File Paths
After moving your iTunes media files to a new location, you may need to update the file paths in iTunes so it can relink to your music files. If iTunes cannot find your media files in their original location, it will show them as missing or with an exclamation point next to the track name.
On Windows, you can relink your iTunes music library by going to Edit > Preferences > Advanced and clicking the “Change” button under “iTunes Media folder location”. Navigate to the new folder location and select it. iTunes will search the new folder and relink your music files [1].
On Mac, go to iTunes > Preferences > Advanced > Change and select the new iTunes Media folder location. This will prompt iTunes to search the new folder and relink the files [2].
You can also relink individual missing tracks and albums by right-clicking and selecting “Locate Media File”. Then navigate to the file in its new location. This method works on both Windows and Mac.
Relinking your iTunes music library can take some time depending on the size of your library. Be patient and let the process complete. Verify afterwards that your music files no longer show as missing.
Reorganize and Clean Up
After changing the location of your iTunes media files, it’s a good idea to reorganize and clean up your iTunes library to ensure everything is working properly. Here are some tips:
- Go to File > Library > Organize Library to consolidate any duplicated items and reorganize the file structure.
- Check for any broken links or missing files. Delete any tracks stuck on “Waiting” status.
- Review your playlists and smart playlists to make sure all tracks are still accessible.
- Consider enabling the “Keep iTunes Media folder organized” and “Copy files to iTunes Media folder when adding to library” options in Preferences > Advanced to keep things tidy.
- Check that album artwork and other metadata is populated correctly throughout your library.
- Consider deleting any junk files, old iOS backups, or other unused items from your iTunes Media folder to save space.
- Create a backup of your iTunes library file (itunes library.itl) before deleting old content, just in case.
Periodically reorganizing your iTunes library is a good habit to prevent issues. After changing the media folder location, take time to clean things up and ensure all your music and other media is organized properly in the new location.
Back Up Your iTunes Library
It is recommended to back up your iTunes library to an external hard drive in case any issues arise later that cause data loss or corruption. This provides a restore point. To back up your iTunes library:
1. Connect an external hard drive to your computer via USB port. The drive should have sufficient storage space for the size of your iTunes library.
2. Open iTunes. Go to File > Library > Back Up to Library.
3. In the popup window, navigate to your external hard drive and create a new folder such as “iTunes Backup”. Select that as the location.
4. Click Back Up. iTunes will now copy your entire iTunes library to the external drive. This includes your music, movies, apps, books, etc.
Storing a backup on an external drive allows you to restore your iTunes library if anything happens to the original files. For example, if your hard drive crashes or you get a new computer, you can transfer the backup and reinstate your iTunes content.[1]
Troubleshooting Tips
Changing the location of your iTunes media folder can sometimes run into issues. Here are some tips for troubleshooting common problems:
If the iTunes media folder keeps resetting to the default location, try holding down Shift and double-clicking the iTunes icon to bring up the Choose Library dialog. From there, you can select the correct iTunes folder location. This issue is commonly reported on Windows 10 and 11 (source).
On Windows, make sure you have proper administrator permissions to move files and folders. Attempting to change the iTunes media folder location without admin rights can lead to errors.
Check that the new file path doesn’t contain special characters or exceed Windows’ maximum folder path length limit of 260 characters (source). Shorten the folder name if needed.
After moving your media, consolidate your library in iTunes by going to File > Library > Organize Library. This will update the file paths for all media files.
As a last resort, create a brand new iTunes library and import your existing media files. This is more time consuming but can resolve persistent issues.
Make sure to back up your iTunes library before making any major changes to your media folder location.