SD cards are a very common type of flash memory card used in devices like digital cameras, phones, and computers to store data. Checking an SD card for errors is important to avoid potential data loss or corruption. There are several ways errors can occur on SD cards such as file system corruption, bad sectors, or logical errors. Regularly checking for errors and addressing any issues is key to maintaining the health of an SD card.
This guide will cover different methods to check an SD card for errors on Windows computers. We’ll look at using built-in SD card readers, third party software, and formatting to scan and fix errors. Tips to avoid errors in the future will also be provided. Identifying and resolving any errors on an SD card can help prevent irretrievable data loss.
Back Up Your SD Card First
It’s important to back up the data on your micro SD card before checking for errors. This ensures you don’t lose any valuable photos, videos, documents or other files stored on the card if errors are detected. Trying to repair or format an SD card that has errors can potentially lead to irrecoverable data loss if the files are not backed up first.
The safest way to back up your SD card is to copy all the files and folders to your computer. Simply insert the card into your computer’s SD card reader or adapter. Then open the SD card drive, select all files/folders, and copy them to a folder on your internal hard drive or external storage device. [1]
Alternatively, you can back up the SD card files to another external SD card. Use a high quality card that’s at least the same size or larger than your current card. Connect both cards to your computer, then select and copy all files from the original card over to the backup card. Store this backup card in a safe place in case you need the data later. [2]
Taking these preventive steps before checking for and fixing SD card errors ensures you don’t accidentally lose important data or memories stored on the card.
Check SD Card on Your Computer
The easiest way to check an SD card for errors is by using the built-in disk utilities on your computer. To do this:
- Plug the SD card directly into your computer’s SD card reader, or use an SD card adapter to connect it to a regular USB port.
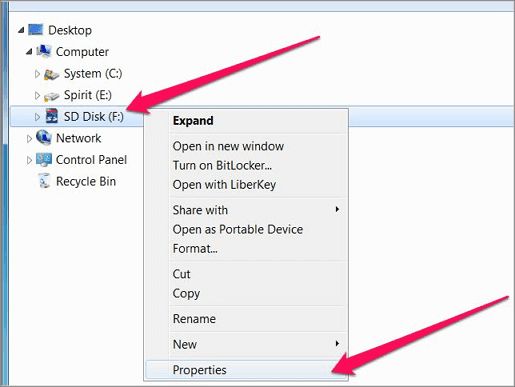
- On Windows, open File Explorer, right-click on the SD card, and select Properties. Go to the Tools tab and click “Check” under Error checking. Windows will scan the card and attempt to repair any errors.
- On Mac, open Disk Utility, select the SD card on the left, click First Aid, then click Run. Disk Utility will verify and repair the disk.
Formatting the SD card can also check for errors. Just be sure to back up any files on the card first, as formatting will erase data. On Windows, right-click the card, select Format, pick a file system, and start the process. On Mac, click Erase in Disk Utility.
After scanning, check the results. If errors are found and unable to be repaired, this likely means the SD card is corrupted and should be replaced. Avoid continuing to use damaged cards, as further data loss may occur.[1]
Check Errors Using SD Card Reader
One way to easily check for errors on your micro SD card is by using a dedicated SD card reader that has built-in error checking functions. Many card readers designed for SD cards will have the ability to scan for bad sectors, lost clusters, and file system errors.
Using a card reader with error-checking eliminates the need to connect the card to a computer in order to scan it. The card reader will interface directly with the SD card and perform a surface scan to identify potential issues. Many will provide a status indicator if any errors are found.
According to Salvagedata.com, “A card reader with built-in error checking will scan the memory card to make sure there are no bad sectors or lost clusters.” This allows you to check for errors and attempt data recovery without a PC if needed [1].
Dedicated SD card readers with built-in error checking provide a quick and easy way to validate your micro SD card health. They help detect issues before they lead to lost data or card failure.
Check via SD Card Formatting
One way to check for errors on your SD card is to format it. Formatting scans the entire SD card for bad sectors. Any bad sectors are marked so they are not used for saving data.
However, formatting erases all data on the card. So before formatting, be sure to backup your SD card data first! Once backed up, you can format the card on your computer or device.
On Windows, insert the SD card, right-click on it in My Computer or File Explorer, and select “Format”. On Mac, insert the card, open Disk Utility, select the card, click “Erase”, and confirm the card will be formatted.
On an Android device, go to Settings > Storage, tap on your SD card, then tap “Format” or “Format as internal” to format it. On an iPhone or iPad, open the Settings app, tap General > iPad/iPhone Storage, select your SD card, then tap “Erase All Content and Settings”.
Formatting scans the entire card for errors, marks bad sectors, and prepares the card to reliably save new data. Just be sure to backup your card first as formatting erases everything.
Check Using Third-Party Software
There are some excellent third-party SD card tools available that go beyond the basic error checking built into operating systems. These utilities can detect bad sectors, attempt repairs, and recover lost data. Some top options include:
EaseUS Data Recovery Wizard (Windows/Mac) – Freeware that analyzes SD card errors, fixes file system issues, and recovers lost files. Provides thorough scanning and optimization of damaged cards.
TestDisk (Windows/Mac/Linux) – Open source tool that checks and repairs partition issues while recovering lost partitions and data. Great for diagnosing issues on corrupted cards.
Disk Drill (Windows/Mac) – Straightforward interface for recovering lost files and reconstructing damaged cards. Provides protection against future errors as well.
These advanced tools go above and beyond the standard error checking tools by providing diagnostics on bad sectors, fixing common SD card problems, and recovering as much data as possible from corrupted cards before they need to be replaced.
Interpreting Error Check Results
When checking your SD card for errors, you may see various error codes or messages. Here are some of the most common and what they mean:
I/O error – This means there was an input/output error when trying to read or write data to the SD card. It likely indicates a physical problem with the card.[1]
CRC error – A CRC or cyclic redundancy check error means the data on the card doesn’t match the checksum, indicating corruption. This could be caused by improper ejection of the card.[2]
Read/write error – This error indicates the system is unable to read or write data to the SD card. It’s one of the most common SD card errors.[1]
Card not formatted – This usually appears when the card’s file system is corrupted and the operating system can’t recognize it. Formatting may fix it.[2]
For minor errors like read/write errors, you can try reformatting the SD card to repair file system corruption. But for physical errors like I/O errors or CRC errors, it’s best to replace the card, as physical damage is unlikely to be fixed with software repairs.
In general, if you get persistent errors even after trying to reformat an SD card, it likely has physical damage and needs to be replaced. Critical errors also indicate it’s time for a new card.
Best Practices to Avoid Errors
Here are some best practices to help avoid errors and extend the life of your micro SD card:
Safely eject the card – Always safely eject the SD card from your computer or device before removing it to avoid corruption.
Handle with care – Avoid touching the contacts and dropping or bending the card, as physical damage can cause issues. Store the card in a protective case when not in use.
Proper storage – Keep the card away from heat, cold, and moisture. Store at room temperature in a dry location.
Buy reputable cards – Stick to major brands like SanDisk, Samsung, or Kingston when buying new cards for better reliability.
Format regularly – Perform a full format on the card every so often to wipe it clean of any lingering errors.
Make backups – Always maintain backups of your important data on multiple cards or other storage media.
Avoid overfilling – Leave 10-20% free space on the card to reduce the chances of corruption.
Handle with care – Be gentle with the card, avoiding bending, dropping, or exposing it to liquids and debris.
Use the official adapter – Use the SD card adapter designed for that specific card when transferring files instead of plugging directly into the computer.
When to Replace an SD Card
There comes a point when an SD card is beyond repair and needs to be replaced. Some signs your card is damaged beyond use include:
- You’ve tried multiple recovery programs without success
- The card is no longer recognized by your computer or device
- You consistently get read/write errors and slow performance
- There is obvious physical damage like cracks or bent metal tabs
If your card shows these symptoms or you’ve exhausted all options, it’s time to properly dispose of it and get a new SD card. Before recycling old cards, make sure to do a secure wipe to delete all data. On Windows, you can use the “Clean” command in Diskpart to overwrite the card (Source). On Mac, you can use the disk utility Erase feature. Physically destroying the card is another option if you want to ensure the data can never be recovered.
When getting rid of the SD card, look for recycling options in your community like electronics or e-waste collection events. Some retail stores like Best Buy also accept old electronics for recycling. Avoid simply tossing cards in the trash, as they contain metals and plastics that are hazardous in landfills. Proper SD card disposal helps protect the environment.
Summary
In summary, there are a few key ways to check your micro SD card for errors:
– Use the built-in error checking tools in your computer’s operating system, like CHKDSK on Windows or Disk Utility on Mac.
– Insert your SD card into a dedicated card reader and scan for errors using the software it came with.
– Directly format your SD card in your computer or camera to scan and mark bad sectors.
– Use third party software like H2testw to do an in-depth scan and identify any file system or data corruption issues.
No matter which method you use, it’s critical to backup your SD card data regularly in case errors are found that can’t be fixed. Formatting the card is often necessary to repair problems, which will wipe the data.
For additional SD card troubleshooting tips, check out our guides on how to fix an unreadable SD card and steps to revive a dead SD card.