Keeping your Windows Server clean and optimized is crucial for performance and reliability. Over time, unused files, temporary data, and other clutter can build up and take up valuable disk space. Cleaning up and freeing space on your server disks helps ensure smooth operations and prevents problems down the road.
Why is Disk Cleanup Important?
There are several key reasons you should regularly clean up disks on your Windows Server:
- Frees up disk space – Removing unnecessary files and data frees up space for critical server operations. Servers often have large storage capacities that can easily become bloated over time.
- Improves performance – When disks are cluttered, the server has to work harder to find and access important files. Cleaning improves read/write speeds and overall responsiveness.
- Reduces fragmentation – Heavily used disks tend to become fragmented. Defragmenting optimizes file storage and access.
- Tightens security – Deleting temporary and unused data reduces exposure from vulnerabilities or malware hiding in obscure folders.
- Aids recoverability – Well-managed disks with adequate free space are easier to restore in the event of failures or outages.
- Saves money – Making the most of existing storage space postpones expensive hardware upgrades and cloud expenses.
Dedicated clean up and optimization passes should be part of any server maintenance plan. For Windows Server specifically, Microsoft provides helpful built-in utilities to automate much of this busy work.
Methods for Cleaning Disks on Windows Server
There are a handful of techniques, tools, and best practices administrators can use to clean Windows Server disk drives:
Disk Cleanup Utility
The Disk Cleanup utility is included in all Windows Server versions and provides an easy way to free disk space by deleting temporary and unnecessary files. Follow these steps to run it:
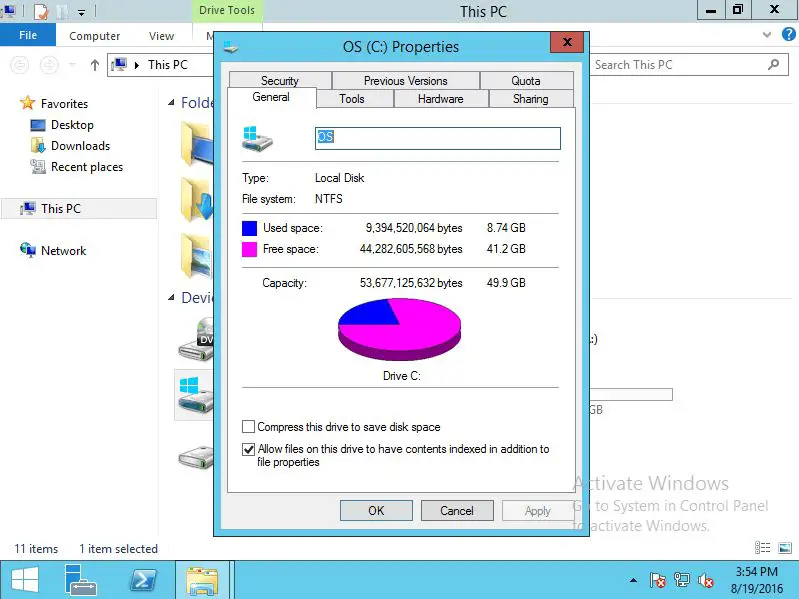
- Open File Explorer and right-click the drive you want to clean up.
- Select “Properties” then click the “Disk Cleanup” button on the General tab.
- Disk Cleanup will scan the drive and show you files that can be safely deleted.
- Check the file types you want to delete, then click “OK”.
- Disk Cleanup will securely erase all the specified files to free up space.
Some of the common file categories that Disk Cleanup finds are:
- Temporary internet files
- Recycle bin contents
- Windows error reports and logs
- Temporary installation files
- Thumbnails and icons caches
- Old Windows update files
Running this utility periodically is a quick way to clear out transient clutter.
Delete Unnecessary Files and Folders
Beyond the generic file types that Disk Cleanup targets, you may also have application folders, log files, user data and other miscellaneous content that is safe to remove. Sort through folders and be on the lookout for:
- Application installers and archived packages
- Old system restore points
- Application logs longer than 30 days old
- Database backups more than two weeks old
- Temporary user data from departed employees
Taking inventory of disk contents can help uncover other candidates to purge. You can always archive necessary data to tape or an offline disk if needed.
Uninstall Unused Features and Roles
In Server Manager, review installed roles and features and determine if any can be removed. This can clear out gigabytes of hidden and forgotten supporting packages. To uninstall roles and features:
- Open Server Manager and select “Manage” > “Remove Roles and Features”
- Select the server to manage features on
- Go through the list and check any features that can be removed
- Click “Remove” to uninstall the selected components
Examples of roles and features that may be safe to remove if not needed:
- Fax Server
- .NET Framework packages
- Multimedia packages
- Windows Defender
- Storage services
Move Data to Alternative Storage
If there are large application data stores, databases, media files or other swaths of data soaking up space, consider offloading them to separate storage if possible. This includes:
- Moving user home directories and profiles to NAS storage
- Redirecting log and cache folders to a secondary drive
- Allocating some databases or file shares to separate SANs or NAS
- Backing up aged application data to tape or cloud archives
This can quickly reclaim tens or hundreds of gigabytes on constrained volumes, especially for servers with large, more static shares of data.
Use Storage Spaces
The Storage Spaces feature in Windows Server allows combining multiple disks into pooled volumes. This provides more flexibility for moving data across physical drives. Strategies include:
- Set up tiered storage pools using SSDs for hot data and HDDs for colder archives.
- Move older shares into deep archival storage pools.
- Distribute data across disks for better resiliency.
This allows optimizing storage use case by case rather than drive by drive. Deduplication and compression can further help reduce storage demands.
Optimizing Disk Performance
Once unneeded disk space is cleared, optimizing performance is also important for Windows Server. Here are key methods to ensure fast and reliable storage:
Defragment Drives
As servers handle heavy loads, files and data can become fragmented across disks. Defragmenting consolidates dispersed data into contiguous blocks for smoother access. To defrag drives:
- Open the Optimize Drives utility
- Select the drives to defrag
- Click “Optimize” to start defragmentation
Schedule optimization to run automatically each week if possible. Defragging not only improves read/write speeds but also optimizes the free space for future use.
Check for Disk Errors
File corruption and physical disk errors can degrade performance. Check Disk scans drives and repairs various inconsistencies. To runCheck Disk:
- Open an elevated Command Prompt
- Type “chkdsk C: /f” replacing C: with problem drive letter
- Allow scan to run and repair any found errors
Schedule scans monthly or after any unexpected server crashes. This protects against creeping data corruption issues before they impact operations.
Upgrade Physical Drives
Older HDDs or small disks can bottleneck servers, especially with today’s faster processors and larger memory capacities. Consider upgrading to:
- Faster HDDs with 7200 or 10000+ RPM
- SSDs for massive IOPS improvements
- Larger capacity HDDs to support data growth
- Faster NAS/SAN shared storage if available
Even one newer, faster disk for the OS and core apps can help overcome sluggish hardware. Use Storage Spaces pooling to optimize tiered storage capabilities.
Tune Application File Handling
How servers and applications handle file operations also impacts disk performance. Recommendations include:
- Tune SQL Server for optimal use of memory, IOPS, caching
- Adjust PHP opcode caches and data object limits
- Use NTFS byte-range locking for web servers
- Limit aggressive file access by antivirus scanners
- Ensure RAID controllers have optimal caching policies
Balancing application loads, concurrency, and caching helps reduce underlying physical disk strain.
Automating Disk Maintenance
Manually cleaning and optimizing disks in Windows Server can quickly grow tedious. Fortunately, automation makes the process easier. Useful methods include:
Scheduled Tasks
Scheduled Tasks can be configured to automatically run clean up and optimization according to a set recurrence. Useful scheduled tasks may include:
- Weekly Disk Cleanup
- Monthly disk defragmentation
- Data archiving and backup jobs
- S.M.A.R.T. disk health checks
Adjust schedules as needed based on usage patterns and importance of tasks.
Group Policies
Group policy scripts can deploy disk maintenance settings across multiple servers. Helpful policies include:
- Configuring task schedules
- Setting disk space thresholds for alerts
- Enabling automatic defrag and storage optimization
- Restricting disk usage by users or applications
Group policies allow standardized administration without managing each server individually.
PowerShell Scripts
For advanced automation, PowerShell scripts can perform various storage maintenance tasks like:
- Identifying stale data to archive or delete
- Tracking disk usage trends
- Automating Storage Spaces or tiered storage moves
- Generating disk health reports
Scripted solutions are great for repeated tasks or complex procedures with logic built in.
Conclusion
Letting disk clutter and fragmentation accumulate can lead to stalled server performance and availability problems. With the built-in Windows Server tools and a proactive maintenance plan, administrators can stay ahead of disk issues before they impact operations. Automation through scheduled tasks, group policies and PowerShell provides added convenience for managing storage efficiently at scale.
Some key takeaways include:
- Use Disk Cleanup regularly to purge temporary files
- Delete unneeded data manually and move to alternative storage where possible
- Uninstall unused Server Roles and Features to free space
- Optimize performance with defragging, chkdsk, and hardware upgrades
- Automate tasks through Scheduled Tasks, Group Policy and PowerShell scripts
Proactively monitoring, tuning and maintaining server storage pays long-term dividends for admins. Keep your disks clean and lean for optimal Windows Server performance.
