Having enough free space on your solid state drive (SSD) is important to maintain fast performance. When an SSD gets full, it can slow down significantly as it struggles to find open blocks to write new data. Fortunately, Windows 10 includes several useful tools to help you clean up your SSD and regain free space.
Why is Free Space Important for SSDs?
SSDs work differently than traditional hard disk drives (HDDs). An HDD stores data on spinning magnetic platters, while an SSD stores data in flash memory chips. HDDs can simply overwrite existing data with new data. But SSDs must first erase old data blocks before writing new data.
This process is called garbage collection. The SSD’s controller chips erase unused blocks in the background while you use your computer. But if the SSD is close to full, there may not be enough free blocks for garbage collection to work efficiently. This can result in much slower write speeds and overall sluggish performance.
Ideally, you should keep at least 10-20% of your SSD’s total capacity free for the best performance. Having this extra free space gives garbage collection room to work and prevents write speeds from slowing down as the drive fills up.
Check Your SSD’s Free Space
The first step is to check how much free space you actually have on your SSD currently. Here’s how to see the free space on your C: drive (where Windows is usually installed):
- Open File Explorer (called Windows Explorer in older versions of Windows)
- Right-click on your C: drive and choose Properties
- Look at the pie chart under Capacity to see the free space
You can also see free space for each disk by going to This PC in File Explorer. The free space will be listed under each drive.
Clear Temporary Files
Temporary files take up space and are safe to delete. Windows stores temporary files in a few locations, the main ones being:
- C:\Windows\Temp
- C:\Users\
\AppData\Local\Temp
You can delete these temporary folders entirely, but an easier way is to use the Disk Cleanup utility built into Windows:
- Type “disk cleanup” into the Windows search bar and select the Disk Cleanup desktop app
- Select your C: drive and click OK
- Disk Cleanup will scan your drive and show you temporary files that can be deleted
- Check the boxes next to all items you want to delete and click OK
Disk Cleanup will safely delete all the temporary files, freeing up space. Just remember to let it finish completely before disconnecting an external drive.
Empty the Recycle Bin
When you delete files normally, they get sent to the Recycle Bin rather than being permanently erased. Your Recycle Bin may be consuming GBs of space with deleted files. To empty it:
- Open the Recycle Bin by double-clicking on it or through File Explorer
- Click Empty Recycle Bin at the top
- Click Yes on the confirmation prompt
All deleted files will be permanently removed, freeing up space for new data. Files remain in the Recycle Bin indefinitely until you empty it, so be sure to check it periodically.
Uninstall Unused Programs
Uninstalling programs you rarely or never use can recover substantial space. Here’s how to uninstall programs in Windows 10:
- Open Settings > Apps > Apps & features
- Browse the list and click on any program you want to uninstall
- Click Uninstall at the top and follow the on-screen prompts to remove the program
Some pre-loaded apps like Microsoft Edge can only be disabled using Powershell or other tricks. But most installed programs can be easily uninstalled through Settings. Remove games, tools, apps and software you no longer need.
Delete System Restore Points
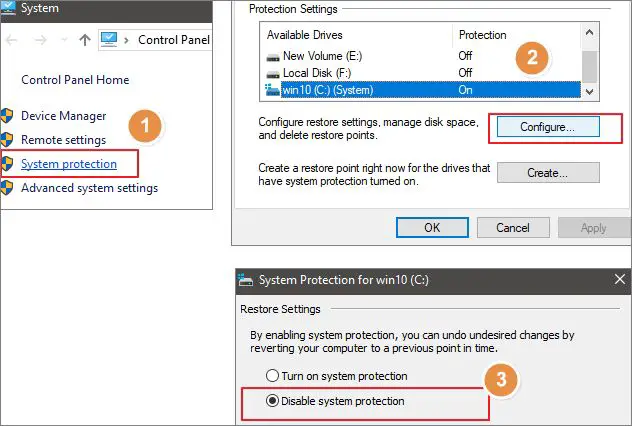
The System Restore feature in Windows periodically creates restore points – snapshots of your system that you can use to roll back system files and settings. But these restore points take up drive space. Old ones can be safely deleted to free up room. Here’s how to delete System Restore points in Windows 10:
- Right-click This PC and go to Properties > System protection
- Click Configure under Protection Settings
- Select Delete for any restore points you want to remove
- Click Apply and OK – Windows will permanently delete those restore points
Many people only need a few of the most recent restore points. You can safely remove older ones to regain GBs of space in some cases.
Change Restore Point Disk Space Usage
In addition to deleting old restore points, you can also change the maximum space allotted to System Restore in Windows 10:
- Right-click This PC and go to Properties > System protection
- Click Configure under Disk Space Usage
- Adjust the Max Usage slider to a lower value
- Click Apply and OK
This will limit the space System Restore can take up going forward. The default is often 50%, but 10-20% is usually sufficient for restore points while freeing up space.
Clear Windows Update Files
Windows Update downloads update files and stores them on your drive, taking up space. The Windows Update Cleanup utility can safely remove these files:
- Open Settings > System > Storage
- Click Cleanup under Free up space now
- Check the box for Windows Update Cleanup and click Remove Files
This will delete your Windows Update download cache, which can exceed 5+ GB for some users. Remember to let the cleanup finish completely before disconnecting external drives.
Remove Old Windows Builds
When Windows 10 installs a major update, your old Windows installation files are saved on your drive, just in case you want to roll back. But as you install more updates, these obsolete builds eat up space. To remove them:
- Open Settings > System > Storage
- Click Cleanup under Free up space now
- Check Previous Windows installation(s) and click Remove Files
This will safely delete all backup files from your previous Windows versions, potentially freeing up 10-20 GB or more.
Use Disk Cleanup to Remove Windows Update Files
The Disk Cleanup utility mentioned earlier can also clean up Windows Update files and old Windows versions. Use Disk Cleanup instead of the Settings utility if you want to delete these files alongside temporary files in one step.
Remove Recovery Partition
Some PCs come with a recovery partition, which contains files to reset your PC to factory settings. If you don’t need it, this partition can be safely removed by:
- Opening up Disk Management (right-click Start and select Disk Management)
- Right-clicking the recovery partition and choosing Delete Volume
- Clicking Yes on the prompt to delete it
Be absolutely certain you don’t need the recovery partition before deleting it. Afterwards, that space is freed up in your main C: drive partition.
Change Size of Reserved Storage
Windows reserves part of your SSD by default for critical OS files and updates. In 2004 and higher, it’s called reserved storage instead of system reserved on older versions. You can shrink reserved storage to free up space:
- Open Run by pressing Windows + R
- Type Regedit and press Enter to open Registry Editor
- Navigate to HKEY_LOCAL_MACHINE\SOFTWARE\Microsoft\Windows\CurrentVersion\ReserveManager
- Change ShippedWithReserves to 0 and click OK
- Restart your PC for change to take effect
This will shrink reserved storage from several GB to just a few hundred MB, freeing up valuable SSD space. Be very careful editing the registry.
Disable Hibernation
When you put your PC into hibernation, Windows saves the contents of your RAM to your C: drive. This hibernation file is as big as your total RAM, taking up precious SSD space. If you don’t use hibernation mode, disable it:
- Open Command Prompt as Administrator
- Run command: powercfg -h off
- Restart your PC for change to take effect
After disabling hibernation, your Windows hibernation file will be deleted, freeing up space equal to your RAM size (often at least 4-8GB).
Compress Old Files
Enabling compression in File Explorer allows you to compress files you aren’t using often, reducing their size. To turn on compression:
- Open File Explorer and click View > Options > Change folder and search options
- Click the View tab and check Compress contents to save disk space
- Click OK – Windows will compress files when they aren’t in use
Right-click old user folders like Documents or Downloads and choose Properties > Advanced to check their current compression status. Compressing large old files can significantly reduce their footprint.
Turn on Storage Sense
Storage Sense is a feature that will automatically clear out temporary files, Recycle Bin items, previous Windows versions and more based on your settings. To enable it:
- Open Settings > System > Storage
- Click Configure Storage Sense or run it now
- Choose how often you want Storage Sense to run
- Enable cleaning of Recycle Bin, temporary files, etc.
With Storage Sense activated, Windows will automatically clean up unneeded files every so often, keeping your drive tidy and freeing up space in the process.
Run Disk Cleanup as Administrator
For better results, run the Disk Cleanup utility as Administrator rather than a regular user. Here’s how:
- Search for Command Prompt, right-click it and Run as Administrator
- Type in: cleanmgr /sagerun:1
- Follow the Disk Cleanup prompts to delete files
Running Disk Cleanup as Admin may allow it to find more files to delete than when running as a standard user. Delete unnecessary system files to open up more free space.
Clear Microsoft Store Cache
The Microsoft Store cache can build up over time, taking up space unnecessarily. To clean it out:
- Open Windows Powershell as Administrator
- Run the command: Get-AppxPackage -AllUsers | Foreach {Add-AppxPackage -DisableDevelopmentMode -Register “$($_.InstallLocation)\AppXManifest.xml”}
- Restart your PC for changes to take effect
This clears out cached Microsoft Store update data, thumbnails, and other files, potentially freeing up 1GB or more.
Delete NVIDIA Driver Install Files
If you have an NVIDIA GPU, old driver installer files can accumulate and take up over 1 GB:
- Open File Explorer and go to C:\NVIDIA
- Delete any old .exe or .zip files related to old drivers
Check this folder periodically and delete any excessive installer files for previous graphics drivers, while keeping the current one.
Perform a Fresh Start
A Windows 10 Fresh Start completely resets Windows, removing all unnecessary files, settings, and programs that may be wasting space. To Fresh Start Windows 10:
- Open Settings > System > Recovery
- Under Reset this PC, click Get started
- Choose Keep my files to refresh Windows while keeping your personal files
This will reinstall Windows 10 while removing most pre-loaded apps, temporarily files and system files, giving you a clean slate. You can then only reinstall programs you actually need.
Run Disk Defragmenter
Disk Defragmenter rearranges fragmented files on your hard drive so they occupy contiguous blocks. This isn’t as vital for SSDs, but optimizing their file layout can still help.
- Open the Optimize Drives app
- Select your SSD drive and click Optimize
- Let defrag run until 100% complete
Repeat this every month or two to keep files properly consolidated, which allows your SSD to access and open them faster.
Upgrade to a Larger Drive
If your SSD is constantly full even after trying all these steps, it may be time to physically upgrade to a larger drive:
- Clone your old SSD to a new, larger one using cloning software
- Or, do a clean install of Windows 10 on a new SSD and transfer your files
- Finally, replace the old SSD with the new bigger one in your PC
Upgrading to a 500GB, 1TB or 2TB SSD provides long-term breathing room. Prices have come down steadily, making SSD upgrades very affordable now.
Conclusion
Running out of drive space can cripple your Windows 10 PC’s performance. Fortunately, there are many tactics you can use to open up gigs or terabytes of free capacity on your SSD. The steps mentioned in this article can help reclaim space from temporary files, unused apps, previous Windows versions and more.
Following these SSD cleanup tips consistently lets you maintain at least 10-20% free space for optimal performance. Pair these methods with upgrading to a bigger SSD as needed, and you’ll always have plenty of open capacity for Windows updates, new programs and daily work.