Cloning a Windows drive can be a great way to create an exact copy of your current Windows installation that you can use for backup, upgrading to a larger drive, or deploying multiple PCs with the same installed programs and settings. While commercial disk cloning software is available, there are also free options that work well for basic Windows drive cloning tasks.
What is Disk Cloning?
Disk cloning refers to creating an exact, sector-by-sector copy of a source hard drive and replicating it to another drive. This allows you to create an identical clone that can seamlessly replace the original drive or be used for other purposes like backup or upgrading.
Some key things to know about disk cloning:
- Creates an exact copy – The clone contains a bit-for-bit replica of the original drive, including the operating system, installed programs, settings, and files.
- Requires compatible drives – The destination drive must be the same size or larger than the source drive to hold the clone.
- Overwrites target drive – Any data on the destination drive will be erased during the cloning process.
- Handy for upgrades – Cloning lets you easily migrate your OS and files to a new, larger drive.
- Useful for backups – The clone provides a bootable backup of your system you can restore from in case of failure.
Why Would You Want to Clone a Drive?
Here are some of the most common reasons for cloning a Windows drive:
- Upgrade to a larger drive – Migrate your OS, programs, and files seamlessly to a larger capacity hard drive.
- Backup your system – Create a bootable clone as a backup you can restore from in case of system failure.
- Migrate to an SSD – Clone your drive to move your OS and files to a speedier solid-state drive.
- Duplicate environments – Replicate your configured Windows install across multiple PCs, such as for office workstations.
- Replace a failing drive – Quickly move your system to a new drive if the old one is failing or damaged.
Free Tools for Cloning Windows Drives
There are a few different free software options available for cloning Windows drives:
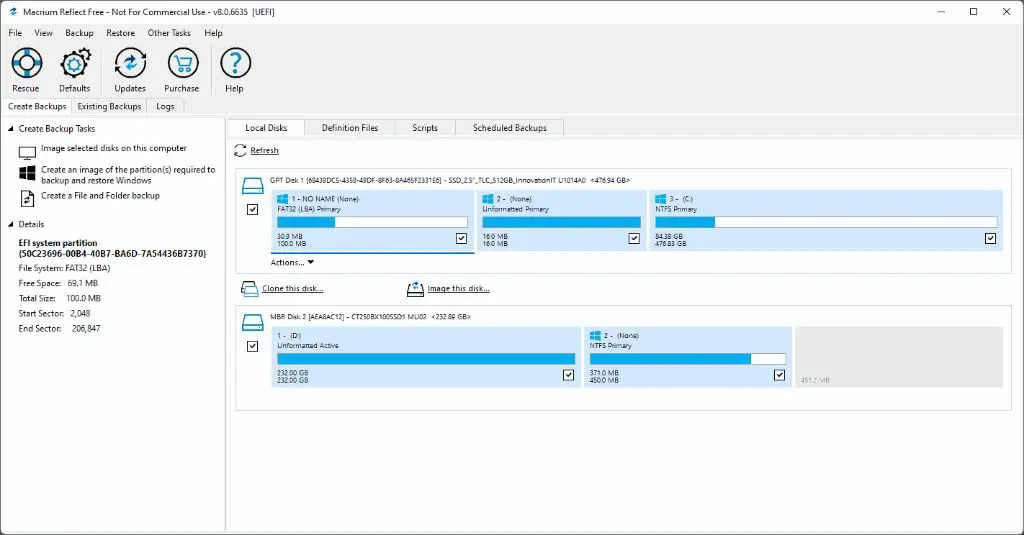
1. Macrium Reflect (Free Version)
Macrium Reflect is a popular, widely-used disk imaging and cloning utility for Windows. The free version provides everything you need for basic disk cloning tasks:
- Intuitive wizard-driven interface
- Clones partitions or entire drives
- Supports USB, SATA, and IDE drives
- Preserves file systems like FAT, NTFS, and Linux formats
- Can resize partitions when cloning to larger drives
- Scheduler for automatic, incremental backups
The free version has some limitations like only being able to take manual backups instead of continuous protection. But for one-off drive cloning it works very well and is easy to use.
2. Clonezilla
Clonezilla is an open source disk imaging and cloning tool that runs from a bootable CD or USB drive.
- Clones drives and partitions for any operating system
- Supports file systems like NTFS, FAT, ext3/ext4, and HFS+
- Backup to local drive, NAS, or cloud storage
- Encryption and compression options
- Can be used for deployment, recovery, and backup
- Command line interface requires some technical skill
As an open source tool, Clonezilla is completely free but lacks a graphical interface. It’s very flexible and powerful but requires some command line knowledge to use effectively.
3. Redo Backup & Recovery
Redo Backup & Recovery is a free, Linux-based backup and recovery program that can also be used for disk cloning:
- Boots from a CD or USB drive
- GUI for easy navigation and use
- Backup wizards walk you through the process
- Full and incremental backup capabilities
- Flexible recovery options
- Can backup to local drives, network shares, or NAS
Redo Backup has an intuitive interface that makes disk cloning fairly straightforward for Windows and Linux systems. However, it lacks some of the more advanced features found in paid programs.
How to Clone a Windows Drive
The basic process for cloning a drive is fairly similar regardless of which software you use:
- Prepare the destination drive – The destination drive must be the same size or larger than the source drive to hold the clone. Any data will be deleted.
- Boot from the cloning software – Either boot from a CD/DVD or USB flash drive into the cloning program interface.
- Select source drive – Choose the drive you want to clone from. This is most often your main Windows C: drive.
- Select destination drive – Choose the drive you want to clone to. This is the new drive.
- Create the clone – Follow the cloning wizard to create a sector-by-sector replica of source drive onto destination.
- Expand partitions (optional) – If cloning to a larger drive, expand partitions on the clone to fill the extra space.
- Swap drives – Once successfully cloned, power down, swap clone drive for original, then boot up.
We’ll now walk through the basic cloning process step-by-step using the free disk cloning software options mentioned above.
Cloning with Macrium Reflect
Macrium Reflect makes it easy to clone your Windows drive in just a few steps:
- Insert Macrium Reflect boot media – Burn the installer ISO to CD/DVD or create bootable USB drive.
- Boot from media – Configure PC boot order to boot from the media before hard drives.
- Select clone disk option – Choose the “Clone disk” option from the main menu.
- Pick source disk – Select the disk you want to clone, usually your Windows C: drive.
- Pick destination disk – Choose the destination drive for your clone.
- Run clone process – Click finish and Macrium will create an exact clone from source to destination.
- Expand partitions – Optionally expand partitions on clone to fill larger drives.
- Swap disks – Power down, replace source drive with clone, boot up.
Macrium makes it easy with its straightforward wizard-based interface. Just step through each screen, select your source and destination drives, then let the cloning process complete.
Cloning with Clonezilla
Clonezilla uses command line input for the disk cloning process:
- Create Clonezilla boot media – Download ISO and create CD/DVD or bootable USB drive.
- Boot into Clonezilla – Set computer to boot from media before hard drives.
- Choose device mode – At the prompt, select “device-device” for drive-to-drive clones.
- Select source disk – Choose the source drive you want to clone when prompted.
- Select destination disk – Pick the destination drive for the clone.
- Confirm clone details – Verify the source and target drives are correct.
- Create clone – Type “Y” to start the cloning process and wait for completion.
- Expand partitions – Use Clonezilla to resize partitions on the clone if needed.
- Swap disks – Power down, replace source drive, boot up from clone.
Clonezilla requires some command line skills but provides flexibility for advanced drive cloning operations.
Cloning with Redo Backup
Here is an overview of cloning a drive with Redo Backup:
- Create boot media – Download ISO and make bootable CD/DVD or USB drive.
- Boot from media – Access Redo Backup interface by booting from media.
- Start backup wizard – Choose “Backup” from the main menu to launch wizard.
- Select source – Pick the source drive to clone when prompted.
- Select destination – Choose the target drive for the clone.
- Run backup – Follow prompts to perform the drive-to-drive clone.
- Expand partitions – Use built-in tools to resize partitions as needed.
- Swap drives – Replace original with clone drive, boot up.
Redo Backup provides a user-friendly cloning experience through its graphical backup wizard. But lacks some advanced functionality compared to paid software.
Tips for Cloning Windows Drives
Keep these tips in mind to ensure your disk cloning goes smoothly:
- Backup first – Backup any personal data you want to preserve before erasing target drive.
- Check drive health – Use built-in disk utilities to verify source and destination drives are healthy.
- Disconnect other drives – Disconnect additional hard drives not being cloned to avoid accidents.
- Use same drive type – Clone to the same drive type (IDE, SATA, etc.) for compatibility.
- Manage space – Target drive should have equal or greater storage capacity than source.
- Expand partitions – If cloning to a larger drive, resize partitions afterwards to utilize extra space.
- Update drivers – Install latest storage drivers after cloning for best performance.
Following best practices like these will help ensure your cloning process finishes successfully.
Potential Cloning Issues
While the cloning process is usually straightforward, you may encounter a few possible issues:
Clone fails mid-process
If the cloning operation fails partway through, it could be caused by:
- Bad sectors on the source or target drive
- Insufficient space on target drive
- Hardware problems like faulty cables, controllers, etc.
- Unreliable networking if cloning over a network
Run disk scans, check drive health using S.M.A.R.T., and confirm hardware is functioning properly.
Clone drive not bootable
If your clone drive doesn’t boot properly, try:
- Checking BIOS boot order
- Disconnecting other non-essential drives
- Booting into safe mode
- Using appropriate storage drivers for your hardware
- Ensuring the master boot record (MBR) or GUID partition table (GPT) was copied correctly
Clone has corrupted or missing data
If some files are corrupted or missing on the clone, possible fixes include:
- Scanning drives for errors
- Cloning again from the source drive
- Restoring from a backup
- Deleting damaged partition and recopying it
Disk cloning should copy everything exactly byte-for-byte so data corruption issues are not common. Trying another clone or backup restore should resolve most problems.
Frequently Asked Questions
Is disk cloning safe for Windows drives?
Yes, disk cloning is generally safe for Windows drives. The cloning process simply creates an exact sector-by-sector copy of your data without modification. However, you should always backup important data beforehand in case of issues.
Can you clone to a smaller drive?
No, disk cloning requires that the destination drive is equal or larger in size than the source drive in order to hold the clone. However, you can try imaging software to compress and copy partitions selectively to a smaller target.
Is an SSD larger than my HDD ok for cloning?
Yes, it’s perfectly fine to clone your Windows HDD to a larger capacity SSD. The extra space on the SSD will be unallocated after cloning. You can then extend your partitions with disk management tools to use the full space.
Can I clone Windows to avoid reinstalling apps?
Absolutely. Cloning Windows to a new drive allows you to migrate your OS, programs, and files seamlessly to new hardware so you don’t have to reinstall and reconfigure everything.
Can you clone a running Windows drive?
Most cloning software requires you to run from bootable media so the source drive isn’t locked by the operating system. However, some paid tools do offer the ability to clone a live active Windows drive.
Conclusion
Disk cloning can be a handy tool for copying your entire Windows drive to backup, upgrade, or deploy new hardware. Free tools like Macrium Reflect, Clonezilla, and Redo Backup provide simple step-by-step workflows for drive cloning tasks. Just remember to backup important data, check drive health, and work carefully to avoid errors. With a few prudent precautions, cloning your Windows drive can be a quick, easy process using these free tools.
