Having a large Apple Music library can be great for accessing all of your favorite songs and albums whenever you want. However, over time your library may become cluttered with music you no longer listen to or want. When this happens, you may decide you want to delete your entire Apple Music library and start fresh.
Completely deleting your Apple Music library is a fairly straightforward process, but there are a few things you need to know first before wiping it out.
Can I delete my entire Apple Music library all at once?
Unfortunately there is no way to mass delete your entire Apple Music library in one step. The only way to completely erase it is to go through and individually delete songs, albums, and artists. This can be a tedious process if you have a large music collection, but it does allow you to selectively save anything you want to keep before removing the rest.
How can I quickly delete large portions of my Apple Music library?
While you do have to delete music individually, there are some tricks to speed up the process of mass deleting big chunks of your Apple Music collection:
- Use the Songs, Artists, or Albums views – Sorting by these categories makes it easy to quickly select and delete entire albums or an artist’s discography at once.
- Create a Smart Playlist – Make a smart playlist to temporarily group all the content you want removed, then delete the entire playlist.
- Use the Select All feature – In any list view you can tap Select > Select All to choose everything visible on the screen, then hit delete.
What music purchased from Apple will be deleted?
Deleting your Apple Music library will only remove songs and albums saved locally on your device that you added from the Apple Music catalog or imported from other sources. However, any music you purchased from the iTunes Store will not be erased. This includes:
- Individual song purchases
- Complete album purchases
- Digital booklets
- iTunes Match songs
These files are protected by your Apple ID account and cannot be permanently deleted unless you specifically go in and delete each purchased item manually.
Can I recover my Apple Music library if I change my mind?
Once you delete a song or album from your Apple Music collection, there is no built-in way to recover it. However, you have a few options if you change your mind after deleting your library:
- Recently deleted tracks will still appear in Recently Added. You may be able to restore them from there.
- You can attempt to re-add any purchased iTunes music that was downloaded previously.
- Check your Recently Deleted playlist for music removed in the last 30 days that may be recoverable.
- Your Apple Music preferences, playlists, and library organization will stay intact. Rebuilding your library over time can restore your setup.
Steps to delete your Apple Music library
Here is an outline of the steps involved in completely removing your entire Apple Music collection from a device:
- Back up your device – To be safe, do a full backup of your device in case you want to restore any deleted music later.
- Sign out of Apple Music – Sign out of the Music app and App Store under your Apple ID account temporarily.
- Delete downloaded music – Go through each listing and select music to delete from My Music and any playlists.
- Remove ineligible tracks – Certain tracks may be ineligible for deletion. You’ll need to hide these.
- Delete music files – Go into your device storage and delete any remaining music files stored locally.
- Sign back into Apple Music – Once your library is deleted, sign back into Apple Music to start fresh.
Step 1: Back up your device
No music will be deleted from your actual Apple ID account and playlists when erasing your on-device library. However, it’s still smart to do a fresh backup of your device before proceeding just in case you change your mind later. Backing up ensures you have the ability to restore any purchased music or playlists that get removed.
You can back up your device either using iCloud or by connecting to your computer and syncing with iTunes. To make sure you have a solid backup, it’s best to use both methods if possible.
Step 2: Sign out of Apple Music
Before deleting any content, first sign out of the Music app and App Store using your Apple ID account. Doing this ensures that any previously downloaded Apple Music tracks get deleted locally rather than simply being hidden until you sign back in.
To sign out, go to Settings > [your name] > Media & Purchases > Tap Sign Out. Enter your Apple ID password when prompted.
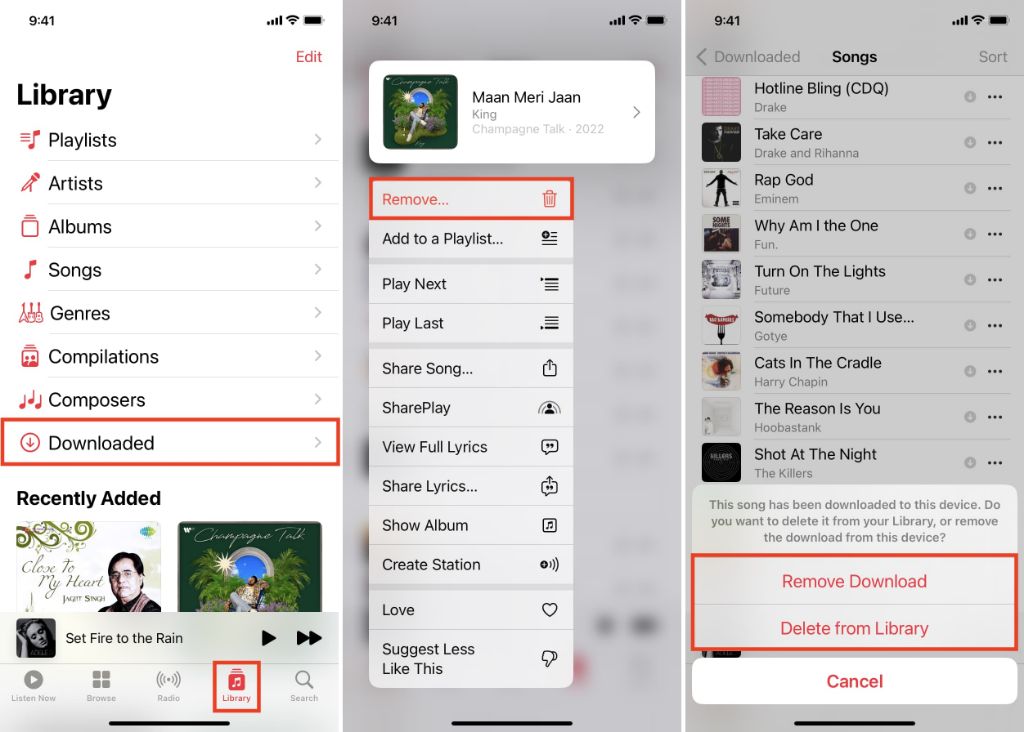
Step 3: Delete downloaded music
With your account signed out, you can now go through your library and delete music. Go to the Songs, Artists, Albums, and Playlists tabs and browse through to select music to erase.
Tap Select for any song, album or playlist you want to remove. Use Select All whenever possible to choose entire albums or playlists at once. After selecting content to delete, tap Delete.
Repeat this process until all downloaded Apple Music tracks have been selected and deleted. iCloud or iTunes purchased music will remain unless you manually delete each item.
Step 4: Remove ineligible tracks
There may be some tracks that are ineligible for deletion from your library due to licensing restrictions. These will be skipped when selecting content to delete.
To remove these tracks, tap on the song and select Hide from the menu. Repeat for any other ineligible tracks. This will hide them from view so your library appears empty.
Step 5: Delete music files
After removing all visible music from the app, your library may still contain locally stored music files. To fully erase everything, you’ll need to delete these files manually.
Go to Settings > General > iPhone/iPad Storage. Under Music, tap on the number of songs listed. On the next screen press Edit, select all tracks, and choose Delete.
You can also connect your device to a computer and delete any song files remaining in the Music folder there.
Step 6: Sign back into Apple Music
Once all music has been deleted, the last step is to sign back into Apple Music with your Apple ID. This will reenable the ability to download songs and rebuild your personal library from scratch.
Go back to Settings > [your name] > Media & Purchases and enter your Apple ID password to sign in again.
Rebuilding your Apple Music library
Now that you’ve completely wiped your Apple Music collection, you can start fresh by saving music you actually want to listen to moving forward. Keep in mind these tips as you selectively build up your new library:
- Search and add individual albums and playlists that fit your current tastes.
- Take advantage of Apple Music recommendations personalized for you.
- Follow artists you enjoy so you don’t miss any of their new releases.
- Build playlists around activities, moods, genres or decades.
- Download music for offline listening before trips or when you have limited data.
- Use Up Next to customize dynamic queues tuned to your preferences.
The key is being selective this time around. Really consider if each album is one you’ll replay again and again. Your new streamlined Apple Music library will give you all of your favorite music in one neat, manageable package.
Conclusion
Deleting your entire Apple Music library may seem like a drastic move, but it can be just the fresh start you need to break free from a bloated, outdated music collection. With some strategic deletions and patience to rebuild over time, you can create the perfect Apple Music library containing only music you truly want to hear when you open the app.
