Formatting a hard drive on a Mac allows you to erase all of the data on the drive and set it up for use again from scratch. This can be useful if you want to wipe a drive before selling or giving away your Mac, if you need to troubleshoot drive issues, or if you want to partition or change the file system on the drive.
Quick Answers
– Use Disk Utility to format the hard drive. This is built into macOS.
– Formatting completely erases all data on the drive. Backup first if needed.
– You can format to APFS or Mac OS Extended (Journaled). APFS is newer.
– Formatting creates one empty volume, ready for use. You can partition later.
When to Format a Hard Drive
There are a few common scenarios in which completely formatting a hard drive may be necessary on a Mac:
Before Selling or Giving Away a Mac
When selling or gifting your Mac to someone else, you’ll want to fully erase and format the hard drive first. This wipes all of your personal data, accounts, settings, apps, files and more from the Mac and restores it to a factory fresh state. This is important to protect your privacy and security.
Troubleshooting Hard Drive Issues
If you’re having problems with your Mac or hard drive like crashes, slow performance, strange errors or corrupted data, formatting everything can help identify if the issues stem from drive problems. Formatting scrubs the drive clean, letting you reinstall macOS and test if issues persist.
Changing File System from HFS+ to APFS
Older Macs used the HFS+ file system, while newer ones default to the modern APFS (Apple File System). Converting a drive from HFS+ to APFS requires completely formatting it first.
Partitioning or Restructuring a Hard Drive
If you want to partition your drive to have separate volumes for different uses, or change the drive partitions in any way, this requires a complete format to restructure the drive first.
Back Up Important Data First
Formatting a drive erases all of its contents permanently. So before formatting, be sure to back up any important files and data you want to keep. Here are some backup options:
– Copy files to an external hard drive or USB flash drive
– Use cloud storage services like iCloud or Dropbox
– Use Time Machine to back up the entire Mac
After backing up, verify the backup finished properly before formatting the drive.
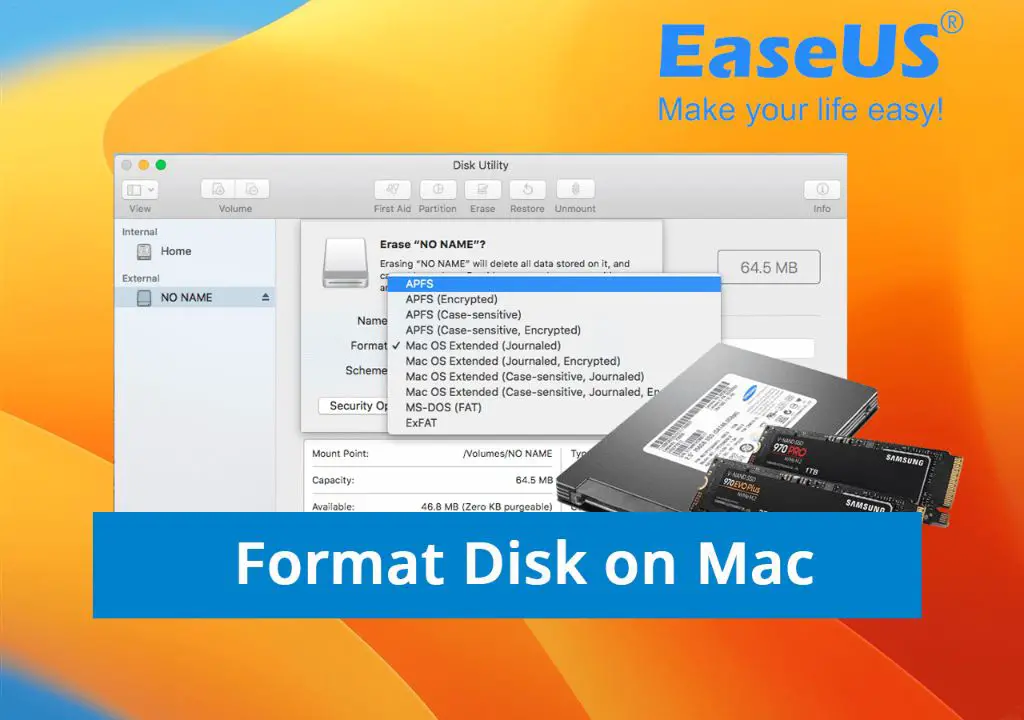
Use Disk Utility to Format on Mac
The easiest way to format a hard drive on Mac is with the built-in Disk Utility app. Here’s how to use it:
1. Close all open apps and documents first for safety.
2. Press Command+Space to open Spotlight search. Type in “Disk Utility” and press Return to launch the app.
3. Select the hard drive volume you want to format in the sidebar. Often named “Macintosh HD” by default.
4. Click the “Erase” button in the toolbar.
5. In the confirmation dialog, set the format to APFS or Mac OS Extended (Journaled). Use the Scheme drop-down to pick.
6. Type a name for the drive like “Macintosh HD”
7. Click Erase. This immediately starts formatting the full drive.
Encryption Options
When erasing in Disk Utility, you can choose to add encryption by selecting Options. This will securely wipe the drive and encrypt the new volume.
Completely Format the Drive
Formatting the drive with Disk Utility performs a complete format, wiping all drive contents fully. Here are some key points about complete drive formats:
– It rewrites every sector on the drive, not just deleting file indexes or partitions.
– No data or files can be recovered after a full format. It’s completely erased.
– The format erases all volumes on the drive. The whole disk surface is wiped.
– Only one empty volume is created, ready to use when done.
– You can partition the empty drive after formatting if needed.
In summary, Disk Utility’s standard Erase process does a full, complete reformat of the selected drive, for maximum privacy and cleaning.
Format Selections
When erasing a drive in Disk Utility on a modern Mac, you’ll be presented with two main format options:
APFS (Apple File System)
APFS is the newer Apple format optimized for solid state drives (SSDs) and flash storage. Key features:
– Optimized for high performance on SSDs/flash.
– Supports encryption and partitioning flexibility.
– Shared storage pools of free space.
– Space-efficient cloning and snapshots.
– Used by default on modern Macs with SSDs.
Unless you need backwards compatibility, APFS is generally the best choice for most Mac users today.
Mac OS Extended (Journaled)
Mac OS Extended format (also known as HFS+) is the older Mac file system designed for mechanical hard drives. Key features:
– Optimized for rotating hard disk drives.
– Case-sensitive option for flexibility.
– Classic Mac format, compatible with older systems.
– Lacks newer APFS features like snapshots.
– Still used on some older Macs or external HDDs.
Mac OS Extended is best for compatibility or machines with traditional hard drives. It lacks APFS benefits like fast snapshots.
The Formatting Process
The steps to actually format a drive are straightforward using Disk Utility:
1. Select drive in sidebar and click Erase.
2. Set format (usually APFS).
3. Set name if desired (like “Macintosh HD”).
4. Click Erase button.
5. Enter password if prompted to unlock drive.
6. Formatting begins immediately, progress bar displays status.
7. Formatting usually takes several minutes to over an hour for large drives. Be patient and don’t interrupt it.
8. When finished, volume shows as a single empty drive, ready for use.
With the drive fully wiped and formatted, you can then reinstall macOS clean, migrate data, partition, or use the disk as desired.
Partitioning After Formatting
The Erase process creates a single empty volume on the drive. You can optionally partition this into multiple volumes after formatting:
1. Select the formatted volume in Disk Utility sidebar.
2. Click the Partition button.
3. Use the + button to add partitions. Set sizes, names and formats.
4. Click Apply when configured to create the partitions.
This will divide up the drive without having to reformat it again. You can make as many partitions as needed.
Bonuses and Tips
Here are some additional notes for extra options and tips when formatting a drive on Mac:
Secure Erase For Deleted File Privacy
If you want to erase a drive quickly but still fully wipe deleted files beyond recovery, use the Secure Erase option instead of Fast Erase. It overwrites data several times.
Partition First If Retaining Some Data
If you only want to erase and format part of a drive, partition it first, then erase just the partitions you want. This lets you keep data on part of the drive intact.
Custom Volume Formats
Disk Utility also supports formatting drives with custom volume formats like FAT32 or ExFAT for cross-platform compatibility. Useful for external removable drives.
Use Finder Menu For External Drives
You can also quickly format many external drives by right-clicking on them in the Finder sidebar and selecting Erase from the menu. This uses Disk Utility.
Conclusion
In summary, completely formatting a hard drive on a Mac is a straightforward process using Disk Utility. Just be sure to back up any important data first, select the drive, click Erase, set the format (usually APFS), optionally rename it, then click Erase again to confirm. Let the reformatting run to completion and you’ll have a fresh, blank drive ready to use!