Overview of QNAP NAS Devices
A QNAP NAS, or Network Attached Storage device, is a centralized file storage and sharing solution designed to connect to your local area network (LAN) (1). QNAP NAS devices provide secure and scalable storage for files, backups, videos, photos and more with the benefits of easy accessibility from anywhere on the network and advanced features like snapshots, cloning and cloud integration.
Some of the main benefits of using a QNAP NAS include (2):
- Centralized storage and backup for all devices on the network
- Shared folders and access controls for collaboration
- Media streaming, surveillance and other applications via add-on apps
- RAID configurations for storage redundancy
- Remote access when away from home
The main components of a QNAP NAS device are the hard drive bays, CPU, RAM memory, and network ports. Most QNAP NAS systems run the proprietary QTS operating system and can be accessed through a web browser for setup, management and access to files. Models vary from simple 2-bay devices up to enterprise-class devices with 12+ bays and redundancy features.
With their excellent balance of affordability, features and flexibility, QNAP NAS devices are a popular choice for personal media storage, backups, surveillance systems, and small business file servers (3).
(1) https://www.qnap.com/solution/what-is-nas/en-us/
(2) https://blog.qnap.com/why-qnap-nas-en/
(3) https://www.qnap.com/solution/7-reasons-why-nas/en-us/
Preparing the Hardware
Before connecting your QNAP NAS to the network, you’ll first need to unpack it and get the physical hardware setup. Here are the steps for preparing the NAS hardware:
Unpack the NAS from the box and remove any protective materials. Lay out the NAS unit, power cable, network cables, and any hard drives or SSDs. Some QNAP models allow installing drives without any tools, while others require a Phillips screwdriver for removing drive bay covers.
Install any drives into empty drive bays, following the instructions in your NAS manual. Push the drives firmly into place and secure them if needed. Most QNAP NAS models support hot-swapping drives later on.
Connect the power cable to the back of the NAS and plug it into a power outlet. Do not power on the NAS yet.
Use an Ethernet cable to connect the NAS to your router or network switch. This will allow the NAS to access the local network and internet.
Once all connections are made securely, press the power button on the front or back of the NAS to turn it on for the first time. The NAS will boot up and you should see indicator lights for drive activity.
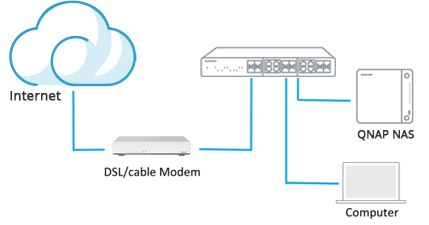
Connecting to the Network
The QNAP NAS device can be connected to the network using either a wired or wireless connection.
For a wired connection, use an Ethernet cable to connect the NAS to your router or switch. Most QNAP NAS devices have multiple Ethernet ports, including a dedicated management port. Connect any of the main Ethernet ports to your network.
For IP assignment on a wired network, the NAS can obtain an IP address automatically via DHCP, or you can assign it a static IP address. To check or change the IP address, log into the QTS web interface and go to Network & Virtual Switch > Network Interface.
For a wireless connection, you will need a compatible USB WiFi adapter. Many QNAP NAS devices have a built-in wireless chipset, while on others you may need to add a wireless dongle. Connect the adapter to the NAS, then log into the QTS web interface and go to Network > Interfaces. Click the Wi-Fi tab, scan for available networks, select your wireless network, and connect.
The process for changing the wireless IP address is the same as on a wired connection. Keep in mind that transfer speeds may be slower over WiFi versus a gigabit wired connection.
Installing QTS Operating System
QTS (QNAP NAS Operating System) is the proprietary operating system that runs on QNAP NAS devices. Before you can use the full functionality of your QNAP NAS, you’ll need to install the latest version of QTS.
To get started, first download the latest QTS software from the QNAP download center. Make sure to select the correct version for your NAS model.
Once downloaded, install QTS using one of the following methods:
- If your NAS supports cloud installation, connect your NAS to the internet and power it on. The NAS will automatically download and install the latest QTS version from the internet without needing a PC.
- Use the Qfinder Pro utility, available for Windows, Mac, and Linux. Connect your NAS to your network and run Qfinder Pro to locate it. You can then use Qfinder Pro to install QTS remotely.
- Manually install QTS using a connected monitor. Connect a monitor directly to your NAS using HDMI or VGA. Power on the NAS, insert the installation CD if needed, and follow the on-screen prompts to install QTS.
The installation process typically only takes a few minutes. After installing QTS, your NAS will reboot into the operating system.
You can now proceed to the initial setup options in QTS, like creating admin credentials and storage pools. With QTS installed, your QNAP NAS is ready for action.
NAS Web Access
Once the QNAP NAS is connected to your local network, you can access the web interface by opening a web browser on a computer on the same network and entering the NAS IP address in the address bar (https://docs.qnap.com/operating-system/qes/2.2.x/en-us/GUID-0E7F2DFB-4F1A-4BF8-8FBE-7FA171239AF6.html). This will bring you to the login screen where you can enter your administrator credentials.
The web interface provides access to all the NAS features and settings. The main menu down the left side includes System Settings, Storage & Snapshots, Applications, Security, Backup & Replication, Network & Virtual Switch, and more. From here you can configure users, shared folders, apps and services, system settings, and monitoring.
Key options under System Settings include general settings, hardware information, notification settings, firmware update, reset options, and more. The Control Panel provides quick access to common options like shared folders, users, apps, backup jobs, system monitors, and logs.
Overall, the web interface allows full configuration and management of the QNAP NAS from any web browser. After logging in with administrator credentials, users have access to all menus, settings, apps, storage and more.
Shares and Storage Pools
Once your QNAP NAS is connected to the network, you’ll want to create storage pools and shares to start managing your storage. Storage pools combine physical disks into one large pool of storage space using RAID technology for redundancy and performance. Some benefits of storage pools include:
- Combining disks into larger storage volumes
- Applying RAID protection for redundancy
- Dynamic expansion by adding disks
- Flexible configuration options
QNAP offers several RAID types like RAID 0, 1, 5, 6, 10 for the right balance of performance and protection for your needs. There is also a dedicated system pool that stores OS data separately from user storage pools.
After creating storage pools, you can then create shares for access from the network. Shares act as network folders that end users can connect to for storage access and file transfers. Permissions and access controls can be applied to manage user access. QNAP offers different types of shares like standard CIFS/SMB shares for Windows clients or NFS shares for Linux.
Overall, proper storage pool and share configuration allows you to consolidate storage into a centralized location while protecting data and managing user access. Consult the QNAP documentation for your specific NAS model’s storage and RAID capabilities.
Users and Permissions
Once your NAS is connected to the network, you will want to create user accounts and set up permissions for access to shared folders. QNAP has built-in user management that allows you to create users and groups. Users can be added individually or imported in bulk via CSV file.
To add a new user, go to Control Panel > User > User and select Create > User. Enter the username, password, and optional details like description and quota limits. You can also choose to send an email notification to new users. Each user can be assigned to one or more user groups.
Permissions are managed at the folder level by navigating to Control Panel > Privilege > Shared Folders. Click on a folder name and select “Folder Permissions” to customize read/write access. Specific users and groups can be granted access. There are also options for recursive propagation to sub-folders.
For more advanced permission configurations, QNAP offers Access Right Management. This allows you to set default permissions, hide shared folders, and enable advanced features like Windows ACL. Refer to the QNAP knowledge base for details on configuring advanced permissions.
Apps and Services
One of the most powerful features of QNAP NAS devices is the ability to install apps and services to expand functionality and features. The QNAP App Center provides access to hundreds of apps that can be installed with just a few clicks. Here are some of the most popular apps for QNAP NAS devices:
Plex Media Server – Allows you to store your media library on the NAS and stream it to devices like smart TVs, streaming boxes, smartphones, and more. Plex organizes your videos, music, and photos into a slick interface.
Download Station – Enables managing and downloading torrents directly on the NAS without needing a computer.
CloudLink – Provides access to files stored on the NAS from anywhere by creating a secure cloud portal.
Notes Station – Allows creating rich text notes, checklists, and to-do lists on the NAS for personal and team productivity.
Qsync – Syncs files between the NAS, computers, and mobile devices so everything is up to date.
There are also many server applications available like Web Server, MySQL Server, VPN Server, etc. that allow hosting web apps, databases, VPN access, and more directly on the NAS.
The QNAP mobile apps extend NAS functionality to Android and iOS devices for convenient remote access and management.
Backups
One of the key features of a QNAP NAS is the ability to configure automated backups to protect your important data. QNAP provides several backup options:
QNAP’s Hybrid Backup Sync allows you to schedule backups from your NAS to an external drive, remote NAS, or cloud storage like Google Drive or Dropbox. It supports versioning, encryption, compression, and deduplication to optimize backup storage and security.
For Mac users, QNAP NAS supports Time Machine for continuous backup over the network. Just enable the Time Machine service on your QNAP NAS and select it as the backup disk on your Mac.
QNAP also offers a Cloud Backup Sync service to securely backup NAS data to QNAP’s cloud for offsite protection. It provides up to 30 backup versions and supports scheduling automatic backups.
With Hybrid Backup Sync, Time Machine support, and Cloud Backup Sync, QNAP NAS provides comprehensive data protection for your important files.
Performance and Monitoring
Monitoring system health and optimizing performance are critical to getting the most out of your QNAP NAS. The QTS operating system provides several tools to keep track of performance and troubleshoot issues.
The Resource Monitor (Control Panel > System > Resource Monitor) allows you to view utilization statistics for CPU, memory, storage, and network. You can identify performance bottlenecks and see which apps or processes are using the most resources. The Performance Test tool can simulate workloads to benchmark the NAS.
The Storage Manager includes volume utilization analytics and I/O throughput statistics. Enabling SSD caching and configuring storage pools properly are key optimization steps covered in the QNAP best practices guide (https://www.qnap.com/en/how-to/tutorial/article/qnap-storage-performance-best-practice). The RAID Calculator helps determine ideal RAID levels.
The Network & Virtual Switch app provides monitoring, traffic analysis, and troubleshooting tools for networks. You can check for issues like packet loss, latency, and poor link quality. The Log Center collects detailed system logs for diagnosing problems.
Settings like storage encryption, compression, and number of snapshots can impact performance as well (https://www.qnap.com/en/how-to/faq/article/settings-that-may-impact-the-performance-of-the-nas). Tuning these options combined with monitoring helps maintain optimal speed.