When it’s time to sell or recycle a device running Windows 11, it’s essential to completely erase all personal data from the internal SSD (solid-state drive). Unlike traditional hard disk drives, simply deleting files or reformatting an SSD is not enough to prevent recovery of sensitive information. This is because SSDs handle data differently at the hardware level. Fortunately, there are a few options for securely wiping an SSD on Windows 11, ensuring no personal data can ever be recovered.
Back Up Personal Data
Before deleting all data from your SSD, it is highly recommended to back up any personal files and data you want to keep. This includes documents, photos, music, videos, browser bookmarks, and any other important data.
To create a full system image backup in Windows 11, follow these steps:
- Open Settings and go to System > Backup.
- Under Backup Using File History, click on “Add a drive” and select an external drive to save your backup to. [1]
- Under More options, click on “Back up now” to start the backup process.
- Windows will create a system image containing a snapshot of your OS, settings, apps and files.
- Store the external drive containing the backup in a safe place.
This system image can be used to restore your system after deleting the data from the SSD. Be sure to verify the backup was created properly before erasing the drive.
Reset Windows 11
The Reset function in Windows 11 will reinstall a fresh copy of the Windows operating system, while giving you the option to keep or remove your personal files. This essentially resets your PC back to its out-of-the-box state. According to Microsoft support, the Windows 11 Reset feature can help you “fix problems that might prevent Windows from working properly,” including issues caused by recently installed apps or drivers [1].
To perform a Reset, follow these steps:
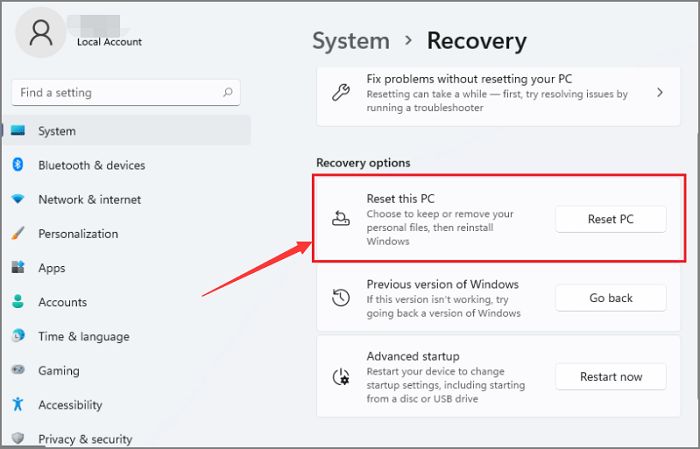
- Open Settings and go to System > Recovery.
- Under “Reset this PC,” click Get started.
- Choose to Keep my files or Remove everything. Keep my files will retain your personal files, while Remove everything deletes everything.
- Select Local reinstall or Cloud download. Local reinstall is quicker but requires at least 6GB of disk space. Cloud download lets you install the latest OS version but takes more time.
- Click Reset to begin. The process will take a while to complete.
Resetting Windows 11 provides a clean install without needing installation media. It eliminates software issues while optionally keeping your files intact. Just be sure to fully back up your data before proceeding.
Use Diskpart Clean Command
The diskpart clean command is a built-in Windows utility that can completely erase an SSD drive. The clean command removes all partition information, data, and formatting from the drive, leaving it in a raw state.
According to Microsoft’s documentation, using the clean command is “the best way to ensure that data is completely removed from a disk before the disk is reused or discarded” (source).
To use the diskpart clean command on an SSD in Windows 11:
- Open the Command Prompt as Administrator.
- Type
diskpartand press Enter. - Type
list diskto view available disks. - Select the SSD drive by typing
select disk X(replace X with the disk number). - Type
cleanand press Enter to start the cleaning process.
The clean process can take a while depending on the size of the SSD. Once it finishes, the diskpart utility will confirm that the clean operation is complete and the disk is now clean.
At this point, the SSD will be completely erased and ready to be reused or reformatted. No data or traces of previous partitions will remain on the drive after using the diskpart clean command (source).
Use Third-Party Erase Tools
One good option for securely erasing an SSD on Windows 11 is to use a third-party erase utility. These tools are designed specifically for securely wiping drives and offer some advantages over the built-in Windows options:
- They erase the entire drive surface, including sectors that may be inaccessible to standard delete commands.
- Many support advanced erase methods like DoD 5220.22-M for securely wiping data.
- Top utilities are well-tested and optimized for quickly and securely erasing SSDs.
Some highly rated SSD erasing utilities include:
Darik’s Boot and Nuke – An open source, free data destruction tool that can erase the contents of any hard drive, including SSDs. It supports a variety of advanced erase methods.
Parted Magic – Provides a Linux-based environment for securely erasing SSDs. Includes tools like SSD Secure Erase for built-in SSD wiping.
Secure Eraser – A freeware eraser that supports many advanced wipe algorithms and standards for erasing SSDs.
To use these tools, you’ll need to create bootable media and then boot from the media to access the erasing utilities outside of Windows. This allows the tools to get low-level access to fully erase the SSD. Specific steps vary by program, so consult documentation before proceeding.
Remove the SSD
Physically removing the SSD from the computer is another option for erasing data. Once removed, there is no operating system access to read the data on the SSD. However, with the right tools, data could still potentially be retrieved from the NAND flash memory chips on the SSD circuit board [1]. Even though the SSD is disconnected, its flash memory retains data until it is overwritten by new data. So removing the SSD does not securely erase the data, it only blocks software access.
To fully erase an SSD that has been removed, the flash memory chips need to be destroyed, which brings us to the next method.
Destroy the SSD
Physically destroying the SSD is the most secure method to permanently erase all data. Once an SSD has been physically destroyed, there is no way for the data to be recovered.
Some methods for physically destroying an SSD include:
- Using a hammer or mallet to smash the SSD circuit board and NAND flash chips. Wear safety glasses during this process.
- Drilling holes through the SSD circuit board and flash chips will damage beyond repair. Use a standard power drill with a small bit.
- Microwaving an SSD for 10-30 seconds will melt internal components and connections. This renders data unrecoverable.
- Immersing the SSD overnight in acid will corrode and dissolve the chips and circuitry. Caustic acids like hydrochloric, sulfuric, or nitric acid work best.
- Incineration of the SSD in a very hot fire, furnace, or thermite reaction will burn and melt it completely.
It’s important to destroy the SSD thoroughly and ensure all components are fully damaged. Partial destruction may still allow data recovery. Once physical destruction is complete, all data is permanently and irrecoverably erased.
Sources:
https://security.stackexchange.com/questions/225451/how-to-physically-destroy-an-ssd-at-home
Final Verification
After erasing your SSD, it’s important to verify that all data has been completely wiped. There are a few methods you can use to confirm a successful erase:
Use disk utility software like HDDErase or HDDscan to scan the drive and ensure every sector reads as empty/wiped and not holding data. These tools can help identify any remnants of files or partitions still on the disk. Run a full scan of the SSD and confirm no personal data remains (source).
Search the raw disk image for any recognizable text or file patterns that could suggest left over data. Use a hex editor to view raw data and inspect for any remaining fragments (source).
Reboot into the SSD and check the file system to see if any previous partitions, files, or folders still show up. The disk should appear empty and like a brand new drive.
Using the SSD manufacturer’s erase utility is the most thorough way to wipe the drive. Their tools can access all areas of the SSD and provide verification when completed (source).
With multiple confirmation methods, you can feel confident that an SSD has been securely erased with no recoverable user data remaining.
Reuse or Recycle SSD
After securely wiping your SSD, you may want to reuse or recycle it responsibly. Here are some guidelines:
If the SSD is still in good working condition, consider reusing it for other purposes like external storage or in another computer. Reusing electronics prevents e-waste.
Otherwise, recycle the SSD properly to prevent sensitive data from falling into the wrong hands. Many electronics retailers like Best Buy offer free SSD recycling programs. You can also use mail-in recycling services like Big Data Supply which securely wipe and recycle old SSDs.
Avoid throwing SSDs in the trash or selling them online where they could end up anywhere. Only use reputable SSD recycling companies that will completely destroy the drive and handle materials responsibly under
e-Stewards certification.
With responsible SSD recycling and reuse, you can ensure your data stays private while minimizing e-waste.
Conclusions
In this guide, we covered the key steps for securely erasing all data off an SSD running Windows 11 before disposing of it or passing it on to someone else. This is an important process for maintaining privacy and security.
We discussed options like resetting Windows 11 to factory settings, using the Diskpart clean command, and utilizing third-party erase tools. Physically removing or destroying the SSD are other guaranteed options. The goal is to overwrite all sensitive files to make sure they can’t be recovered later.
Following these best practices helps prevent your personal data from falling into the wrong hands. Before getting rid of an old SSD, take the time to give it a proper wipe. This protects your privacy and gives you peace of mind knowing your information is secure.